4 more things to know as a SharePoint News reader

After the recent updates for publishing SharePoint News and creating a Digest, I also wanted to create an update for readers. This post follows on my post “10 things to know as a SharePoint News reader“. We keep on learning!

1. There are various places where you can find your saved-for-later posts.

When you do not have the time to read a news post right now, or when you want to keep it for later, you can save it for later. Click the icon. But where to find those saved items, when you are finally in bus or train or on your sofa? There are at least 5 places where you can find it:

Click the “tab” icon to save a news post for later
  • Microsoft365 Homepage
  • SharePoint Homepage
  • SharePoint mobile app
  • and more!

You can read all about it in this post: Where do you find news posts saved for later?

2. You can filter for News posts in the Search results

Type in a search word in the box on top (make sure you are in the correct “scope”: all M365, this site, this hub, this library).

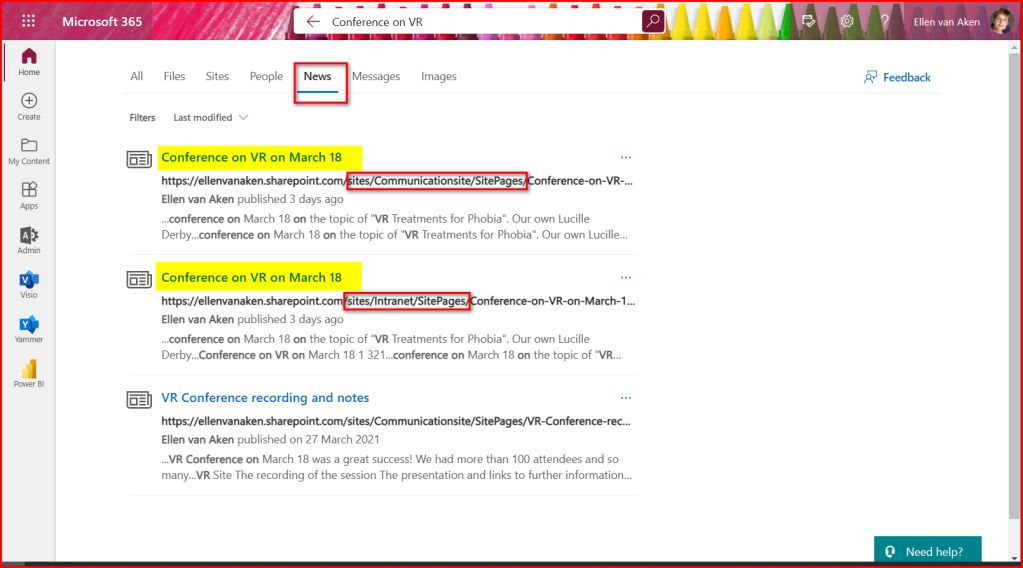
On the results page you will see a number of “verticals”, or content types, such as Files, Sites and News. You will easily recognize the News posts in the overview by their icon: a folded newspaper, but you can also click on the News tab and see only News.

Clicking on the News “vertical” will show you just the News posts from the search results

3. Please warn the author when you see a post with a greyish thumbnail and no header image

It will probably look like this:

If a News item looks like this, there’s something wrong.

The header image may be deleted, moved or you do not have access to it.
This can also be a Linked Post that has been deleted. The image will disappear after a few days. This will be the case when, after clicking on the post, you get a message “Hmmm…can’t reach this page”. See my post “SharePoint Holmes and the Missing Message“.
You may want to warn the author that there is no thumbnail visible and ask them to check.

A grey image is always an error. If they have deliberately not used an image, the post will look different on the News page:

If a News post looks like this, the publisher has chosen to use the Plain template (without image)

4. You can unsubscribe from News you may have missed

“News you may have missed” is an email that shows you News that may be interesting for you, based on the Microsoft Graph, but that you have not read yet. This is a controversial functionality and I wrote about it earlier. This is an organizational setting that we could not turn off fast enough in my last role 😁, but in case you do not like it and your Microsoft365 administrator has not disabled it, you can do so yourself.

Go to the SharePoint landing page, click the gear wheel top right and select “Email notification settings”. On the next page, uncheck the button at the bottom of the list. It should look like the screenshot below. You setting will be saved automatically.

Turn this button off if you do not want to receive the “News you may have missed” emails

Please let me know if you know more “gotcha’s” for SharePoint News readers!

SharePoint Holmes and the Missing Message

SharePoint News is easy to create and manage, but that does not mean things can not “go wrong”. This is often due to unexpected or unknown behaviour. So, you can imagine that our hero SharePoint Holmes likes the functionality! 😁

The situation

I received an issue in our support system from a News reader who saw an interesting News post on a SharePoint site. However, when he clicked on it, he got an error message. He had refreshed the page, closed SharePoint and reopened, and even logged out and back in, but he could not open it.  
(What a model employee, by the way, doing the most obvious troubleshooting actions before logging an issue. I have seen many people get into a complete panic when they get an error message, while a simple “did you turn it off and on again” could have solved the problem)

But how could that be? He saw the item, it had recently been posted in the site! 

An obvious case for SharePoint Holmes. I grabbed my problem-solving cap and set to work.

The investigation

I logged in as admin into the site and checked his permissions. This was a site accessible for all employees. Good.

Then I looked with him at the site’s homepage. The red-lined item was the problem post.

Screenshot of SharePoint site home page, with News posts. It all looks good, but there is one News post that gives an error upon clicking.
The site in question. Everything looks normal, but the red-lined post gives an error message.

When he clicked the post, this was the error message. Do you see what SharePoint Holmes sees?

Screenshot from Error message saying:
"Hmmm… can't reach this pageIt looks like the webpage at https://ellenvanaken.sharepoint.com/sites/Communicationsite/SitePages/Changes-in-the-ERP-system.aspx might be having issues or it may have moved permanently to a new web address.
ERR_INVALID_RESPONSE"
This is the error message.

Right, the site above says “Intranet” while the error message refers to a link in “Communicationsite”.

I got the same error message upon clicking the News post, (confirming once more this was NOT a permissions issue), and checked the URL of the site where the item had been posted. There was “Intranet” in the URL of the site with the issue, but the error message was for an item in a “Communicationsite”.

💡 Aha, this looked like a News post that had been created with the “News Link” option. This is an easy way to share News from one site to another. Instead of creating your own post, you can click on Add > News Link and add the URL in a popup. SharePoint will then add thumbnail, title and description, and you can keep that as is, or edit when needed. When someone clicks on the post, they will be redirected to the post in the site where it was created, in this case the “Communicationsite”.

Screenshot from SharePoint site with News web part showing what happens when you click the Add  button under News. You will get two options: News post (to create a news item from scratch) or News Link (to link to another news post in SharePoint or internet)
An easy way to share News from other sites or even the internet

First I checked whether my hypothesis was correct. I opened the Site Pages Library in the Intranet site and looked for the post. When I opened it it looked indeed like a “News Link” page: a page with the link and the Page Details, nothing more.
💡 Normally the image from the Source site would also be shown, but in this case it was missing, and this was a reason to suspect that the original News post had been deleted.

Screenshot of the page that you get when you add a Link to a News Post. In this case there is no image, which is a clue for SharePoint Holmes.
This is what you get when you add News as a link to another site (or the internet). Normally you would also see the image, but this time it is empty, another clue.

I then opened the “Communicationsite” and checked the Site Pages Library (just to be on the safe side) and when I could not see the post, I went to the Recycle Bin. And yes, there it was.

Screenshot of the Recycle Bin of the site where the News item was posted
The News post from the link has been deleted in the site where it has been posted. Links to this post will now be inaccessible.

I contacted the person who had deleted the News post and enquired about the deletion. It turned out that the deletion was done accidentally in haste, and only a short time ago, as the image was still visible. (After a few days, the image will disappear as it is no longer stored in a Site Assets Library)

The solution

In this case, the “deleter” restored the post in the Communication site and that action restored access to the News post in the Intranet site.

Of course, it will not always be as straightforward. Sometimes it can be necessary to delete a post because it is outdated and potentially harmful to keep.

It may make sense to agree on a form of Life Cycle Management for News posts within your organization, and only delete something when a post is older than 1 year, for instance, if it does not need to be deleted earlier. You may want to read “Writing SharePoint News posts – our way” for more agreements you can make with your fellow News publishers.

As News Publishers will not be able to see easily where their News items are being shared, you will never be able to completely prevent issues like the above. But it will help to inform your News Publishers about this potential issue when using the “News Link” option.

Tip: you can check if your News post has been used in another site as follows:

  • Copy the title of the post and enter this in the Microsoft365 homepage Search box (so you search all through Microsoft365)
  • Alternatively, use some keywords from the title that are less common
  • Click the News tab in the Search results
  • Check if there are more entries than yours
  • If you want to delete the item you may want to warn the Publishers who have added your News post to their site.

This will not really help if someone has posted it to a restricted site that you have no access to, or when they have changed the title, but it is an option to reduce any “damage”.

Screenshot of two News posts with the same name, indicating that one is a link to another. The News Search vertical will help filter out the News posts.
Another News post that has been added as News Link: two posts with the same name in Search, in different sites.

About SharePoint Holmes:
Part of my role was solving user issues. Sometimes they are so common that I had a standard response, but sometimes I needed to do some sleuthing to understand and solve it.
As many of my readers are in a similar position, I thought I’d introduce SharePoint Holmes, SharePoint investigator, who will go through a few cases while working out loud.

Why does my SharePoint News digest not reach my colleagues?

Since a few weeks I am also on Mastodon (@ellenvanaken@mastodon.social) and there I happened upon this question from @almostwitty:

“Does anyone know how to manage the SharePoint “News you might have missed” feature? Some people aren’t getting them and I have no idea why…”

I thought that was a great question, so I started investigating, including the regular News Digest option as well, since issues can occur there too.
I focused on technical/functional reasons, reading “not getting them” as “not receiving them in their mailbox” rather than not understanding what they are about. (But there’s an explanation on how it works from Microsoft in this post as well!)

There are three levels where email newsletters can go wrong: organizational (because of settings or email issues), sender or recipient issues or actions.
In the case of organizational issues, most likely the whole organization, or a specific part of it (e.g. a specific email domain or location), will not have receive the digest.
In case of individuals who have not received it, the issue is harder to identify and solve.

A. Regular News Digest

This is a newsletter with a hand-picked selection of news, sent by a site owner (sender) to an email list or group of colleagues (recipients). You may want to check my earlier post “10 things to know about the SharePoint News digest”
Always think carefully before you decide to send a News digest – not everyone likes to receive “even more stuff to read” from their organization!

In the following cases someone or more people may not receive it:

1. Organization: There has been an email glitch in your organizations Outlook/Exchange

Check with your Microsoft365 admins if this is the case. The glitch can affect all your organization, or parts of it, e.g. with a different email address.

2. Sender: You have exceeded the Outlook sending limitations

Check the sending limitations here. E.g. you have sent your newsletter to more than 500 people, of you have sent too many emails in one day. The limits appear to be lower for people who have been in the organization shortly and have no reliable reputation yet.
Solutions may be to send the newsletter in smaller batches, to use organization-wide groups instead of individuals (any group that is in your Company Directory), or to send the newsletter from a different email address. (e.g. a department mailbox rather than your personal email)

3. Sender: you have more than 256 characters in your subject line

See all Exchange Online limitations (link below) under “Messaging limitations”.
A more complete, but more complicated overview of all Exchange Online limits here.

Please create a shorter subject line.

4. Sender: your digest mail is seen as Junk Mail

This has happened to me when I first sent some digests, because I sent it to a lot of people who had never had any interaction with me.

Please inform colleagues that you are starting an email newsletter, monitor delivery of your first digest, train your colleagues how to add senders of in-company newsletters to their safe senders and ask them to check their Junk Email folder on a regular basis.
It can also help to send the digest not from your personal email, but from an organizational account, e.g. Communications, or Department XYZ.

5. Recipient: Has deliberately blocked your email address, reported earlier newsletters as Junk and/or has set a Rule to send your mails to the Deleted Items

While option 4 is more or less an accident, this one is a deliberate action. There is no “Unsubscribe” option for SharePoint News digests, so every employee who is not happy to receive and read your mail will find ways to avoid it. Your digest will probably be in their Junk Email or Deleted Items.

It may be good to inform colleagues about the benefits of the News digests. Additionally you could train them how to add senders of in-company newsletters to their safe senders and to to check their Junk Email folder on a regular basis.

6. Recipient has accidentally deleted or archived the mail

Sometimes I do that too – I delete something by simply pressing the wrong button, swiping the wrong way, etc. Sometimes it is because I am interrupted while reading email, sometimes I decide too fast that this is not interesting, it can be anything really, and nothing personal! 😊

The email may be in the Deleted Items or in the Archive.

7. Recipient’s mailbox is full

Especially when your organization has many F3-licenses, it may happen that their mailbox (only 2 GB) is full and can no longer receive emails, even though the News digest is a small email in size. Check out the Quirks of the F3 license.

There’s not much you can do there. The recipient will have received one or more warnings to clean up their mailbox.

B. News you might have missed:

This is an automated digest of items that you have access to, may be relevant for you (according to the Microsoft Graph) but have not read yet. More info from Microsoft.

In this case, there are only organizational or recipient issues. People may not receive this for the following reasons:

8. Organization: it has been disabled on organizational level

Microsoft provides information on how to do that. You may want to discuss with the Microsoft365 admins (and others involved) to turn it on again, because there may have been a good reason to disable the functionality.

9. Organization: There has been an email glitch in your organizations Outlook/Exchange

(Similar to 1.) Check with your Microsoft365 admins if this is the case. The glitch can affect all your organization, or parts of it, e.g. with a different email address.

10. Recipient: There is no news that they have missed

They may have read all there is to read. That may be because they have been a colleague for only a short time and does not have access to many sites yet.

11. Recipients have turned off their subscription in the email or on their SharePoint page

This is ON by default. At the bottom of the email there is a link called “Notification settings” that takes you to a page in the SharePoint homepage where you can disable this digest.

Screenshot of the bottom of the "News you may have missed" email, with the link to change your notification settings.
You can disable this automated digest here.

You can also do this from the SharePoint home page by clicking the gear wheel > Email notification settings.

Screenshot of the SharePoint landing page and the menu under the gear wheel. With "Email notification settings" you can turn the digest off.
On the SharePoint landing page you can also turn off this digest.

In both cases, you will go to the below page where you can toggle off the button at the bottom.

Screenshot of the Notification settings page where you can determine if you want to receive "News you might have missed" or not.
If you do not want to receive “News you might have missed” you can set this button to “Off”

12. Recipient: Has deliberately blocked noreply@sharepointonline.com, reported earlier digests as Junk and/or has set a Rule to send mails from this sender to the Deleted Items

(Similar to 5.) This is a deliberate action. The digest will probably be in their Junk Email or Deleted Items.

You may want to inform users that blocking noreply@sharepointonline.com is not a good idea, as they will also not receive other mails about their SharePoint sites and documents. (e.g. auto-deletion of Teams recordings) Creating awareness about this email may be good idea, as is teaching them how to disable the “News you might have missed” email instead, as explained in 11, if they really do not want it.

13. Recipient has accidentally deleted or archived the mail

(Similar to 6.)

The email may be in the Deleted Items or in the Archive. Again, creating awareness about this email may be a good idea, and you may also want to teach them how to disable it properly if they do not want to receive it.

14. Recipient’s mailbox is full

(Similar to 7). The mailbox of F3-licensed users (only 2 GB) may be full and can no longer receive emails, even though this is a small email in size. Check out the Quirks of the F3 license.

There’s not much you can do there. The recipient will have received one or more warnings to clean up their mailbox.

Conclusion

There are many reasons why someone does not receive a SharePoint News digest or a “News you might have missed” digest. The reasons can be on organization, sender and recipient level, and may be deliberate or accidental. That makes it hard to troubleshoot, but I hope I given you a few ideas to start with. Good luck!

Please let me know if I have forgotten any!

10 more things to know about creating SharePoint News

Decorative image - a self-created concoction of the SharePoint logo, a Newspaper icon and the number 10.

Some time ago I wrote a post: 15 things to know about creating SharePoint News

By now it is 16 things, because posts with numbers are cursed, as my fellow bloggers will know 😁

In the mean time I have learned a few more things, so it is time for an update.

1. The news publishers in your organization may appreciate guidelines

With all the options SharePoint has to offer, in web parts, columns, fonts and font colours, you may want to provide your News publishers with a few writing and design guidelines. This will help create some consistency across your intranet.
I have shared my last organization’s guidelines in an earlier post: Writing SharePoint news posts (our way). This post was pretty popular so I guess it fills a need.

2. Be aware of when to use which image source

I have tried every option and made an overview in this post: Images in SharePoint news and pages.

In short:

  • Using an image from Web Search and Upload will create a new folder and file in your Site Assets library. All other options do not.
  • You have most control using Upload or Site, as you will know where the image is stored and you will be able to re-use it easily
  • Stock Images and Organizational Assets are the best options when you care about respecting intellectual property, assuming someone is in charge of maintenance of Organizational Assets

3. In some cases the header image is not visible

I have written about troubleshooting images. These are a few common causes:

  • The “Plain” page template (no image) is used
  • Readers have no permission to view the picture, for instance because it lives in someone’s OneDrive
  • The image has been moved or deleted
  • On Yammer, in some cases when the post has been promoted to Yammer – see point 4.
Screenshot of SharePoint news web parts with a post with header image that was deleted, and a post in Plain template, with no header image by default.
Example of a News web part with a news post with a deleted header image (top) and one using a Plain template (with no header image)

4. Promoting a post to Yammer may not show it as nice as you expect

How your News post looks on Yammer is depending on

5. The Description field can be used for several purposes

The Description is a field that you can find in the Page Details. It is easily overlooked, and you do not have to use it, but it can be quite powerful.

  • Create a summary of your post. This will be displayed under the title of the post and will show your readers quickly what the post is about. You will have to make an effort, as by default the first part of the body text will be displayed.
    The Description will also be shown in the Newsletter and in Search results.
  • Hide key words that will be used in Search results. It is best if you add these keywords as far to the bottom of the description as possible, to avoid it showing up in the news overviews.

Read more about it: 7 things to know about the Description field (by now it is 8…sigh 😊)

Screenshot of two examples of a SharePoint News post: one with the default Description (= the first part of the body text), one with a short summary of the post, which shows you quickly what the post is about.
Example of a summary: To the left, a custom summary of the post. To the right: The default description: the first paragraph which trails off.

6. You can add a publication date on the post or page itself

The publication date of a News article will be visible on the News web part, (if you have that enabled), but when you open a News post you do not see the publishing date. You may want to add the date from the web part settings in the header (1), then toggle on the “show published date” button (2) and then the date will be shown underneath the title and author (3). I have not found a way to enable this by default. Please let me know if there is an easy way to make this the standard.
Adding the publication date is a good practice for intranet pages with a longer lifespan.

Screenshot of SharePoint news post in the making, with the option to add the Published date to the post itself, underneath title and author.
The web part settings is where you can make the publication date visible. By default it is off, unfortunately.
Screenshot of SharePoint news page with the News web part. The publication date is shown, but this date is by default not replicated on the news article itself.
You can show the publication date in the News web part, as shown here, but this does not show on the News post by default.
Screenshot of SharePoint News article, published, with the publication date underneath title and author. This is useful for both news and intranet pages.
This is the publication date on the published post.

7. You can manage comments on your posts and pages

Your readers can respond to posts by clicking the Like button or adding a comment. Notifications will be sent via email to you. If this gets a little overwhelming or distracting, my post 4 ways to manage comments on SharePoint news or pages may help you.

8. If you are publishing “on behalf of” an Author, here’s some ways to redirect comments to them

By default, Likes and Comments are sent to the person who has published the post. There is no standard option to redirect them to the person who is the intellectual owner (as opposed to the publisher) of the post.
I have come up with a few workarounds in this post: Diverting SharePoint news comments to the Author.

9. In some cases you will NOT see “See All” on the News web part

Sometimes the “See all” link, which you will need to see more news items and in order to create a Newsletter, is not visible:

  • When you have less than 5 published News posts
  • When you use the Hub News display
  • When you have hidden the “Title and Commands” in the web part settings.

You can read more about it in my post SharePoint Holmes and the Disappearing Digest link.

Screenshot of SharePoint news web part settings, where you can toggle off the "Show title and command" bar. This will take away the word News, but also some other useful things.
If you toggle the “Show title and commands” off, the items News, See all and Add in the top bar will not be visible on the page.

10. The Carousel display still has usability limitations

Even Microsoft, who are big on inclusive design, have not managed to come up with a good Carousel. It also does not display any indication of the content of the article apart from the title. You can read my rant in this post: Can you get a text preview in a SharePoint News Carousel?

Screenshot of a SharePoint news Carousel.
An example of a Carousel.

As SharePoint is evolving, we keep finding out more and more things about it, so please stay tuned and keep asking me questions, so SharePoint Holmes and I can investigate!

Number “10” by publicdomainpictures.net

Can you get a text preview in a SharePoint News Carousel?

I recently got the following question: “Is it possible to get a text preview from News in a Carousel? This would be for those users who want to see more than just the title, but without clicking.”

I love this type of questions, so I decided to find out.

Carousels and me

I am not a big fan of Carousels. I can imagine the large images look nice, but I have read too many negatives. The quick why? This website: https://shouldiuseacarousel.com/

They do not provide good usability, for instance:

  • People tend to overlook them.
  • Most people do not spend enough time on a page to see all the items in the Carousel, so generally only 1 or 2 posts are being seen by most visitors.
  • The buttons to move them forward are too small and not easily clickable for people who have problems with their motoric skills.
  • Screenreaders cannot deal with them.

At the bottom of this post I have added a number of articles.

When Microsoft introduced a Carousel for SharePoint News, I honestly thought that they had solved the issue because why would they, who are pretty big on usability and accessibility, introduce functionality that would not have a good usability? But when I saw the product, I noticed that it just looked like all others. I could not find a usability review by anyone. (Please let me know if you know one).

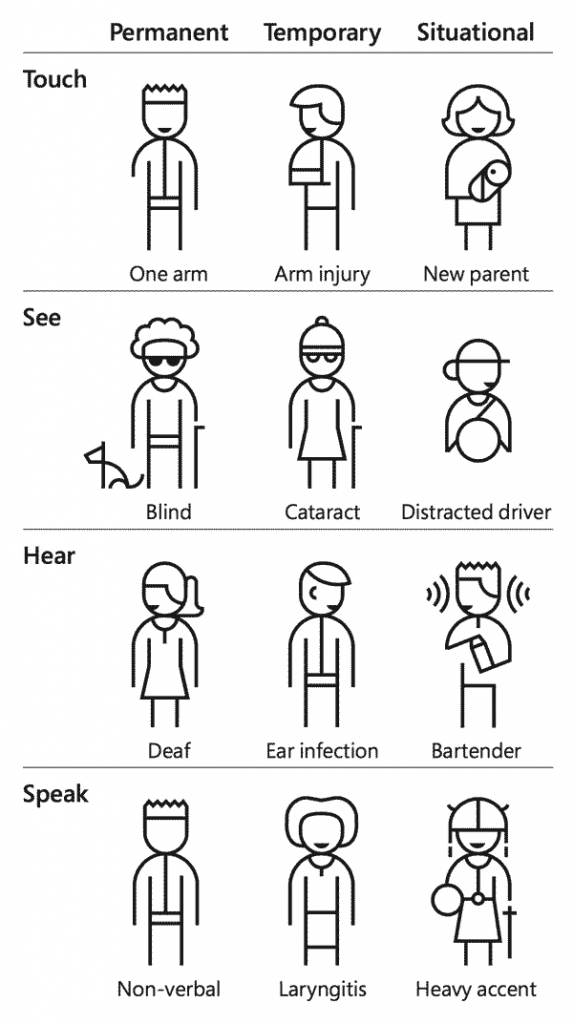
BTW, I really love the below image (from Microsoft’s Inclusive Design pages) to show that inclusivity issues are more common than you might think. Not everyone has a permanent issue, but many people have temporary or situational issues. A small part of the population is blind, but many people have eyesight issues, including myself before my cataract operations – I had problems with colour contrasts and very small print, for instance.

Diagram with common situations when someone cannot touch, see, hear or speak "normally" due to permanent or temporary disability, or a specific situation, such as a bartender that cannot hear well because of a noisy environment.
The Microsoft Inclusive design Persona spectrum. I LOVE this.

But I digress! The question was: Is it possible to show a preview of the post, and not just the title, in a Carousel?

I checked a number of items:

1. News web part

I started out with changing my Intranet site’s News web part to Carousel. This is what the Carousel looks like in Edit Mode:

Screenshot of Edit Mode for a News web part in Carousel mode. It has some options to adjust how it is displayed on the page. e.g., number of items, automatic cycle and call to action.
Edit mode for the News web part, when selecting Carousel
  • You can determine the number of posts to show (recommended is max. 5, but you can go to 8)
  • You can change to the next item automatically (not recommended) and set the interval for change.
  • You can show a call to action. We will come back to that later.

So, there is no option in the Carousel itself to make extra information, such as the Description field, visible. On to the next option.

2. News post

The next step was to open one of the posts and see if there is any option for an extra text, image description or anything that could be shown in the Carousel.

In the web part menu, you can add “Text above title” where you can add 40 characters of text, so I did. It is immediately shown. I also added an Alt Text for the image.

Screenshot of news post in edit mode, showing some options for the image and for the display of the post.
Edit mode for the news post, with options

3. Page Details

Then I looked at the Page Details, changed the Description into a snappy summary and added a Call to Action with a link to a Form.
More on the Description field in this post.

Publishing the end result

So, I have 4 possible options to display:

  • Description
  • Text above title
  • Alt text for the image
  • Call to Action

I republished the page and looked eagerly which of the items would manifest itself on the News page.

Nothing. Zero. Zilch. It still just showed the title. Hovering over any element (image, title) did not show anything. 😥

Screenshot of the News post after adding the extra options, such as "Text over Title", Description, Alt Text for the image, and Call-to-Action. Sadly, nothing is visible, not even when hovering over image or title.
The Carousel after adding all the extra’s and republishing. Sadly, none of the additional items are visible.
  • The Description is only visible in the web part layouts Top Story, List and Side-by-Side.
  • “Text above title” is only visible on the news post itself.
  • Alt text for the image is only available on the news post itself, in the Immersive Reader
  • The Call-to-Action does not show up, and the text and link in the Page Details are deleted after publication, so I guess this does not work. I added a Call-to-Action web part, hoping that it perhaps needed this nearby, but nothing. I will look into that; I remember a discussion on Twitter but forgot between whom.

Conclusion

I think it is currently NOT possible to show a preview, neither by default, nor by hovering over an element. If any of my readers have found a way to do it, please let me know!

Suggestions

At this moment I can only suggest using another web part layout, such as Top Story, List or Side-by-Side. Use the Description text to provide a good summary of the article. This is better for usability and accessibility and would allow users to see what the story is about, so they know whether it is worth their while to click.

Top Story layout. This shows the post’s Title and Description.

Additionally, you can use the Microsoft feedback portal to make a suggestion to allow a preview.

Articles on Carousels:

Carousel Photo by Mihai Vlasceanu: https://www.pexels.com/photo/carousel-with-lights-1403653/

7 things to know about the Description field in SharePoint pages and news

My former colleague recently asked me how to add metadata or tags to SharePoint news or pages, in order to be able to make them link to a certain common topic, and be able to find them in Search.

My first thought was to add metadata to the pages in the Pages Library, but I quickly dismissed that thought as it would mean that every publisher would have to go into the library after publication to add their metadata. It would also mean that every Page Library would have to have those fields added and back-filled and oh well, I got tired just by thinking about the implications! 😄

But then we remembered that we had once added something on the page, “somewhere in a popup to the right”. I started investigating.

It turned out that the place to look for is the Description field. You can find it by clicking on the link “Page Details” during or after creating a new post or page.

There are a few things to know about this field.

1. The Description field is almost on top of the popup

It is directly under the thumbnail of the header image.

After clicking on Page Details (1) the popup will open and you will see the Description (2).

However, the popup often opens “in the middle” so you need to scroll up to see it.

If the popup opens like this, please scroll up!

2. The Description field is auto-populated after publishing

It will be populated with the first 255 characters of the body text.

SharePoint will tell you how many characters you have left.

3. You can change or remove the text after publishing

Now why would you want to change the description text manually? Items 4 and 5 will provide the answer!

4. The text in Description is shown in the News web part

Rather than having a text that suddenly ends in the middle of a sentence, you may want to edit the Description to provide a good summary to your readers.

The number of characters displayed is depending on the configuration of the web part, e.g.

  • If you have no image, you will see more characters than with an image.
  • If your News is in a page-wide column, you will see more characters than when it is one of three columns.
  • Hub, Carousel and Tiles layouts do not show descriptions.
In the red-lined example, we can remove all text behind the ! in the Description and have one proper sentence.

This preview is not relevant for pages, as these are not shown on web parts.

5. The text in Description is shown in Search results

When you have executed a search, in all of Microsoft365, SharePoint or your site, the Description text will show in the Search results, at least the text around the keyword.

Please compare this screenshot of a news web part, where the word “peregrine” is only

  1. In the title
  2. In the body text
  3. In the Description
  4. In a different text web part

To this screenshot of a search on the word “Peregrine” in the Microsoft365 homepage search box. The numbers correspond to the list above.

The search word ‘peregrine” is in various places in the news posts, but they will all turn up in search.

Please note that I have filtered the search for News, to avoid that the various images that have been auto-uploaded to the Site Assets library during news creation, clutter the list. How was it again with images in SharePoint news? This post will tell you all.

6. The text in Description is searchable

From the screenshots you can see that the keywords can be on various places on the page, but the posts all turn up in Search.
This means that you can add keywords or metadata in the Description, without having to use that text in the title or body of the post or page.

For News, you’d best add the keywords at the bottom of the field after the summary text, so you do not show the keywords alone in the news preview. My news post 3 only has “peregrine” in the Description, and it makes a meagre preview on News.

For pages, you want to make sure that you have a good text for Search, but you do not need to worry about any preview.

Please note that I chose the word “peregrine” in my example because I have not used it before in this tenant. In real-life you will get more search results so you may need to filter.

7. The text in Description is not dynamic

When you are editing your post after publication, the description will not be adjusted. This does not have to be an issue, but you need to be aware, especially when you have edited the first paragraph of your post. My post SharePoint Holmes and the not-so-dynamic Description tells you more.

You can leave the description as is, replace it with the new intro, or even better, replace it with a summary of your post so your readers get the gist immediately!

8. The Description shows up in Newsletter

It will be no surprise, but just to be complete. The Description is also displayed underneath the title in the SharePoint Newsletter.

Conclusion

The Description field in the Page Details can be very useful in the following scenarios:

  • Providing a one-sentence summary of your news post on the News page(s) and Newsletters instead of the first words that trail off somew…
  • Making sure the post or page can be found in Search results. You can add the relevant keywords without having to add them to the title or the text. For instance, if it is related to a certain project or topic, but you do not want to use that word all the time.

Do you have other scenarios?

Are you using the Description field consciously or do you have another scenario where it comes in useful? Please let me know!

From Stream (Classic) to Stream (on SharePoint) – summary

Redirecting the Stream tile to Stream (on SharePoint) will roll out to standard release tenants from now.

Office365 support folks may ask themselves what to do – enable it now or wait until more is known? Please note Stream will only be decommissioned when the functionality in SharePoint is comparable to Stream now – which is not the case at the moment. I expect you will have a year at the very least.

I have done some experiments in the last few weeks (June 2022), to give you a better idea of the current consequences of this change, and this is my advice:

  • Is Stream new for (or not yet used by) your organization?
    Redirect the tile as soon as possible, and instruct everyone in the new ways of working (video creation and storage, web parts etc.) via SharePoint, OneDrive and Teams.
  • Is Stream an important app for your organization? E.g. you have created a video portal?
    Wait until more is known. At the moment there are quite some functionality gaps, although these are being addressed as we speak.
    • You may want to do some pre-work such as checking out how many videos you have, which department is the most active, and which sites would be the receptors for videos migrated from Stream. Housekeeping could also be a good idea, if you own many videos.
    • You could also start instructing people where to create new videos and how to embed videos on pages, how to manage video in SharePoint etc.
    • Do you have an idea about how to approach the migration project when it is time? You may want to think about that now as well.
  • Do you have a few active pockets of video on Stream, and the number of likes, views and comments are not very important for the owners?
    Suggest a manual migration (download from Stream to PC and upload to SharePoint) to the owners, which will reduce the complexity of your migration project later, by doing a few things now.

I have written a few posts to help you with each of these scenarios:

What experiments have I done?

  • I have redirected my Stream tile in Office365 to Stream (on SharePoint).
    I found that this redirects to a new page in SharePoint, comparable to the Office365 homepage, where you can see all videos on OneDrive, Teams and SharePoint you have access to.
    Videos that are in Stream stay there and will eventually be deleted. This means any video on Stream that you want to keep, needs to be migrated by you.
  • This means you suddenly have a migration project. Although I expect it will be some time before Stream gets decommissioned, it will take thought, preparation, communication and other work.
    I have a few suggestions for that project.
  • Microsoft will provide a Migration tool, which I have not seen yet. I expect this will move videos with all their metadata (including comments, views, likes), but YOU will have to decide where the videos will go.
    If you do not want to wait, and/or if you have a few Stream channels where the metadata are not terribly important, you can reduce complexity by moving those videos manually. I have checked what happens when you download from Stream and upload to SharePoint.
  • Do you have Stream videos embedded on your SharePoint intranet and other pages? You will need to change web parts and link to videos in SharePoint.
    I checked which web parts are best:
    • Highlighted Content for videos from one site
    • Quick Links for a hand-picked selection of videos
    • File Viewer for a single video, illustrating a News post
  • As video is treated as a document, I have also checked if the Document Library web part would be a good web part to display video, as you can configure it more than the Highlighted Content. However, it is a lot of extra work and it is not better than the Stream or Highlighted Content web parts.
  • Do your colleagues use Stream (desktop or app) to create video’s? You may want to wean them off and suggest another app from the Office365 suite. These are my recommendations:
    • the OneDrive mobile app for their impromptu and personal videos
    • a recorded meeting on Teams desktop for more official videos, such as instructions or speeches.

When you have access to the SharePoint Admin and Message centers, you can see some improvements for Stream being planned, e.g. inline playing in the Hero web part.

The SharePoint message center will keep you informed about Stream (on SharePoint) improvements

What’s next?

I hope I have saved you some time by doing and sharing my experiments. If anything new pops up, like further improvements to Stream (on SharePoint) I may create a new post.

Good luck!

Can the document library web part look like Stream?

OneDrive and SharePoint will be the storage location for video in Office365. I have already shown earlier how to display your videos on SharePoint pages.

I was curious to learn what you can do with the document library web part for this purpose, knowing that the recommended Highlighted Content web part lacks some functionality compared to the Stream web part. I also liked the Card view for the Document Library, so I wanted to check what it can do. Not just because I like playing around with these things, but also so you, Office365 support person, does not have to do it yourself! You are already busy enough.
So the question is:

Can the Document Library web part show videos in a way that is closer to the Stream web part?

What are we aiming for?

As a reminder, this is a Stream web part for multiple videos. You see thumbnail, title, # views and #likes.

Stream (Classic) web part displaying “All of Stream”

And this is the web part for Highlighted Content, displaying Stream (on SharePoint) videos. You see thumbnail, title, uploader, date.

Highlighted Content, most recent. This displays videos in SharePoint.

So, how do we go about when we want to tweak the Document Library web part? This is the basic display, using a card view – more about that later. You see the thumbnail, name (with extension), Modified by and Modified date. Almost the same as the Highlighted Content, but less compact.

So, can we tweak the Document Library web part to be more like Stream? And if yes, how?

1. Add Title column to the All Documents view

The Document Library web part displays the file name, with an extension. If this does not bother your audience, you can skip this item.
If you want to display the title, you need to add the Title column to your All documents view. In most cases you will need to manually add the titles to your videos. This is work, but it will give you the opportunity to use a better title than the file name.
Do not remove the Name (linked to document with edit menu) column because you may need it to make individual adjustments.
Please note the Title column does not show in bold. This makes it slightly harder to notice than the Name column.

2. Create a Tiles view

In your document library you will need a view in Tiles mode before you can create Cards. So, first of all, save your standard All Documents list view again as “Page View” and then save it again as Tiles. This will be the view to add to the page, after some configuration.

If you want to display other columns in your Page view, please add them now.

The view to add to the web page (after tweaking).

3. Use different views

You now have the following views:

  • All Documents for maintenance, adding columns etc.,
  • Page View to display on your page.

Make sure you know what’s what and do not delete either. You can create other views if needed.

4. Configure Cards

You can only configure Cards in the document library itself, not on the web page. So go to your document library, open the Page View and select “Format current view” from the bottom of the view menu. (see screenshot above)

Then click on “Edit card” and the Card view will pop up with options to change it.

You can create and edit the Card view in the document library.

You can select which columns to show, and decide if you want people’s pics or not.
You can also decide if you want to show the column names. They can provide extra information, but take up vertical space, so it is up to you to see what works best.

Document card designer. The … allow you to move an item up or down

Below an example without the column names and the Modified By (as this is often not relevant), but with an extra choice column called “Topic”.

Example of configured card.

5. Showing the number of Views 😒

I know you want to see what the end product looks like on a page, but we are not there yet!
I have tried to find a way to easily show Views and Likes, as they are shown together with every Stream video.

Unfortunately I could not make the Views visible on the Card. The number of views are not stored in a column.
The only way you can see how many hits this video has had is in the document library itself. Select a video (1), click the “document details” icon (2) and you can see the number of views in the popup. (3) 😒

You can not make this visible on the page, not even when you have enabled the command bar.

You need to go to the library to see the number of views.

6. Showing the number of Likes 😒

Another thing I want to show is the number of likes. I know there is a Rating option in document libraries, so I checked out this post from Gregory Zelfond to see how I enable that again.

I did not see the Rating option in my document library and in the video Greg confirms my suspicion that this is only available in Team sites. But my Intranet site is a Communication site, obviously, and it makes much more sense to me to have a rating option in a large-audience Communication site than in a limited-access Team site!

So, just for the sake of it, I replicated my video library in a Team site and enabled the Ratings.

With Likes it looks like this:

Video library in a Team site – likes

And with Star ratings it looks like this:

Video library in a Team site – with Star ratings

Well, that looks cool, huh?

It does, BUT you can not click on the heart or the stars to give your feedback – you can only do that in the list view in the document library itself…

Another disappointment!

7. Showing the number of Comments 😒

This is not available on the Stream (Classic) web part, but you can see it in the Stream (Classic) portal and on every video page.

You can see number of views, likes and comments on the My Videos page in Stream (Classic)

I checked if there is a column that shows comments, to add to the Card. Indeed, in the View configuration there is a column called Comment count but it does not get added to the View when you select it.
(Number of) Comments are only visible when you open the video.

Comment count column – but it does not show up when you add it to the view.

8. Configuring the page

Now it is time to add the web part to the page. I used the following setup for the web part:

  • One column with the Document Library web part
  • Page View
  • Hide the command bar
  • Show “See all” button
Web part configuration

And this is the best I could do (in a Team site)

Document Library web part in a Team site, non-clickable likes.

Conclusion:

The Document Library web part is a little more flexible than the Highlighted Content web part, so you can vary in what you show on your SharePoint page. It takes some work to make it ready (you need to create and configure an extra view at least).
It does not show exactly like the Stream web part, so if you are looking for views, likes and comments we will have to wait until Microsoft comes up with a web part more like Stream.

There will be a SharePoint video collections page for Teams, that may do the trick. I have not seen that yet. More information here, please scroll to “In development – Release June 2022” for the announcement.

In any case I enjoyed myself with all the investigative work!

Where to create a video in Office365

This Stream project is a gift that keeps on giving. There are so many things I want to find out and write about! Not just for myself, but especially for you, to help you understand what this change will mean.

This change also means that you will have to change the ways your colleagues create videos. I do not know if many people in your organization are using Stream right now, but even if they don’t, you may want to create a campaign on video creation, as video is an important medium and it may be a good idea to increase the creation and usage of it in your organization.

My goal for this post is to help Office365 support folks guide their colleagues in a simple way to other video tools. “Please no longer use Stream, use …”

I have reviewed the options.

Where can you create videos in Office365?

  • Stream Classic (desktop and app – please note F3-licensed users can only view, not add!)
  • Teams (desktop and app)
  • OneDrive (app)
  • Yammer (app)

At this moment the Office mobile app does not support creating videos, but I have just learned this will be added in future as the Office mobile app is very much focused on documents. You will be able to create 90 second videos with annotations.

Stream (Classic) – desktop

You can record a screen or a video with your web cam. (Instructions from Microsoft)
You can trim the video, but it can only be 15 minutes max.

👍 Trimming options

👍 Stable image as this is usually done from laptop

👎 Max. 15 minutes

👎Type of videos is limited to web cam options or screensharing

👎 Created and saved in Stream which is Office365 but an app that will be discontinued, so you will have to move it to SharePoint

Stream (Classic) – app

The Stream mobile app is a bit more flexible than the desktop version. There is no time limit, and you can use the smartphone camera.

Instructions from Microsoft

👍 Quick to start

👍 Freedom in topics as this uses the smartphone camera

👍 Created and saved in Office365 (but in Stream, so you will have to move it to SharePoint)

👍 Editing options, see example below: (Not sure if I need to add that I am not an experienced video creator 😀)

👍 Trimming options (in the Stream desktop app)

You can add some effects while creating your video.
You can use the effect buttons at the bottom of your screen during recording.

Teams – desktop

Using a Teams meeting recording option, you can create a

  • meeting recording
  • “talking head” video (using the webcam)
  • screensharing recording, e.g. for Office365 instruction videos

When you use a Live Event and/or add a different camera, you can also create face-to-face event videos, such as conferences, lectures and physical town halls.

I generally use the Meet Now option to create a screensharing video.

Meet Now is a quick way to start a meeting with yourself

Instructions from Microsoft.

At this moment, it is not possible to trim or edit your video in Teams or SharePoint. You need to download your video, upload it to Stream, trim and then download and upload to SharePoint. I hope that this will be available on the other apps shortly!

👍 Created and saved in Office365 (OneDrive > Recordings folders or in a Teams channel)

👍 Stable image as this is usually done from laptop

👎 No trimming options, so the video generally starts with the standard Teams meeting screen

👎 No effect options

👎 Type of videos is limited to web cam options or screensharing

👎 You need to start a meeting first and then push the record button

Teams – app

The Teams app uses your camera phone, so you are more flexible when it comes to the topic of your recording. You can use the options from the desktop, but also flip the camera from self-view to world-view.
Instructions from Microsoft

👍 Freedom in topics as this uses the smartphone camera

👍 Created and saved in Office365 (OneDrive > Recordings folder or in a Teams channel)

👎 No trimming options, so you start with the standard Teams meeting screen

👎 No effect options

👎 You need to start a meeting first and then push the record button

👎 Video quality is not so good

👎 You need to give your microphone access to Teams – if you forget this there will be no sound, as in this example:

No sound, video in Teams mobile app of part of the Singel (city moat) in my hometown Utrecht
Create a “Meet Now” by tapping the camera top right.

OneDrive – app

The OneDrive app allows you to record audio or video with your regular phone camera. You are very flexible. You can flip the camera from self-view to world-view. Your video is saved in your OneDrive (root folder) and can not be edited. You can move it from there to a suitable SharePoint/Teams site for sharing. (Moving deletes it from your personal OneDrive).

👍 Automatic upload to Office365 (OneDrive root folder)

👍 Freedom in topics as this uses the smartphone camera

👍 Quick to start, compared to Teams

👍 Good video quality

👎 No trimming options

👎 No editing options

Example:

Video created with the OneDrive mobile app

Yammer app

The Yammer app also works with your phone camera. Just click the “new message” button

You can use self-view and world view, and add texts, emoji etc but it is displayed vertically, even if you film horizontally. Check out the example below. You can create a video from your feed, a community or your inbox, and the end result is stored in Yammer. The resulting message (=video + other info) can be moved to another community, but not to SharePoint, so you will have to download the video to PC and upload it to SharePoint. It is also not shown on the Stream (on SharePoint) landing page.
I expect that with native Yammer (which I am not using at the moment) you will be able to move it to another SharePoint site.

The effect options in the Yammer app

👍 Automatic upload to Office365 (Yammer)

👍 Effect options (texts, emoji etc.)

👍 Quick to start – just open Yammer and create new message

👍Freedom in topics as this uses the smartphone camera

👎 Needs downloading to share outside of Yammer (when using New Yammer in any case)

👎 No trimming or editing

👎 Effect options are shown vertically, even when you film horizontally

👎 Video quality is better than Teams, less than OneDrive

Video created with the Yammer mobile app. You can add text, emoji, drawing but only vertically.

Phone video

You can also use your phone camera to create a video and then upload it to OneDrive or SharePoint/Teams. I have not made an example as most people will know how this works.
It takes discipline to upload work videos to Office365 and delete them from personal records. If you think this is a challenge for your employees, you’d better teach them using the OneDrive app as the preferred option.

👍 Editing options including trimming, colours, filters, formatting

👍 Quick to start

👍 Good video quality

👎 Needs discipline to remove video (if it is a private device) after upload to Office365

Recommendation: Teams desktop or OneDrive mobile app

Stream will go away, so you will have to use another way to create videos in your organization.

In my opinion, the most useful options are

  • Teams desktop, for more formal videos, such as demo’s and talking heads
  • OneDrive app, for impromptu videos or when on location

We are really missing trimming and editing options, so I hope Microsoft will add them to SharePoint soon! This Excel file with functionality planning does not have info about the editing options. (Unless I am overlooking something). But Marijn Somers told me that a good tool (Clipchamp) will be built into Windows 11, so we can look forward to that!

Of course there are a zillion other video tools available, with excellent editing options, but my goal for today is a simple swap of Stream with another app from the Office365 suite.


How have you or will you tempt your colleagues to move away from Stream and use another option instead? Please let me know!

Manual migration from Stream to SharePoint

You will have noticed I am currently trying to find out as much as possible about the consequences of the decommissioning of Microsoft Stream.

There is no hurry, as only the Targeted Release has been able to redirect the Stream tile to SharePoint, and the standard release will only be able to do it from July 2022 onwards. When Stream will be disabled, no one knows, but I guess it will at least be a year until that happens.

Still, I like to be prepared and to know what will happen exactly, before I do something that has unpleasant side effects. And I guess you will want to know, too! So, let me save you some time by doing some experiments.

If I would still be working at the mental health care organization (I retired in January) I would have moved my small video collection manually from Stream to SharePoint in the upcoming summer period.
I owned just a few instruction videos, and although I would miss the likes and views that my videos received on Stream, those are not really important.
I can imagine that there are more small pockets in organizations that feel that way.

Migrating manually (Downloading to PC and uploading to SharePoint) will result in some data loss but it may offset the freedom to to this at your own time. Also, it will save the project manager time and complexity.
One of my readers asked what will happen to transcripts, comments and stuff. I have not used the migration tool that Microsoft will provide. But I can check what happens when you do a manual migration.

Hey ho, let’s go! 😁 (Hello, former colleague Annica, I hope you are well)

Test setup

  1. I have recorded a Teams meeting with a transcript. By default, this video has been stored in my OneDrive. I have also added a comment.
    A recorded Teams meeting may sound like a limited business case but we have created many instruction videos this way.
  2. I have downloaded it to my PC and uploaded it to Stream (Classic). There I liked the video, added a comment and a Form.
  3. I have downloaded it from Stream and uploaded to a SharePoint library. This will be the scenario for a manual migration.
  4. I have copied the OneDrive file to a SharePoint library, just to see if there is any difference.
  5. I have also downloaded the file from OneDrive and uploaded it to SharePoint, without the Stream step.

Let’s see what happens with transcripts, number of views, Forms and comments. It is already known that “likes” from Stream (Classic) will not be a feature of Stream (on SharePoint).

1. OneDrive

When I open the video the transcript pops up immediately.

Video and transcript in OneDrive

I do not get a signal that there is a comment, but that may be because I added it myself. I can open the comment section and read my comment.

Video and comment in OneDrive

2. OneDrive > download > Stream

When I download the video and upload it to Stream, and open it there, the transcript is shown top right. It has timing next to it. Please note I added comments and the like after this video was uploaded to Stream, as well as a Form.
The comment from OneDrive has disappeared.

Video, transcript, like, comment and Form (top right, under Interactivity) in Stream

3. Stream > download > SharePoint (manual migration scenario)

This leaves you with the plain video – the likes, comment from Stream, transcript and the Form are not migrated. That is strange, as the download from OneDrive to Stream migrated the transcript.

Video in SharePoint, downloaded from Stream. by default, the transcript option is disabled. 😒
Enabling the transcript option in SharePoint

When I enable the transcript, I have the option to generate a new transcript in English, or to upload the transcription file in any language.

When the video-to-be-migrated has a transcript in Stream, you can download that by going to the video, clicking the … underneath the video, selecting “Update video details”, and then you can select to download the captions.

Downloading the transcript from Stream

It is a VTT file that you can use to upload in SharePoint. It will provide you with a timed transcript.

I have generated the transcript in SharePoint.

I have also generated a new transcript and this looks almost the same as my original transcript, and it is timed, but the times are slightly different. It is nice that it can be done, but it will be extra work, of course.

I have looked at the Library settings to see if I could enable the transcript option by default, but could not find it. Perhaps I need to add a content type Video, but I could not add new content types. Someone with more experience in content types may want to jump in!!!

4. OneDrive > copy > SharePoint

When I do the regular Copy To from my OneDrive to the shared SharePoint library, the transcript (not timed) is copied and opens up when the video starts playing.

The transcript is copied from OneDrive

And also the comment from OneDrive has been copied.

The comment on my OneDrive video is copied to SharePoint.

5. OneDrive > download > SharePoint

Downloading the file removes the transcript and the comment, so this is really not a good idea.

When you download from OneDrive and upload to SharePoint, all extra’s are lost. Copying or Moving will leave the extra’s intact.

Conclusions

When looking at my proposed manual migration scenario, please be aware of the following:

  1. Likes, number of views and comments from Stream will not be migrated when downloaded and uploaded to SharePoint. For Likes this is already known, for views it is obvious, for comments it was a surprise.
  2. You can see the number of (new) views in the details pane.
  3. Forms will not be migrated – you will have to create a new SharePoint page and add the video and the Form as separate web parts. (Let’s hope better options will be developed)
  4. Transcripts will not be migrated to SharePoint and you will have to activate the option after upload of each video.
  5. You have two options to create the transcript:
    1. You can create a new transcript in SharePoint automatically when the language is English
    2. You can download the transcript from Stream and then upload it to SharePoint for all other languages.

This scenario will not work for everyone, and perhaps, knowing all this, you now want to use the Microsoft Migration tool even more! No problem, now you can explain why you want this, without having to do the investigations yourself! 😁

Coming up next:

Next time I will show the differences in video creation using Stream, Teams and OneDrive.