SharePoint site naming conventions – my experience

The other day, Gregory Zelfond’s SharePoint Maven newsletter featured best practices for naming conventions for SharePoint sites.
In the three organizations I worked for, I have used very different naming conventions. So let me share them to illustrate Greg’s points.

My first intranet

We had central creation of sites, but not really a naming convention. We checked if there was already a site with that name, tried to keep names short, avoided spaces and special characters, and tried to bring some order in the chaos by adding business or brand abbreviations into the name, such as AP (AmbiPur), CT (Coffee & Tea) and some others.
It all worked, which is strange for such a large organization (120.000 employees at one time), but then SharePoint was not yet widely used, so we had a few hundred sites at most.

Good practice: central site creation; short, no spaces or special characters; somewhat meaningful for users
Bad practice: no formal naming convention (but best efforts)

My second intranet

This was an excellent example of bad practices before and after migration 😁
(Read more at: my second SharePoint intranet)

When I arrived at the scene, every business or corporate department had their own site collection. (Yes boys and girls, site collections were still all the rage then!)
Ownership of the site collections (including site collection administration permissions!) was with the business, and ICT was site collection admin for general support. And every site owner could create subsites. 😱
As most business owners did not really know about URL character limitations, we also experienced that documents could not be opened due to a too long URL, caused by endless “nesting” of subsites and sometimes very long site names.
Every business had a number of sub businesses, all in that same site collection. As soon as someone needed a site for Marketing, the business owner created one called Marketing under their own sub business, or created a subsite under Marketing if there was already a site with that name. So we ended up with several layers deep and various sites called Marketing (or even “…/Marketing/Marketing/…”) within one site collection.
You can imagine this was a bit messy. 😁

It was fun to support.
“Ellen, could you help me with the Marketing site please?”
“Which Marketing site?”
“Ours”
“Can you send me the link please, as we have four sites called Marketing in different parts of the site collection.”
“Oh really?”

Good practice: meaningful to users
Bad practice: no central site creation, no formal naming convention, spaces turning into “%20” in URLs, long URLs

After migration to SharePoint Online, every subsite became a stand-alone site, as recommended. We finally had central site creation and adopted a naming convention. This was simple: a number, starting with 00001 for the first site being migrated and then onwards. There was no other logic, nothing like “we reserve 00001 until 09999 for this business” so the order was the order of migration, then creation, which is completely irrelevant.
We changed the site name after creation to something more meaningful, but that number was still in the URL, providing no information scent whatsoever. I think it was rather cruel to users.

A site with a numeric URL

On site pages (see above) the number is not so bad, as the site name is shown in various places. Also across SharePoint you will see the site name, not the site URL.

But in documents you only have the number to remind you which site you are in, as seen in the screenshot below.

A document in a site with a numeric URL

Good practice: central site creation, formal naming convention
Bad practice: not meaningful to users

My third intranet

My last employer had central site creation and a solid naming convention when I arrived, and we never felt the need to change:

  • a letter to mark the purpose of the site, determining the template, e.g. a for archive, p for project. We later added g for groups (Teams-sites) and i for intranet sites.
  • a dash – to separate the letter from the rest
  • 3 letters to mark the part of the organization
  • 3 letters as abbreviation for the required name

So, that could be “p-ictprt” for a printer replacement project from ICT, or “c-fehsec” for a collaborative site for secretaries of the FEH unit.
After creation, we changed the site name to a more intuitive name.
It was short, it had an information scent, and it allowed us to filter and sort for housekeeping purposes. (In the Active Sites list in the SharePoint admin center)

The homepage of a site with a (somewhat) meaningful URL

Good practice: central site creation, formal naming convention, short, no spaces or special characters, meaningful for users, useful for maintenance and support
Bad practice: none (well, perhaps the dash in the URL but I think that added meaning and it is still short)

Remarks:

  1. Please note that the site’s icon displays the characters from the original URL. It will not change upon changing the site name. You may need to change the site icon to get rid of that “2” in the screenshot below.
The first character(s) of the original URL will be displayed

2. You may also want to think about a naming convention for Teams, see this article from Microsoft: https://learn.microsoft.com/en-us/microsoft-365/community/microsoft-teams-naming-importance
In my third organization, we used the same convention as for SharePoint sites but then with g as the first letter, and we changed the Teams name after creation into something meaningful.

3. Please sign up for SharePoint Maven’s Newsletter if you have not done so yet. Gregory knows a LOT and explains things very well.

Which naming conventions have you used?

Please let me know in the comments!

Colour your collaboration

When you open my clothes cupboard you will see , from left to right: red, orange pink, purple, blue, white, grey and black. That is right:  I organize my top garments (blouses, sweaters, jackets etc.) according to their colour.  

Colour sends a very strong message, it is almost the first thing you notice when you look at something. Colour can also be used to highlight differences and similarities between entities. 

So, I am very happy that it is now possible to change the colour of a folder in OneDrive or SharePoint. I think this can help with finding the content you are looking for. 

Gregory Zelfond shares a pretty complete how-to and a number of facts about coloured folders:
How to Color Code Folders in SharePoint and OneDrive | SharePoint Maven 

Colour can give a very fast indication of the contents of a folder, but no more than that. It should not be your only organizing principle: 

  • Some of your colleagues may have eyesight issues, so if they use a screenreader they may hear the name of the folder, but not the colour; they may be colour-blind (especially common for red/green colours), or they may suffer from cataracts, which may make it hard for them to distinguish colour nuances.  Light red and light orange have little contrast between them, as have light green and light teal, and perhaps light purple and light pink. 
  • Light can influence contrast, both the light in the room as the brightness of the screen. 
  • A colour may mean different things to different people, for instance a favourite (or hated) football club.  ⚽🏉
  • The colour sequence green-yellow-orange-red may confuse colleagues if used in a different context than meaning something like good, not so good, bad (or variations on that theme).
  • Colour is not specific enough to be a stand-alone attribute. You will still need a good folder name, and possibly a number and an emoji.  (I wrote about the use of emoji earlier
Light Green and light Teal may be difficult to distinguish from eachother
Light Orange and light Red do not differ that much
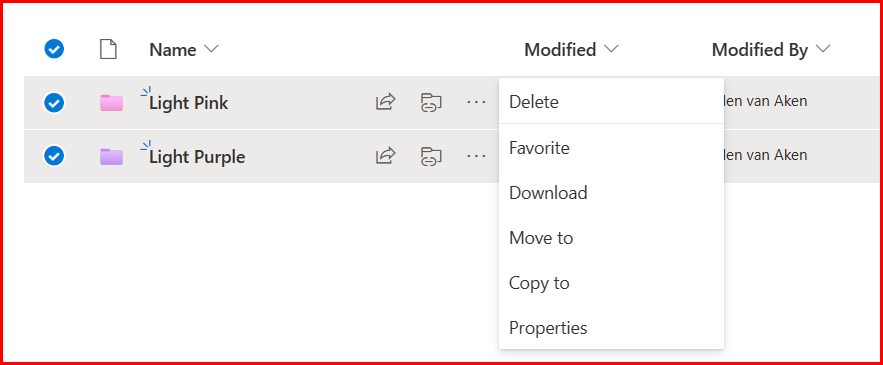
Light Pink and light Purple are quite close to one another

So, how can you use the colours to your best advantage? It depends….on the owner but mostly on the audience. 

OneDrive 

OneDrive is your own set of folders, so you can do whatever you like. You can create a rainbow, make all folders pink, use the favourite colour of the person you share a folder with, or apply the colour according to the app where the folder comes from. (Remember that Microsoft365 creates folders in your OneDrive when you use certain apps?)

This is the latter:

My OneDrive folder colours reflect the colour of the app they originated from (approximately).

So, whatever works for you.  

SharePoint team sites 

For SharePoint it is slightly different.
Firstly, your OneDrive is one document library, and you will see your folders immediately. In SharePoint you will need to open a document library first to see the folders.  
Secondly, team sites are for collaboration, so colours may not be your decision alone. You will generally know the people working in this site, and probably meet on a regular basis, so you need to discuss what colours and labels and sorting principles to use for different folders, so that everyone understands what the folders are about. If there is a lot of employee turnover, you could add instructions about the use of colour.  

SharePoint sites from Teams 

In general, this works like SharePoint collaboration sites with a few gotchas, e.g. you can not change the colour of the General folder, and in some views the colours will not be shown. Please see Greg’s post!
As with the stand-alone SharePoint site, you will want to discuss with your Team members which labels and colours you would like to use.  

SharePoint communication sites

As these have a large and generally unknown audience, this is more of an “information sending” site. It will be more difficult to use meaningful colours, as they may not be obvious to your diverse and dispersed employees. Some explanation may be needed. 
On the other hand, I do not think many employees will go into your folder structure. I expect they will mostly access documents through Search and links in News items and on pages.  

Still, there are few things you can do to make things easier:

You could use one colour per document library, so people know in which library they are, e.g. the Finance, HR or Communications library.  

If you have one library for all departments, you can use one colour per folder for each department.   

A coloured folder for each department publishing on the intranet.

It makes sense to agree on the distribution of colours over the departments in order to be as consistent as possible within your organization. So, all folders containing public Finance documents could be green, all folders containing public HR documents could be red, etc.  

Even if it may not be relevant to the entire audience, it can be useful for editors – so your HR officers know they have to upload in red folders. 

You can also give all folders in all public SharePoint sites your corporate colour, if available. (At his moment, you are limited to the 16 colours shown, so SaraLee’s red would be an option, but AkzoNobel’s dark blue would not.) That way people will know they are looking at corporate information. 
Does anyone know if you can create folders with another default colour than the yellow? I could not find that information.

Imaginary library for the Sara Lee intranet – every folder is created in the corporate colour by default.
(Please note I don’t know if this can be done at all, and Sara Lee as a company no longer exists)


So, it may be small and trivial feature for some, but it can help people knowing where they are, as long as you use it with some caution.  

A few more things to know:

Colour is not metadata so you cannot search, sort or filter on colour. So if you want all folders of a similar colour to be together, you may need to add letters, numbers or a prefix to the labels to get them together.  

There is no bulk-changing available for folder colours. So in case you want to change colour for multiple folders to the same colour, you have to do it one-by-one.

You can not make bulk edits for the colour.

Unfortunately, you cannot change the colour of a document library. Those libraries will always have that yellow/brown colour. It would be nice if you could change that, too!

Are you using this?

Are you using coloured folders right now, and if yes, how? Please let me know in the comments! Much has been written about it, but I am curious to know how much it is being used.

SharePoint Holmes and the Concealed Classic sites

Today I have a mysterious SharePoint issue myself. Fortunately, I know where to reach SharePoint Holmes so I can ask for help! 😉

< takes cloak, puts on detective cap >

The case

Over the years I have created lots of new sites in my tenant, in order to learn, to test stuff and to make screenshots for my posts. As my list of sites was pretty long, and as I am no longer using most of those sites, I decided to do some spring cleaning.

What better place to start than the SharePoint Admin center? So there I headed, to the list of Active sites. This includes the root site, an App Catalog, a site called “Group for answers in Viva Engage (I never created that myself!) and my External site, which should no longer exist but still is around. (More about that in another blog)

I checked each site and deleted it when possible. Oh, the joy of being alone in your tenant and not having to ask if an unused site can go! 😁 (Mind you, at other times it is not very practical to be the only user in your tenant.) I ended up with this manageable list of 13 sites:

My Active sites. The ones that are sort of “system-related” are highlighted.

To check all sites had really gone, I looked at my SharePoint landing page, under Followed sites.
I noticed a few sites that were not in my list of Active Sites, such as 3 varieties of “Team site”. They are all highlighted in the screenshot. What is happening here?

The investigation

I clicked on each of the highlighted sites to see what was the matter.

Sites I follow. The highlighted ones do not appear in my list of Active sites.

“Espana-Management Only” and the “Team site” on the same row appeared to have been deleted. Deletion of a site apparently does not delete the Follow, which is unpleasant.
I unfollowed those sites to keep my list clean.

This is what you see when you click a Followed site that has been deleted.

I opened the other sites. Hey, this was interesting.
“Quick Links”, “Project site” and “Sales Reporting” looked like subsites, judging from their URL. According to the information link in the SharePoint admin Active site list subsites are not listed in the Active sites, as are some other system sites. OK, that is a little annoying, but as we are not supposed to use subsites anymore, it also makes sense.

That leaves a few other sites.
I had already noticed that the 3 subsites are Classic sites. The “Team Site” and “ellenvanaken-teamsite” are also Classic sites.
But they are not in my list of Active sites!

I went back to the SharePoint Admin Center and filtered on “Classic sites”. Nope, they were not in the overview.

Filtering on “Classic sites” showed only three “system” sites

I was not exactly happy about this, as I want to be able to know which sites are in my tenant. Which other sites was I missing?

I checked the “Recent” in my SharePoint Landing page and noticed another Classic site that was not in my list – “Drinks business”. The URL did not look as if this was a subsite.

My list of recently visited sites contained another Classic site not in the list

I traced back all the subsites except the “Drinks business” to their parent sites: “Team Site” and “ellenvanaken-teamsite”. But those two parent sites were not in the list of Active sites!
I looked again at my list of Classic sites in the Active sites. There are two sites that start with “ellenvanaken” so might that be a clue that those were the original sites created when I set up my tenant? And that all sites were created from there?

I clicked on the link of the root site but got an error message.

My root site has an error, it does not have a homepage

But when I added “_layouts/15/viewlsts.aspx?view=15” to the root I could access the list of subsites. BINGO!

The solution

All my mysterious subsites were there.

The mysterious sites are subsites of the root site.

I had never realized that these were all subsites and therefore not displayed in the list of Active sites. In the early days (my tenant is from 2011, well before Modern SharePoint) I created each subsite from the ellenvanaken-teamsite. Later I created sites from the SharePoint landing page, which creates sites on the top level.

Well, I am not exactly happy with these messy results but at least I understand and know where all my sites are. I need to think about streamlining this clutter!

Conclusion

  1. If you have an older tenant you may still have Classic subsites hanging around, which are not visible in your list of Active sites in the SharePoint admin center. This is a potential risk, as they may live on forever, may contain outdated or incorrect content or people may still be working in an outdated environment. Although Classic sites still work, they are a tad cumbersome to work with, once you have become accustomed to current SharePoint!
    So you (or your Microsoft365 admin) may want to take a look at your root site and see what you can find underneath.
  2. You may want to inform your colleagues that deleted sites will still be shown in their Followed sites. A periodic reminder to go through all Followed sites (and to unfavourite all that have been deleted or they are no longer interested in) may help them to keep their lists manageable.

About SharePoint Holmes:
Part of my role was solving user issues. Sometimes they are so common that I had a standard response, but sometimes I needed to do some sleuthing to understand and solve it.
As many of my readers are in a similar position, I thought I’d introduce SharePoint Holmes, SharePoint investigator, who will go through a few cases while working out loud.

Please note: Due to an exciting, but rather time-consuming private project I am currently posting a bit less frequently than normally.

Combining SharePoint News from different sites

Sharing News posts from different sites in your site can help you create a good News experience for your audience, as you can share other people’s News without having to publish it yourself. It will also help other publishers by increasing their audience.

We used this extensively in my last role. Communications picked up interesting News posts from other parts in the organization to share that on the intranet Homepage. Reversely, local News publishers sometimes added corporate News posts to their own News.

It is easy to do but there are some things you may want to know.

1. There are three ways to add news posts from other sites to your News

a. One-time only: use the Add News Link

This way you will add one post to your News feed. The item will be displayed on the News web part as if it has been published in your site, it will have the name of your site on top of it.
This link will create a new page in your Site Pages Library, but upon clicking the title or image from the News web part, you will be taken to the original post in the original site. So, you are NOT making a copy, just a reference.

How to do this:

Go to the News web part, click New and select “News link” instead of News post

Screenshot of SharePoint site Homepage with the option to add a News Link.
How to add a link to another News post – use the highlighted option

Enter the link to the News post in the popup. The popup will automatically populate with image, title and description from the News post. You can adjust this where needed. Click “Post” at the bottom of the popup to publish.

You will see the current Page Details and can adjust them when needed.

After you click Post, the post will be added to your News web part as if it has been created by yourself.

Screenshot of SharePoint page with News web part after adding a News link to another news post.
The linked post is added like a regular News item

In the Site Pages Library, a new page will be added that contains only the Page Details, but not the complete item. That still lives in the original site.

Screenshot of page created in the Site Pages Library with just the Page Details.
In the Site Pages library you will get a new page with just the Page Details.

You can imagine that this works well for the occasional post that you want to add. Keep in mind that, when the original publisher deletes the post, your linked news item will give an error message. You may want to check out my post “SharePoint Holmes and the Missing Message” for the details.

TIP: This is a good way to republish an older post from your site. By adding the News Link it will show up as a new item, on top of the feed. This is much easier than fixing the position in the web part which is rather cumbersome.

b. Permanent: Add one or more News sources

In the News web part, by default the News from “this site” will show, but you can select other sites to show their News.

Go to the page with the News web part and click the Edit button. In the web part settings, you can choose “Select sites” and then check the sites you want to add to your News web part. Generally the sites you use frequently will be visible, but you can also search for them.

When you have selected the site you will immediately see their News mingled with your own, depending on Publish date.

Screenshot of how you select the sites that will be part of your News web part.
Upon selecting the sites you will see their News posts mixed with your own. They will have the name of their original site on top.

Unlike the “News Link” options, posts will show the name of their original site above the title, and no reference page will be created in your Site Pages Library.

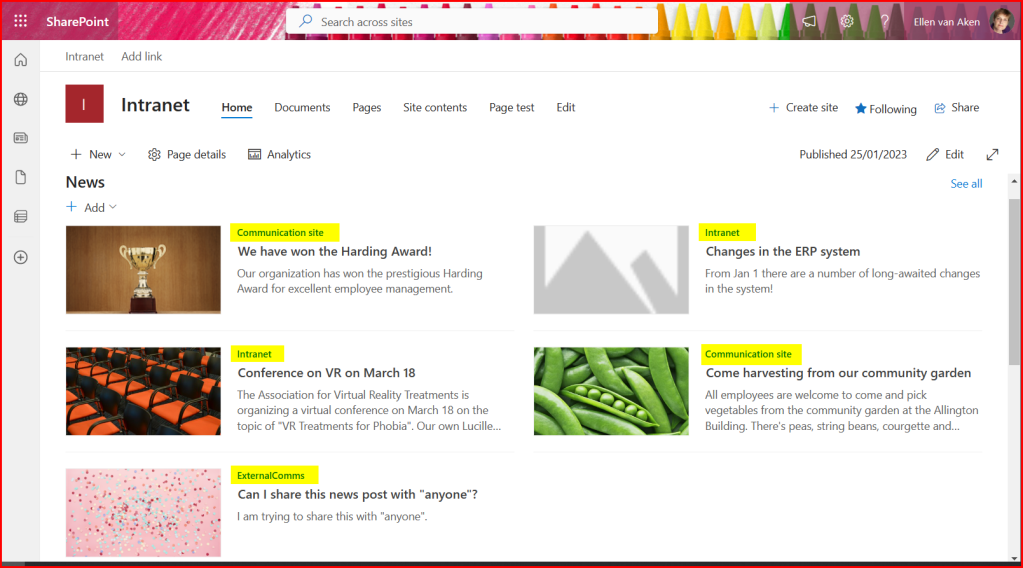
Screenshot of the News of the Intranet site homepage, with News of two other sites added as other sources.
This is the News feed of the Intranet site and two others

c. Permanent: all sites in the Hub

In case you have a number of sites that belong together, e.g. together they form the Intranet or the global HR information, you can create a Hub site to bring them all together with navigation, design, search, News etc.
Gregory Zelfond has a good explanation in this post, so please give that a read if Hubs are new to you: How to create Hub sites in SharePoint online.

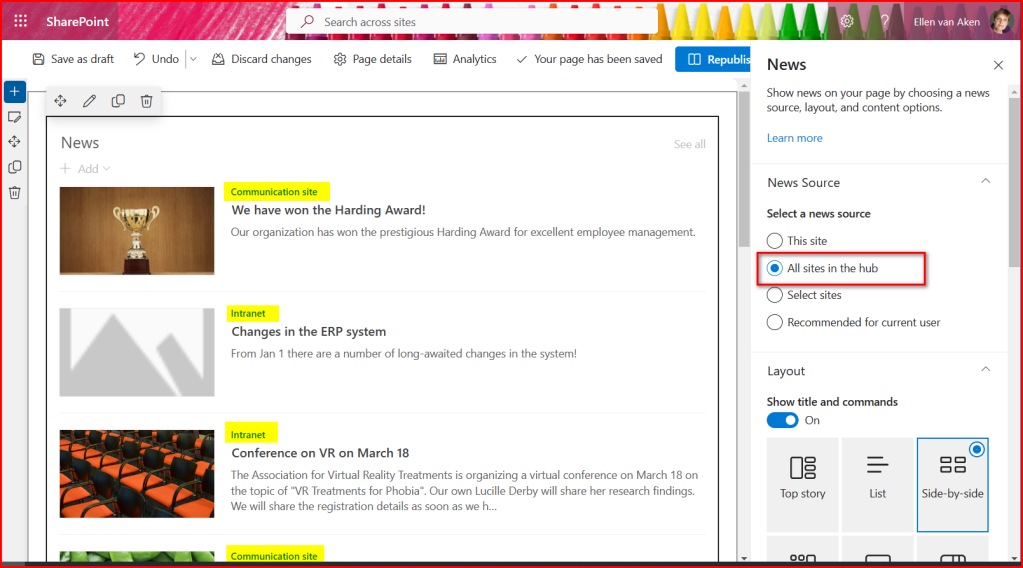
In this case, I have turned the Intranet site into a Hub site and associated 2 other sites with it. You see that each News post has the name of the site where it lives, on top. Again, no reference page is created.
(By the way, you also see that the post I used in my earlier blog now has lost its image, a clear sign that something is wrong!)

Screenshot of how to show the News of all sites from the Hub.
When you have created a Hub site and associated sites with the Hub, you will get the option to include all Hub sites in the News web part.

Screenshot of SharePoint news web part, with News from the 3 sites that are in the Hub.
You see the most recent News from the three sites that are part of the Hub.

2. You can add Team sites to the mix

All three options above can be done with both Team sites and Communication sites. In the screenshot below, I added a Team site to the Hub and the News post I created is incorporated.

Screenshot of SharePoint news web part, including a News post from a Team site.
Top left is the latest News post from a Team Site, that I associated with the Hub.

3. Mind permissions!

Make sure that any posts or sites that you include in your News web part or News Digest, is accessible for your audience. You may want to check with the site owners about the site’s permissions.

This is especially the case with Team sites which are likely to have more strict permissions than an organization-wide Communication site. Team sites may contain updates from important projects, that you may want to share, but make sure everyone can read them, otherwise you will have to create your own post.

4. You can create a digest from combined News

Regardless of where the News lives, you can turn all News posts that are in your web part into a News digest. In the screenshot below I left out the ERP item, where the original has been deleted, but you see that all others can be included in the News digest. But…please verify that everyone has access to all sites! (see 3.)

Screenshot of the News Digest creation page - all articles in your site can be included in your Digest.
All posts in your site can be included in your News Digest

5. You can add a News web part to more pages than one

You will most likely have the News web part on the Home page of your site, and you want that to be as interesting as possible.
But you can create as many News web parts in your site as you want or need, and configure them separately using option 1b. This allows you to keep track of other posts and pick out any interesting ones.

EXAMPLE 1: Suppose you are a multi-national organization, and each country has a News site for that country. You can create an extra (hidden) page with a Web part, select all the country sites as your Source, so you can keep track of what is going on in each country. You can then use the info from that web part to add News to your own site, or send a News Digest about what is happening in the various countries.
EXAMPLE 2: You can combine the News of different Project sites to keep track of their News (assuming you have permissions) and then make a selection as a Project Update digest.

These are just examples to give you an idea about “keeping track of News” without having to add it to your Homepage.

Below you will see a screenshot of how I added an extra page in the Intranet site, where I added News from two completely different sites than used earlier.

Screenshot of a different page in the Intranet site, with a News page that uses completely different sites than the News source.
A new page in the Intranet site with completely different News items. This can come in useful to keep track of other News.

Do you have any tips or experiences to add about Combining News? Please let me know!

Sharing SharePoint news to Yammer

Last week I wrote about “promoting” SharePoint news items to Yammer. Only when the header image lives in the Site Assets library, the image is displayed on Yammer.
(According to Susan Hanley, it is also displayed when the image is from Organizational Assets)

While I was doing the experiments, the following questions popped up:

  • Does this work in the same way for News posted in Team sites?
  • Is there any difference when you use a different browser?
  • Do news items display better in the Yammer apps?

Let’s find out, shall we?

1. Promoting news from a Team site

Until now, I have only shared news from Communication sites. For the sake of completeness, I recreated all news items from my earlier post in an existing Team site in my tenant.

During Promoting to Yammer, the preview does not show the image, nor does it show on Yammer. This was the case for all options.

You may also notice that the display is slightly different than when you promote from a Communications site: there is no space on the left hand side for an image.

No preview when you promote a news item to Yammer.
None of the options display an image

Now this Team site was created in January 2018 and is not a modern, group-enabled site so I tried it again with a freshly created Team site. Experiments are marked with T2. I have no “recent” option as this was a brand new site.

The preview shows an image in most cases, and on Yammer the behaviour is the same as for the Communication site as mentioned in my preceding post.

One of the previews
A new, group-enabled Team site behaves like a Communication site in this respect

Conclusion: Very modern (group-enabled) Team sites work like a Communications site when showing images on Yammer, but if you have a slightly older Team site, your News header images may not be displayed. You may want to keep this in mind when troubleshooting!

2. Do different browsers show the same result?

I generally work in Microsoft Edge, but when I opened the Yammer page in Mozilla Firefox and Google Chrome, there was no difference. I also tried Safari on my iPad, same results.
So this is not browser-dependent.

3. Yammer iOS apps

The experience in iOS was rather disappointing – no images are visible on iPad or iPhone, and for the Communication site, it showed just the link to the page. Not nice!

News from a Communication site. Only the link, not even the title!
New Team site – even the “Upload” option does not show an image

Conclusion

There’s quite a number of factors that influence the visibility of images on Yammer. Location of image, site type, site age, web or app, so there can be various reasons why the image from your News item is not displayed when shared on Yammer!

(I feel like creating a troubleshooting guide…)

Troubleshooting external access to SharePoint sites

We frequently get questions about external contacts that can not access SharePoint sites that they should have access to. Well, access and permissions are troublesome in all organizations, but access issues for external users can have additional causes and solutions, so here’s an overview to help Site Owners and support and admin people (such as myself) to identify and fix issues.

The site owner can check the first 4 items, and if that does not work, the support and admin folks may be able to help with 4, 5, 6 and 7.
It always helps to ask for a screenshot of the error messages, because you can already learn a lot from those.

It is wise to advise external users to log in with their browser in private or incognito mode, especially if they are from an organization that also has Microsoft365. It will avoid account mixups.
Thank you, former colleague Anita, for reminding me!

1. Does the user have access?

Let’s make sure that is not an issue, right? Check if the user is a Guest on Teams, or in case of a stand-alone SharePoint site, check if this person has permissions. Please be aware that external users only become visible in SharePoint permissions after they have been in the site once. So, if you can not find them in the Visitors or Members, it does not mean they have not been added.
In the screenshot below, I have already added someone with a Gmail account, but that person has not yet accessed the site. You may want to check item 2 first.

External users are only visible when they have accessed the site. Most annoying!

2. Has the user seen the invitation?

Warn your user that the invitation may end up in the Spam, Junk email, Unwanted items or whatever their non-regular mailbox is called. My invitation to a Gmail account was considered Spam, and my invitation to a Hotmail account also ended up in Junk mail. Messages in Gmail Spam are deleted after 30 days (see below) and in Hotmail Junk in 10 days, so your external contact may never have seen their invitation!

Invitations easily end up in Spam or Junk mail!

3. Has the user’s invitation expired?

External users need to do their first log in within 90 days, or their invitation expires.
In Classic team sites, the Site owner will see this in Site Settings > Access requests and invitations, under “Show History”. If it says “Expired” you may want to add the user again.
In Communication sites, check Gear wheel > Site Information > View all site settings > Access requests and invitations.
I could not find this option in other site types, and adding “/Access%20Requests/pendingreq.aspx?mbypass=1” to the root did not help either.

Here’s where you see who has been invited.

4. Does the user log in with the exact email address as per the invitation?

This is a frequent cause of problems. If you have added your externals with their Outlook or Hotmail account, they can generally access smoothly; if they have a Gmail, Yahoo or other free mail account you can warn them to expect issues, but if they have an email account for work, using their own domain name, you can not tell whether they can expect issues or not.
Externals should access with a Microsoft account. So if you give someone access with their Gmail account, they are prompted to create or use a Microsoft account. This is not always clear, I have found.

Gregory Zelfond has created a good overview of what the external user sees, and how they should proceed.

Another issue can be if the user has multiple emailadresses, and they access with the wrong one. We recently had an issue where the person had two very similar addresses. It was not clear to both the external and the site owner that he was logging in with @organization.eu, while access was given to @organization.nl ! It was clear from the error message, but you know how people can panic over error messages 🙂

SharePoint admins may use the follwing Microsoft info when trying to help the Site Owner:

Error when an external user accepts a SharePoint Online invitation by using another account

“Access Denied”, “You need permission to access this site”, or “User not found in the directory” errors in SharePoint Online and OneDrive for Business – scroll down to see some trouble-shooting for external users.

5. Is the site accessible for external users? (admin only)

Another reason for issues can be that the site is internal-only. In my organization sites are by default internal, but when external access is needed, we can open them up. When people request a new site and they specify that the audience contains external users, we make it accessible for externals from the start. Otherwise, it needs to be changed when the need is there, but site owners do not always know or remember that most sites are internal-only.
An admin can check the sharing settings in the SharePoint admin center.

This site is accessible for external users.

6. Is the external user listed as a Guest user in the Admin center? (admin only)

External users added to Teams will be visible straight away, but again, for stand-alone SharePoint site they need to have accessed the site first. If they are mentioned, they have access and have been able to access this or another site in your tenant.
If they are not visible, it does not necessarily mean they have not been added.

Guest users have their own list in the admin center

7. Has guest access expired automatically? (admin only)

This is a relatively new feature in the SharePoint admin center. You can limit the time that a guest has access, counting from the moment the guest has been given access. After the time has expired, the site admin receives an email and can extend the period.

You can set an automatic guess access expiry in the SharePoint admin center.

Personally I would welcome the option to set an expiry time after a certain period since the last log-in, but “from the moment you have been given access” does not make much sense to me. You can be in the middle of a project and then get kicked out because it has been 60 days since you were given access and the site admin has overlooked the email or forgotten to extend your access? Most annoying!

8. Has the other organization blocked access to external networks?

Sometimes the employer of your external guest does not allow access to external networks. You will not know, and it is up to the external guest to find out. There’s not much you can do about it, except giving the external person an account from your own organization.

Access to Teams

Although external users can have difficulty accessing a Team as well, access is much easier to check than in stand-alone SharePoint sites. Permissions to a Team are easier to check, and guest users to Teams are immediately visible in the Guest users in the admin portal, while SharePoint users only become visible when they have accessed the site once.

Did I miss anything?

Have you found a frequent issue with external users and how have you solved that? Would you know where to find the Access requests and invitations in modern non-communication sites? Or do you have another question or remark? Please add them to the comments!

New! The SharePoint app bar

“Hey, that’s weird, there’s only five News items on my SharePoint start page, not six,” I noticed the other day. When I looked a bit better at the page, I saw that something had been added on the left side of the page: the SharePoint app bar. At that moment, the only item that worked was the Home button, which led me to the SharePoint start page. Which, seeing that I already was on that page, was not a real advantage 😁. The other options showed an empty popup.

So, after asking around on Twitter, it turned out that more people had it and that they also saw empty popups, but Melissa Torres, the developer of this functionality at Microsoft, was so kind to confirm that it was populating, and indeed, the next day everything worked as it should.

Thank you, everyone who responded to my Tweet! 👇

Many people responded to my Tweet, including Melissa Torres from Microsoft.

What does it do?

Here’s a nice explainer video from Melissa Torres. (Thank you, Phil Worrell, for sharing that)

  • This is the Microsoft documentation.
  • The app bar is displayed on the SharePoint start page and all sites with modern pages. We have some “classic” sites at work (well…modern but with a classic homepage) and it does not show on the home page but when you navigate to a document library you see it.
  • The app bar allows you to quickly move between content and sites, so when you in one site and need to go to another, you do not necessarily have to go via the SharePoint start page.
  • There are 4 buttons, see Tweet above, top to bottom:
    • 🏠 Home, which takes you back to the SharePoint start page, or, if your organization has a Home site specified, to the global navigation.
    • 🌍 My Sites, which shows your frequently visited sites and your followed sites
    • 📰 My News, which shows you about 8 recent News items
    • 📄 My Files, which are recent documents you opened or worked on

Is the SharePoint app bar something to celebrate?

🌍 I was especially interested in My Sites. We do not have a SharePoint-based intranet yet, and we currently use SharePoint mainly for document management, generally in sites with limited permissions. We are slowly starting with communication sites and News, but the majority is “closed” sites. We have a custom web part showing “My Sites”, showing all sites you have access to, and I recently got some feedback that this was no longer displaying all sites. I wondered if this would solve that problem.

There is a Microsoft User Voice (what are these rumours I hear about closing that down?) asking for an out-of-the-box functionality that shows all sites you have access to, but that has been on the waiting list since 2017. Microsoft indicates that with a SharePoint intranet, there will be many sites everyone will have access to, so a list like that will be confusing rather than helpful. They suggest to use Following and looking at Recently visited sites, in order to create your own list. I will have some convincing to do, as the “All my Sites” is apparently popular functionality and now I need to tell people to “DIY”.
I know “Do It Yourself” is a Microsoft thing, but that does not necessarily resonate with everyone. 😉

So, in that way My Sites is a bit of a disappointment, as it does not show “All My Sites” but rather “Recently/Frequently visited” and “Followed sites”. I think this is definitely useful but we will have to help people to make this useful for them. I can see the benefits of a quick switch between sites.

🏠 The Home button is at present not really useful, as there is a SharePoint button in every site to take you back to the SharePoint start page. When we have a Home site, and a global navigation, this button will be more interesting.

Every site has a link that takes you back to the SharePoint homepage

📰 The My News option is nice, but to be honest, News is not THAT important that I need to be able to switch to it quickly when doing something else.

📄 My documents can be useful. I may need to find a certain document when working in a SharePoint site.

And this…

❓ I also wonder about what happened to plans for the SharePoint start page – about a year ago we were told that the left column would go away, but that never happened. I then thought that every “application landing page” would get the full list of Microsoft 365 apps, as we currently see on the Forms homepage, but that may also not be true.
So, perhaps the app bar will replace the left column? Oh well, we will see.

👍 All this may be a reason to get rid of classic pages!

👎 I am less happy with the fact that I can only see 5 news items on the start page.

What do you think?

SharePoint News or List?

One of my colleagues asked me to help her with setting up a “news functionality” in a communications site. She had the following requirements:

  • nice and inviting looking, with images
  • easy to add news for two or three publishers
  • readers have the option to set an email notification

SharePoint News?

SharePoint News is excellent of course, but it does not lend itself well to notifications, as we have seen before.

Sending a News digest then? No, because the site owner does not know whom to send it to. The content is not confidential and the site is accessible for all employees. The content is not of interest for all employees, so sending it to “All Employees” is not a good option either. Any other option would need her to maintain users – but she has kept the site open so she does not have to maintain anything more than some publishers.

Same issue with a Power Automate action – although that works better than a notification, she does not know whom to send it to. And asking all interested people to create a workflow themselves would create a ton of support questions. “Low-code” is still “too much code” for someone who is not interested in creating workflows.
BTW, I have used the “Send a customized email when a new file is added” template for some time, which sends a link to a recently published News item.

A list, then?

So I decided to check something else. Whatever happened to the good old Announcement list, that I have used so often in earlier roles? And had I not recently seen a new list template with a large image on display?
I decided to check if one of these could meet all requirements. Besides, it would provide a good reason to play with the new Lists app 🙂

Announcement list?

👎 There is no Announcement list template in a Communication site. I knew that the Communication site has fewer options, but I just forgot that this was also not available.

👍 When I started to work from a Custom List, I found that I could add a column to upload a picture. That must be new – I only remember the unpleasant option for “hyperlink or picture” that needs a link and a properly formatted image.

👍 The Custom List now also has a Gallery View option, which I used to create a News view, consisting of

  • Image (upload)
  • Title (single line of text)
  • Body (multiple lines of text)
  • Created (system)

👉 You will need to have the picture stored on your PC when you create a news item in this way. This means you can not use those lovely Stock Photo, Search on Web and Organizational Assets options you have when creating a News item, but I guess that for some people this may not be a problem.

👍 Looks nice when added to a page.

👍 When you click on an item from the page, you can read the item in full.

👎 Notifications work as expected, but instead of a thumbnail of the image, you see an unpleasant URL.

This is a notification email. The image does not display. The title (highlighted) is clickable and leads to the item.

Asset Manager list?

So, I decided to investigate that Asset Manager list template that I saw displayed in the new Lists app.
After a few tests, I removed all columns except:

  • Device Photo (which I renamed to Image)
  • Asset Tag (which in the List settings is called Title and cannot be renamed, single line of text)
  • Condition Notes (which is the only Multiple line of text field in the list). I renamed that to “Body” to be in line with the Announcements list.
  • I created a News view based on the Asset Gallery View and added that to the page

Well, it looked as if I just recreated that Custom List 🙂 It behaved in exactly the same way as the other one.

Other observations about Lists

When you click “Create an app” from the Site menu, it leads you to the old page with the different list templates. When you click “New List” from the Site Contents page you go to the new List apps creation page. You can also select “New App” which will lead you to the “old” lists.
I hope this will get streamlined over time as it can be a bit confusing.

The “oldfashioned” apps when you click the gear wheel.
Clicking “List” will give you the new Lists options, and using “App” will give you the “oldfashioned” lists.

You will see a bit of the body text if you use “Plain Text” in the body. If you use “Rich Text” or “Enhanced Rich Text”, it will not display. I personally like the Rich Text, as it gives you just a few more options, but I guess you will need to decide what is most important.

The body text in the Announcements list is Rich Text, while the body text in the Asset list is Plain Text.

When you click on an item from the page, you see a reasonably nice page to read the full news item.
If you click from the list, you get a much more unpleasant view, huddled to the right with a “Show more” link for the body text, even if the text is not that long.

If you click on the title of the item from the web part on the page, you will get this.
When you click on the item from the list itself, you get this. You have to click on “See more” even though there is not THAT much text.

Conclusion

All three options can facilitate creating news items easily, once someone has set up those lists and web parts.

All options together on one page.

SharePoint News is superior in options for making great pages, and also has more display options for the web part, but the other lists provide better options for notifications, although the notification email is very plain.

Owner’s decision

When the site owner saw the SharePoint News, and the News digest, she fell in love instantly and decided that maintaining a Distribution List (yikes, but one of the few options to send a News digest quickly to a large audience) for her “core audience” was worth the extra work. The “core audience” can then distribute it to others.

Case completed 🙂

VR image by Florian Pircher on Pixabay

Computer image by Sora Shimazaki on Pexels

Chairs image by Skitterphoto on Pexels

9 steps to clean up your OneDrive

CleanOndrive-headerAs mentioned in earlier posts, the majority of my colleagues have 2 GB of storage space in their OneDrive and some struggle to stay within those limits.

So, we are currently helping them with cleaning up and giving them some tips on how to keep within boundaries. It may be interesting for you as well!

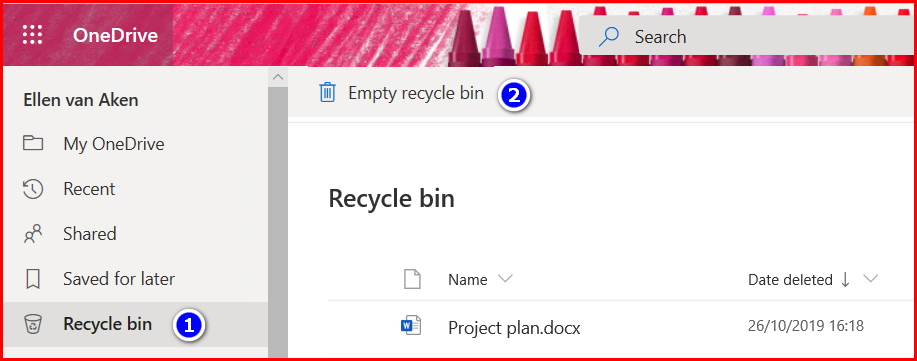
1. Empty the Recycle Bin

You may want to start with a clean slate, so let’s empty the Recycle Bin first. If, during cleaning, you accidentally delete too much, you will have fewer documents to search through for restoring. Also, emptying the recycle bin will free up space!

CleanOnDrive-recyclebin
Click “Recycle bin” on the left-hand side and then “Empty recycle bin”

2. Check the size of your OneDrive

It helps to know how much stuff you have, and how much you need to remove. So, click on the Gear wheel top right, click “OneDrive settings” and then select “More settings”. You will pass a useful screen with notification options – worth looking at but out of scope for this post.
Then click “Storage metrics”.

CleanOnDrive-size
Almost there!

On the next page you will see the lists in your OneDrive site collection (it is a SharePoint site collection, after all) and the amount of free space is shown top right.

Cleanondrive-storagesize
Look at the top right of the page to see how much free space is left.

3. Move shared documents to SharePoint or Teams

Sharing documents in OneDrive to collaborate on is great as long as the document is not final. Once it is final, please move it to a SharePoint site so it can be part of the team’s collective knowledge and make room in your OneDrive.
Do not hoard shared OneDrive documents – if you leave the organization your OneDrive will disappear with all its content. (After a period when your manager can access it.) We frequently get questions about lost shared documents as many people appear not to be aware of this. 😦

Do you plan on leaving the organization soon? Check out this post to see what to do – and start now.

So, check out which documents you share and with whom. Do you still need them at all? Do you still need to share them or are they ready to live elsewhere?

cleanOnDrive-shared
The overview of the documents I share with others – “Departmental docs” sounds like an excellent candidate to be reviewed and moved!

If you want to move the documents to SharePoint, go back to your “My One Drive” section, select them and then click “Move To” from the grey bar and select the SharePoint site where they will live. (Make sure you follow that site so it appears as one of your first choices). The documents will be deleted from your OneDrive in the process. (If you want to know how Copy To and Move To work, read my earlier post and also my post about the risks)

CleanOnDrive-moveto
Moving documents to a SharePoint site

If you have many documents to move, you may either want to do it in smaller batches or use Copy To and delete the documents after you have checked that they have all safely arrived at their SharePoint destination.

And if you no longer need the documents you share, you can just delete them.

4. Create or Request a SharePoint or Teams site

In case you have no location at your disposal, create or request a SharePoint site or a Team (which comes with a SharePoint site) so you can share documents with your project team or department.

5. Find the largest and the oldest documents

Unfortunately you will have to do this by folder, as you can not create views without folders. Although OneDrive is a SharePoint site, it misses some cool SharePoint functionality, such as the option to add metadata columns and create views, or the possibility to add templates. (note to self: submit to User Voice 🙂 )

The following paragraph has been added in May 2020:
* Please be aware that Microsoft365 adds folders to your OneDrive when you use certain applications. The “Attachments” folder to store email attachments is one, but Apps (contains Forms documents), Microsoft Teams Data, Microsoft Teams Chat files and Pictures can also contain a lot of documents that you may not be aware of.  Read my post on this topic*

Open a folder and click on the pull-down arrow next to the File size column and click on “Larger to smaller”.  Determine whether the largest files need to stay on your OneDrive. They may fit on your SharePoint or Teams site as well, so you can Move them there, or perhaps they can be deleted.

cleanondrive-sortlargest

Then sort for the oldest documents by clicking the pull-down arrow next to the Modified column and selecting “Older to newer”. Generally you will have accumulated quite a lot of documents in your career. When projects have been completed or interest has waned, you might as well move them to a SharePoint archive site, a records center (in that case they should have been moved there long ago!) or delete them.

6. Remove versions

This can make sense for very large documents that you have worked on intensively and that you want to keep. There may be several versions that take up space.
Select the document, click the … to the right of the name, and select “Version History” from the menu.

CleanOnDrive-remove version1
How to go to the version history

You will now see the versions.
If you are still working on the document, it may be safer to remove the oldest versions only.

CleanOnDrive-rremoveversion2
Click the version you want to remove and select “Delete Version”. Repeat if needed.

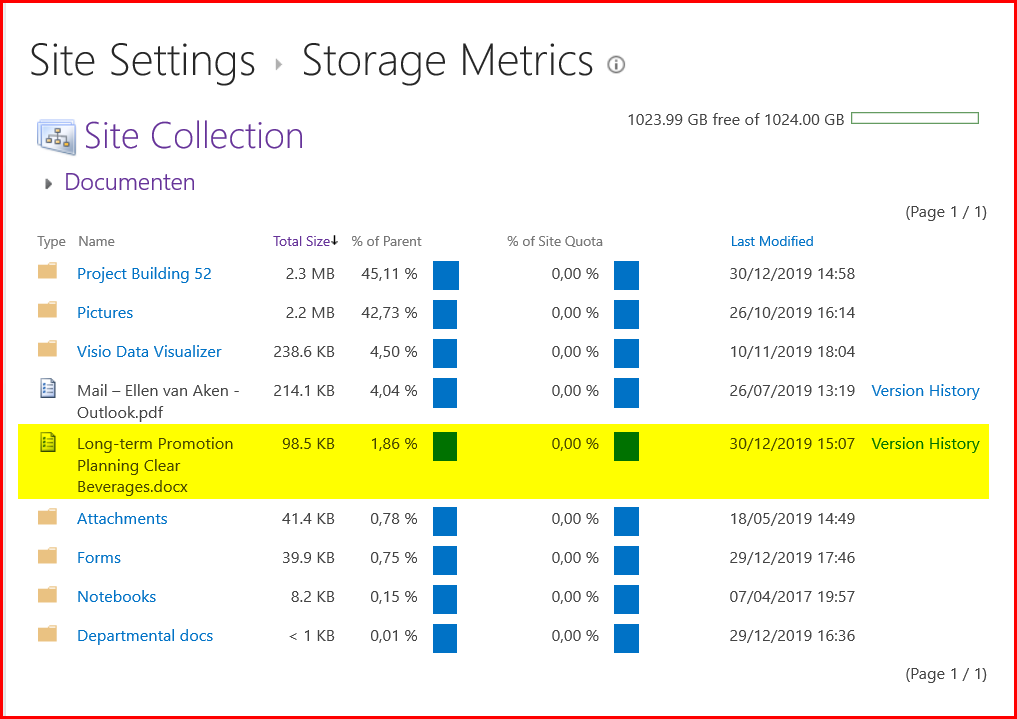
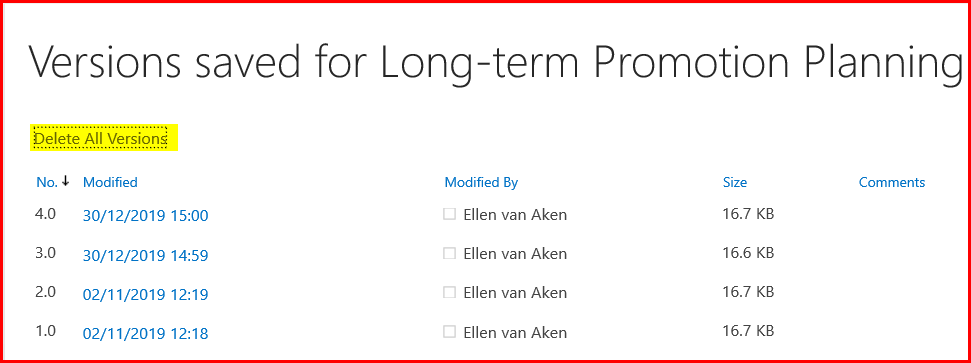
If your document is final, you can delete all versions and keep the latest version only. If there are many versions involved, the quickest route is to go to the Storage Metrics (see par. 2), click on “Documents” and drill down until you see the document.

Ondrive-versions3
This is a good way to remove all versions in one go.


Click “Version history” on the right of the document and then you will see an option to delete all versions in one go, leaving the last one.

ondrive-version4
This is the best way to delete all versions in one go.

7. Move private files to a personal location

While it is all too common to have a mix of private and organizational docs on your systems, your OneDrive is primarily meant for organizational stuff. Your private info should not be here, especially if it takes up valuable storage space.  You also do not want to lose it when you leave the organization, right? So, move your personal files and photo’s to your private OneDrive (now with extra-secure Personal Vault), iCloud, Google Drive, a USB stick or another place.

8. Empty the Recycle Bin and check storage

Hopefully this has helped you get below that 2 GB. If you, you need to repeat and be a little more strict this time around!

9. Repeat regularly

In order to stay below the limit, go through these steps again on a regular basis.

10. Bonus tip: Give your folders different colours

(Added December 2023)

If you have many folders and would like to see in one glance what is what, you can now give your folders different colours. How cool is that?

Greg Zelfond explains how to do it and what to look out for: https://sharepointmaven.com/how-to-color-code-folders-in-sharepoint-and-onedrive/

Do you have tips?

Do you have experience with colleagues whose OneDrive fills up quickly? Any suggestions that we can use?

7 ways to re-use texts in Office 365

Template headerDo you have to write the same text time and time again? For instance, an email confirming an appointment, a work instruction or an in-company invoice?

There are a few ways to do that.

1. Re-use and existing mail or document

I guess this feels as the easiest way. But how often have you forgotten to remove the “FW” when you forwarded that email, or forgot to change the salutation? And have you ever overwritten and saved a document that you wanted to keep intact?

Yeah, thought so 🙂

2. Store the text in Word or OneNote and copy-paste

You will have fewer accidents with this option, but now you may suffer from extensive but invisible make-up. This may cause your texts to have weird indents or line spacing when you have pasted them. The best way to strip off the code is to copy-paste to Notepad and then into the final message, but this is often forgotten and also not 100% guaranteed.
Besides, you will have to store that document or note and look for it whenever you need it.

3. Email template – text only

An easy way to manage your email texts is with an email template. That lives in Outlook so it is easily available when you need it – no need to search!
You can create as many templates as you want. You can store about 2100 characters in a template.

Outlook Client/Desktop:

  1. Open new email
  2. In the ribbon, top right, click the … and select “View Templates” from the popup

    Templates-OfficeClient
    Find your email templates in the Outlook Client
  3. You will see a few standard templates

    Templates-MyTemplates
    Standard email templates in the Outlook Client and the place to add a new one
  4. To create a new template, click on +Template
  5. Give your template a title (e.g. “Appointment confirmation”), add text and/or images and click “Save”

    Template-newtemplate
    Give your template a good name and add the text (and any embellishments)
  6. To use a template, click on the title and the text will be added to the email.

    Templates-Applied
    Adding the text to your email is very easy! 

Outlook Online – Current Outlook

  1. Open new email
  2. Bottom right, click the Templates icon
  3. Proceed with 3 as above

    Templates-OnlineOld
    The Templates icon is bottom right in Outlook Online – it’s highlighted in yellow! 

Outlook Online – The new Outlook

  1. Open new email
  2. Click the … at the bottom of the mail and select “My Templates” from the popup
  3. Proceed with 3 as above

    Templates-OnlineNew
    When you are using the New Outlook Online, you will need to click the …

4. Email template – text and make-up (Outlook Client)

If you need to use a template that contains both text and make-up, for instance for an email newsletter or other format, you can do this in Outlook Client/Desktop. It is a much more complicated process, so I would suggest to use this only if the look-and-feel is important and needs to be consistent.
BTW, you get a free email Newsletter when you use SharePoint News, of course, but for all those other occasions this option will be useful.

Microsoft has good instructions on how to create and save a template. It includes sending an email using the template as well.

5. Email signature

Before I discovered the templates, I used to store repetitive texts in an email signature. I have shared dial-in information for my personal Live Meeting (I think that was what web conferencing was called in those days 🙂 ), and shared help and support information in that way. Although I only use templates now, there may be cases where you prefer an email signature.

Outlook Client/Desktop

Microsoft has good instructions for creating signatures.  However the screenshots are a tad outdated. Now, you either use “Tell me what you want to do” or open a new email and click the Insert tab > Signature” to get to the signatures location.

You can have multiple signatures in the Outlook Client, but please be aware you can only add one per email, so always make sure your name and other information is included.

Templates-Clientsignature
How to add a signature in the Outlook Client

Outlook Online – current Outlook

  1. To add a signature, click the Gear Wheel in Outlook
  2. On the bottom of the popup, under “Your app settings” click “Mail”
  3. Under “Mail > Layout” on the left of the screen, click “Email signature”
  4. Add text and optional image, check the desired box if applicable, and click “Save”

    Template-signatureoldoutlook
    In current Outlook Online, this is where you add your signature
  5. To add a signature manually, open a new email, click … on top of the message and select “Insert signature”

Outlook Online – the New Outlook

  1. To add a signature, click the Gear Wheel in Outlook
  2. Click “View all Outlook Settings” on the bottom of the popup
  3. Select “Compose and Reply”

    Templates-NewOutlook-Signature
    In the new Outlook Online, this is where you add your signature 
  4. Add text and optional image, check the desired box if applicable, and click “Save”

Please note you can only have one signature in Outlook Online.

6.  Document template in SharePoint – general

You can add a template to a SharePoint document library for your team’s recurring documents. Think about reports or work instructions. You can do this for all Microsoft documents and you can have multiple templates in one library.
Anyone who can manage the document library can do this, so you will need at least Edit permissions.

I use and suggest this very often right now and wish it was also available in OneDrive!

  1. Create the document you want to use as a template and save it with a meaningful name – it may help to add “template” to the name
  2. Open the document library in question, click “New” and then “Add Template”

    template-SPNew
    Where to add the template
  3. Upload the template
  4. Check that it displays correctly.

    Templates-SPAdded
    Giving a good name is important – you will want to notice the template easily
  5. To create a new document in the template, click “New” in the Document Library and select the template. A new instance of the template will open.
  6. To move position of the template, or to make changes to the template itself, click “New” > “Edit New menu”. A popup will appear on the right-hand side of the page.
    Hover over the document to be removed, repositioned or edited, click the three dots that appear to the right of the name and you will get a popup with options.

    Template-SPeditmenu
    Editing, deleting or changing the position of the template is very easily done 

7. Document template in SharePoint – custom

It is also possible to add a custom template document as the default document. I can imagine this may have its uses when you want to use it for very formal documents, such as contracts or financial reporting. Those documents will have a strict format that needs to be adhered to.
In that case you can do that via the Library Settings > Advanced Settings. Microsoft describes the steps here. Although they mention SharePoint Online, they talk about “email-enabling” the library, which has been deprecated for several years by now, so I wonder when this has been last reviewed. (Of course I gave feedback to this article)

This needs Site Owner permissions but may also be done by an admin or IT.

Have I forgotten an option? Please let me know!

Image by Cohdra on Morguefile.com