After the recent updates for publishing SharePoint News and creating a Digest, I also wanted to create an update for readers. This post follows on my post “10 things to know as a SharePoint News reader“. We keep on learning!
1. There are various places where you can find your saved-for-later posts.
When you do not have the time to read a news post right now, or when you want to keep it for later, you can save it for later. Click the icon. But where to find those saved items, when you are finally in bus or train or on your sofa? There are at least 5 places where you can find it:
Click the “tab” icon to save a news post for later
2. You can filter for News posts in the Search results
Type in a search word in the box on top (make sure you are in the correct “scope”: all M365, this site, this hub, this library).
On the results page you will see a number of “verticals”, or content types, such as Files, Sites and News. You will easily recognize the News posts in the overview by their icon: a folded newspaper, but you can also click on the News tab and see only News.
Clicking on the News “vertical” will show you just the News posts from the search results
3. Please warn the author when you see a post with a greyish thumbnail and no header image
It will probably look like this:
If a News item looks like this, there’s something wrong.
The header image may be deleted, moved or you do not have access to it. This can also be a Linked Post that has been deleted. The image will disappear after a few days. This will be the case when, after clicking on the post, you get a message “Hmmm…can’t reach this page”. See my post “SharePoint Holmes and the Missing Message“. You may want to warn the author that there is no thumbnail visible and ask them to check.
A grey image is always an error. If they have deliberately not used an image, the post will look different on the News page:
If a News post looks like this, the publisher has chosen to use the Plain template (without image)
4. You can unsubscribe from News you may have missed
“News you may have missed” is an email that shows you News that may be interesting for you, based on the Microsoft Graph, but that you have not read yet. This is a controversial functionality and I wrote about it earlier. This is an organizational setting that we could not turn off fast enough in my last role 😁, but in case you do not like it and your Microsoft365 administrator has not disabled it, you can do so yourself.
Go to the SharePoint landing page, click the gear wheel top right and select “Email notification settings”. On the next page, uncheck the button at the bottom of the list. It should look like the screenshot below. You setting will be saved automatically.
Turn this button off if you do not want to receive the “News you may have missed” emails
Please let me know if you know more “gotcha’s” for SharePoint News readers!
I recently got the following question: “Is it possible to get a text preview from News in a Carousel? This would be for those users who want to see more than just the title, but without clicking.”
I love this type of questions, so I decided to find out.
Carousels and me
I am not a big fan of Carousels. I can imagine the large images look nice, but I have read too many negatives. The quick why? This website: https://shouldiuseacarousel.com/
They do not provide good usability, for instance:
People tend to overlook them.
Most people do not spend enough time on a page to see all the items in the Carousel, so generally only 1 or 2 posts are being seen by most visitors.
The buttons to move them forward are too small and not easily clickable for people who have problems with their motoric skills.
Screenreaders cannot deal with them.
At the bottom of this post I have added a number of articles.
When Microsoft introduced a Carousel for SharePoint News, I honestly thought that they had solved the issue because why would they, who are pretty big on usability and accessibility, introduce functionality that would not have a good usability? But when I saw the product, I noticed that it just looked like all others. I could not find a usability review by anyone. (Please let me know if you know one).
BTW, I really love the below image (from Microsoft’s Inclusive Design pages) to show that inclusivity issues are more common than you might think. Not everyone has a permanent issue, but many people have temporary or situational issues. A small part of the population is blind, but many people have eyesight issues, including myself before my cataract operations – I had problems with colour contrasts and very small print, for instance.
The Microsoft Inclusive design Persona spectrum. I LOVE this.
But I digress! The question was: Is it possible to show a preview of the post, and not just the title, in a Carousel?
I checked a number of items:
1. News web part
I started out with changing my Intranet site’s News web part to Carousel. This is what the Carousel looks like in Edit Mode:
Edit mode for the News web part, when selecting Carousel
You can determine the number of posts to show (recommended is max. 5, but you can go to 8)
You can change to the next item automatically (not recommended) and set the interval for change.
You can show a call to action. We will come back to that later.
So, there is no option in the Carousel itself to make extra information, such as the Description field, visible. On to the next option.
2. News post
The next step was to open one of the posts and see if there is any option for an extra text, image description or anything that could be shown in the Carousel.
In the web part menu, you can add “Text above title” where you can add 40 characters of text, so I did. It is immediately shown. I also added an Alt Text for the image.
Edit mode for the news post, with options
3. Page Details
Then I looked at the Page Details, changed the Description into a snappy summary and added a Call to Action with a link to a Form. More on the Description field in this post.
Publishing the end result
So, I have 4 possible options to display:
Description
Text above title
Alt text for the image
Call to Action
I republished the page and looked eagerly which of the items would manifest itself on the News page.
Nothing. Zero. Zilch. It still just showed the title. Hovering over any element (image, title) did not show anything. 😥
The Carousel after adding all the extra’s and republishing. Sadly, none of the additional items are visible.
The Description is only visible in the web part layouts Top Story, List and Side-by-Side.
“Text above title” is only visible on the news post itself.
Alt text for the image is only available on the news post itself, in the Immersive Reader
The Call-to-Action does not show up, and the text and link in the Page Details are deleted after publication, so I guess this does not work. I added a Call-to-Action web part, hoping that it perhaps needed this nearby, but nothing. I will look into that; I remember a discussion on Twitter but forgot between whom.
Conclusion
I think it is currently NOT possible to show a preview, neither by default, nor by hovering over an element. If any of my readers have found a way to do it, please let me know!
Suggestions
At this moment I can only suggest using another web part layout, such as Top Story, List or Side-by-Side. Use the Description text to provide a good summary of the article. This is better for usability and accessibility and would allow users to see what the story is about, so they know whether it is worth their while to click.
Top Story layout. This shows the post’s Title and Description.
There are many tools in use for asking 360 degree feedback. If you have one at your organization, which works well, this post is not for you. 🙂
If your organization uses a protected Word form, please pay attention, as this can be done more efficiently!
The reasons for protected Word documents has never been clear to me; it may have to do with avoiding that people change the document accidentally or on purpose. In any case, I do not like it, as I think it is an inefficient way of doing things and, even more importantly, a password-protected document can not be opened by someone who has a F3-license!
So, when someone asked for help because he could not open the document in Word Online, I immediately thought of replacing it with a Form.
The Form can be made into a template and shared across the organization.
As the information collected is for your eyes only, you can personalize the Form if you see fit – in appearance, in introductory text, or even questions. (Although I would be careful with the latter)
You can automatically collect names & email addresses of all invited colleagues, without them having to type it. You can also do it anonymously if that feels better.
All feedback is automatically collected in one Excel file without you having to cut and paste from various Word documents.
The Word document
It contains the following:
Organization logo
Field to enter the name of the owner of the file (who is looking for feedback)
Field to enter the name of the feedback-giver (so it is not anonymous)
Date
Q1: What does this employee do well? What is (s)he good at?
Q2: What would you like to tell this empoyee? What should they think about? (Good advice, suggestions)
Q3: What can be improved? Is there any behaviour that they might want to change?
Q4: Additional feedback (optional)
The Form
I rebuilt the Form and ended up with just the 4 questions. I aso rephrased the questions to be more personal. (What does this employee do well > What do you think I do well?)
The rest is built into the Form. (OK, I admit that I forgot to add the logo in the screenshot below)
A new place to create a template; it was under Send, then it was a separate person icon, now it is under …
You create the link to the template here
You will get a link, which you can share on a SharePoint page, with some instructions, or someplace else. Make sure that there are copies somewhere, in case the owner leaves the organization!
Template instructions, for the user
Click on the link to the feedback template
On top of the page, click “Duplicate It”
Creating the individual Form (with logo this time!) from a template
You will now have a copy in your list of Forms.
Please click on the title and delete the word “Copy”
Check and adjust the introduction text
Click on the … top right and check the Settings. Do you collect names and email addresses (or do you prefer anonymous feedback?) and do you have a nice personalized “thank-you text”? Adjust when needed.
Your 360-degree feedback request is now ready to be shared with the selected colleagues.
(I am assuming that the user knows how to work with Forms otherwise, such as sharing the link and collecting the responses)
Do you want to try it?
I have made the Form available for you. As it is now available for anyone, I am no longer collecting email and names as I would when using an internal Form. But please…
The roles in Teams meetings, especially for the Organizer, are changing constantly. To see who can do what, please check out my post “The importance of being Organizer” and look at/download the “who can do what” sheet.
Our health care organization has gone a step further in using Teams.
Our dedicated (non-Microsoft) software for helping our clients online was just (=before COVID-19) being rolled out with various amounts of success. Some people loved it, and saw the benefits for both client and therapist (no need to travel for both parties, client being in their own environment, connection with the client registration systems), others said they needed the face-to-face meetings to be able to provide real help.
Now that we have had to move all therapy online, we found a functionality gap in the software: the option to use this for group sessions, either multiple therapists seeing one client, or sessions with one therapist and several clients.
After discussing various options we agreed to make Teams temporarily available for this purpose, so our therapists can finalise the existing group therapies, and perhaps even start new ones.
Microsoft Teams is a business tool and meant for collaboration in an organisational context. Mental health therapy is something completely different, so we had to create special instructions to make sure that our therapists are in control of the meeting. But also in other situations, such as meetings with many attendees (You can have up to 350 people in a Teams meeting!) knowing these control options can be useful:
1. Create the invitation from Outlook
Create the invitation from Outlook Online, NOT from Teams.
Add the relevant title, attendees, date and time, and message info.
Make sure you make this a Teams meeting.
Before sending, click the “Response Options” top right and select “Hide attendee list”. Optionally, you can also UNselect “Allow forwarding” to avoid uninvited people getting into your group session.
As soon as you have made a choice, the popup will go away, so it is a good idea to check if you have made the right selections.
Click Send.
Make sure to hide the attendee list, so clients do not see eachother’s email addresses. Also, do not forget to toggle the Teams meeting button if you have not yet made all meetings a Teams meeting!
Alternatively you can add the attendees to the BCC field, but as this field is not visible by default, it means people will have to change their Outlook settings. Using “Hide attendee list” is easier. Those who use the Outlook desktop (in our case: hardly any therapist has this) can use the BCC field or add the users as a Resource. This is a bit of a weird workaround in my opinion. Just use Outlook Online, it is great!
Now, if the invitation is sent, the attendees will see only their own name in the invitation, which is a privacy requirement in this situation. If you have also disabled the “Forward invitation” option, this will be displayed on the invitation, depending on the recipient’s email programme.
2. Manage meeting options
By default, everyone can go into the meeting freely, and everyone can present. (Update 15-04-2020: the default is now that externals will have to wait in the lobby. Good idea.) While this is the easiest setting for regular business purposes, it is not always the best option. We have heard about Teams meetings in education, where pupils muted the teacher and/or changed his/her role into attendee or even threw each other out of the meeting altogether!
So, in our situation it may be best to prevent any issues and provide a little more control to the therapist(s). The following can only be done by the person who has organised the meeting.
Open the meeting in your Teams calendar
Click the Meeting Options, to the right of the time zones OR on the bottom of the invitation underneath the link to the meeting. (see the Outlook screenshot below)
I prefer this button to adjust meeting options.
Change the lobby settings to: “People in my organization” (so you can discuss with your colleague before you allow everyone into the meeting)
Change the presenter settings to anything except Everyone. “People in my organization” is a good one. This will make all others an attendee, and they can only use audio, video and chat. (Roles description by Microsoft)
Update Feb. 7, 2021: Determine if you want people to be able to unmute. By default everyone can talk, but you could start the meeting in silence, and then allow people to speak up later in the meeting.
Update Feb 7, 2021: Decide if attendees are allowed to chat (default: yes), or not, or in-meeting only. (=when at least 2 people are in the meeting)
Click Save.
I would suggest the above meeting options for a group session with our (psychotherapy) clients.
This can also be done from the invitation in Outlook:
At the bottom you will find the meeting options. Please note you are reminded that you have hidden the list of attendees.
3. Change meeting options during the meeting (added Feb 7, 2021)
In case you would like to change presenters or other options during the meeting, the organizer can also adjust the meeting options from the control bar by clicking the … (1) and selecting “Meeting Options” (2):
The meeting options are a bit hidden behind the menu for this screenshot, but normally, when you click “Meeting Options from the control bar, the full menu becomes visible.
4. Manage attendees during the meeting
During the meeting the organizer and presenters also have some other controls via the Participants icon.
See who is present in the meeting and control their microphone, roles and other things.
You will now see the list of participants.
The options to manage attendees. These options are available for organizer and presenters.
You can now “Mute all” or manage individual participants by clicking on the … behind their name and
Mute someone individually, e.g. when they provide background noise.
Pin, to make them visible all the time, for you only.
Spotlight, to make the visible all the time, for everyone. This is useful if someone gives a speech.
Make an attendee or, when they are an attendee, you can make them a presenter.
Remove them from the meeting.
Steven Collier has made a nice video where he explains “Teams-bombing” and the prevention thereof with an example of a rebellious student.
5. Avoid “private viewing” of your presentation
If you are sharing via PowerPoint, by default people are allowed to click through at their own pace.
This is what an attendee sees on-screen, when you share a PowerPoint without switching off the private viewing.
It may be a good idea to switch that off, especially if your presentation has a carefully designed build-up. After selecting to share “PowerPoint” and your presentation, you will see some controls in the meeting control bar. Click on the eye icon to turn off private viewing. It looks like this:
Click on the eye to allow or stop (this screenshot) clicking through the presentation.
6. End the meeting
If you want to make sure that the conversation stops when the meeting ends, you can click the arrow next to the “Leave” button and click “End meeting”, which will stop all audio and video. The chat will still be accessible for people in the organization and can still be used, if you have enabled chat this way.
End the meeting. This option is only available for the organizer.
Conclusion
The default settings of Teams may be a little too “flexible” for non-business purposes. Fortunately there are many options to have more control.
Mind you, you as my regular audience will probably know all of this, but our therapists generally know only the basics of Office365 (oh, I need to say Microsoft365 now, right?) and they need detailed instructions, as they have to schedule these sessions themselves.
Next time, I will discuss the user interface for various email programmes. I have had a ton of questions about what clients see and I want to make sure I can answer that properly.
We had updated our instructions for working from home, either with work laptop, work smartphone, private computer or private smartphone, because everyone has to work from home, where possible, until further notice.
We had created and tested instructions for Teams chat, calls, videocalls and online meetings, internally and externally, because of course many meetings would shift to online.
Our support team was ready to take calls and take over people’s laptops from home, our netwerk had been tested, and everyone knew we would have a lot of questions starting Monday.
We are a mental health care organization, and our psychiatrists, psychologists, therapists, nurses and care-takers have chosen their jobs because they want to work with people, not with computers. We knew they would have many questions when they suddenly had to do intakes and consulting sessions online, or organize a Teams meeting for their daily handover meeting.
So, we were prepared!
…Or were we?
However, we were not prepared for the lack of digital skills of some of our work force, some of whom did not know how to download an app from the app store, how to open the Office365 start page (it is actually a button in the Start Menu), or that they have to slide their web cam cover open in order to show their face to their colleagues during a videocall 😮
We were also not prepared for the number of people that attempted to download the Teams app, while they have the F1 license (which is for web apps only). But can you blame people that they click the most visible button, especially at times of hurry or digital stress?
We have all voted in User Voice – please vote as well and help us get that “Get the Windows app” off the start page – or at least make it less dominant!
Most of our users can not download the Windows app – they can only use the web app. But that “Get the Windows app” button is so dominant, that everyone clicks it.
And it was a complete surprise to get an overwhelming number of Team site requests. We thought everyone had been informed well enough that a Team site is not a prerequisite for organizing a Teams meeting. But my colleague and I were flooded by requests. Even after filtering out exact requirements we still had to create tons of Team sites (we create them centrally to have at least some control over the names of Groups) and improvised a number of “Team site for owners” and “Team site for members” webinar sessions to quickly show all those new users how Teams can help them get their work done in an effective way.
Some of my colleagues were not prepared to have their whole family at home, as schools have closed as well, and everyone needed a place where they can work or learn.
This resulted in some of my colleagues preferring to do part of their work in the evenings, when children are in bed, the network is used less, and a proper seat and table does not need fighting over. Which led to a meeting in the evening and we will do some webinars in the evening next week, because many colleagues are in the same situation.
On the plus side
Although this is not a fun situation to be in, it has a few advantages:
Suddenly all colleagues had to upgrade their digital skills, whether they wanted or not. We try to help them as much as possible, but it is ultimately up to them. For many of them it turned out to be just a small hurdle and they are becoming regular users now.
Teams (which until now we created very sparingly) is now a standard product for the organization, which means we can move our strategy forward much faster than anticipated.
Our online tools for therapy (non-Microsoft) are being rolled out much faster than anticipated.
All colleagues feel much more “together” now that we have to face this crisis.
It is interesting to see that we can improvise so well when needed.
And me?
For me, the whole situation has not made that much difference yet. Apart from staying at home for at least 23 hours of the day, it has just been a week working from home, like I do normally one day a week. But you may want to ask my husband who suddenly has a wife at home all the time 😉
But who knows how long this will last…and not being able to go outside much or visit family or friends may become rather a strain.
I am still puzzled by all those Team site requests though. The group chat may be a replacement of all the daily talk you do if you are sitting in an office. Well, we are already thinking about doing a survey to see if and how Teams has helped in these “interesting times”…
With Halloween upon us, here are a couple of fright-inducing wishes for people that manage or support your Office365-based intranet or digitalworkplace. Courtesy of your “Wicked Witch of the Dutch” 🙂
This post has been inspired by Comms Curses by Helen Reynolds.
So, be aware if someone throws one of these spells on you.
Computer and network curses
May your bandwidth be forever restricted
My your wifi drop when you are presenting your new intranet to your Board of Management
May your migrations be throttled due to too much content being migrated at the same time
May your computer need a mandatory reboot in the middle of a global webinar that you are hosting This happened to me once. Thanks to whoever threw that spell on me!
Office 365 Functionality curses
Office 365 has tons of good, well-designed functionalities that you take for granted. So what if someone curses you with sudden changes?
May all your embedded videos start autoplaying at the highest volume when you open the page
May Search and Delve forget their security trimming As if their normal behaviour is not puzzling enough!
May all pictures on your SharePoint modern pages be deleted
May all your Flows stop working without warning
May all SharePoint document and list item permissions be unique
Organizational curses
An organizational change can have an enormous impact on your digital workplace. Trust me, I have been there. So you can create a lot of panic and work when you throw an organizational curse someone’s way:
May your intranet need to merge with that of the organization that has just bought your organization Are you already looking forward to the discussions about who has got the best one?
May part of your organization be divested, making it necessary to move that part of your Office365 content to another tenant This happened at my earlier employer, and I tried to write about the project, but it was so much and so complicated that I stopped
May your CEO suddenly come up with the suggestion to replace Office365 with the platform of this nice small vendor that (s)he just met at this event Good luck with talking him or her out of that brilliant idea!
May your intranet owner insist on home page customizations I wrote The Curse of Customization about this
May all your SharePoint site owners leave at the same time without providing successors Divestitures or large reorganizations can do that
May your organization decide to cut your MVP-improvement budget, forcing you to stay at an imperfect and slowly declining level for the next few years
May your Office365 support and/or tenant administration be outsourced I wrote Ouch-Sourcing about this – and I may write more
May your introduction video, meant for employees only, go viral after being uploaded without hiding or security and being included in my Video Collection
🙂
Microsoft curses
The havoc that Microsoft brings upon us now and then is reality rather than imagined 😉 but just in case you want to scare your enemy, let’s go:
May Microsoft introduce new standard functionality that you have just custom-developed yourself My previous organization had just spend a lot of time and money on a custom-built News solution, when Microsoft announced…News!
May the latest update turn your MVP into a NVP
May Microsoft roll out unwanted changes without warning or without the option to undo them.
May all your employees suddenly be able to buy their own licenses. Oh wait… 🙂 You can still vote on UserVoice to block this!
What to do when you have been hit by a curse?
I am working on the counter-spells but until now I have not been very successful…
Whoohahahahahahahahahahaha!
Pixel witch image courtesy of saphatthachat at FreeDigitalPhotos.net
Noise image courtesy of imagerymajestic at FreeDigitalPhotos.net
Voodoo doll image courtesy of Kheat at FreeDigitalPhotos.net
News image courtesy of rawpixel.com on pexels.com
Witch with pumkin image courtesty of Lekkyjustdoit on FreeDigitalPhotos.net
In my previous organization I often received complaints about what was shown in Delve. Exactly like the results you see in Search, what you see is what you have access to, and for many people this was hard to understand. Every time the Search or Delve results got questioned (“Search is broken!”) I could prove that this person saw this search result or this document card on Delve because they had access to it, whether that was desired or not. I loved this demonstration of the importance of proper permissions management 🙂
In Search, any mismanagement of permissions only becomes apparent when you are actively searching, but in Delve “content finds YOU” so it is ruthlessly in-your-face.
Joanne Klein has written a great post on Delve and how to disable it – entirely or partially.
In my current organization we have not promoted it very much yet, so when we recently changed a number of licenses from E1 to F1 and then to F3, we did not consider the fact that the Delve app would no longer be visible for the F3-users, a big risk.
However, we received a question from someone who uses the people-part for looking up managers and direct reports, so I found three alternative options.
1. Via “My Office Profile”
After all, the Delve “Me” page is your profile page, so that should be available for every user. Just click on your picture top right and select “My Office profile”.
“My Office profile” leads to your Delve “Me” page
2. Via the URL
Delve is available for users if they are logged in to Office365 and use the following URL: https://<datacenterlocation>.delve.office.com.
For our organization and my own tenant this is https://eur.delve.office.com and for a tenant in the UK this would be https://gbr.delve.office.com
I do not have access to any other tenants so I can not give you the “code” for other data centers but please take a look at your Delve to see what it is. It may come in useful one day.
My Delve page. The URL will resolve itself to yours as soon as you enter the URL.
3. Via Outlook (people data only)
Like Delve, Outlook also uses Active Directory so all people data is also in Outlook.
Users with an F1-license use the Outlook On The Web experience and they can see people’s managers and direct reports in the people card.
When you hover over a person’s name (searched or from an email) you will first see the small card, which expands into a larger card. When you click “Show more” you will see a ton of info, including the “Organisation” which will allow you to see a person’s manager and direct reports. In my case the tab is greyed-out because I am the only one in my tenant and have not set up AD.
Lots of info available if you click “Show more” on the extended hover card. The “Organization” tab will show you direct reports and managers.
What’s next for Delve?
My colleague was happy with the alternatives provided.
But when I found this all out I wondered if Delve may be going away as a separate workload as the functionality is now embedded in other, more frequently used, tools. Would anyone know?
Just as I was writing this post, I found this post from John Liu (in response to a Tweet about Delve from Joanne Klein) who is also wondering about the future of Delve – he has a good idea for its development.
So let’s wait and see if Delve keeps being a separate app, but with added functionality, or will be absorbed into relevant other workloads in Office365…
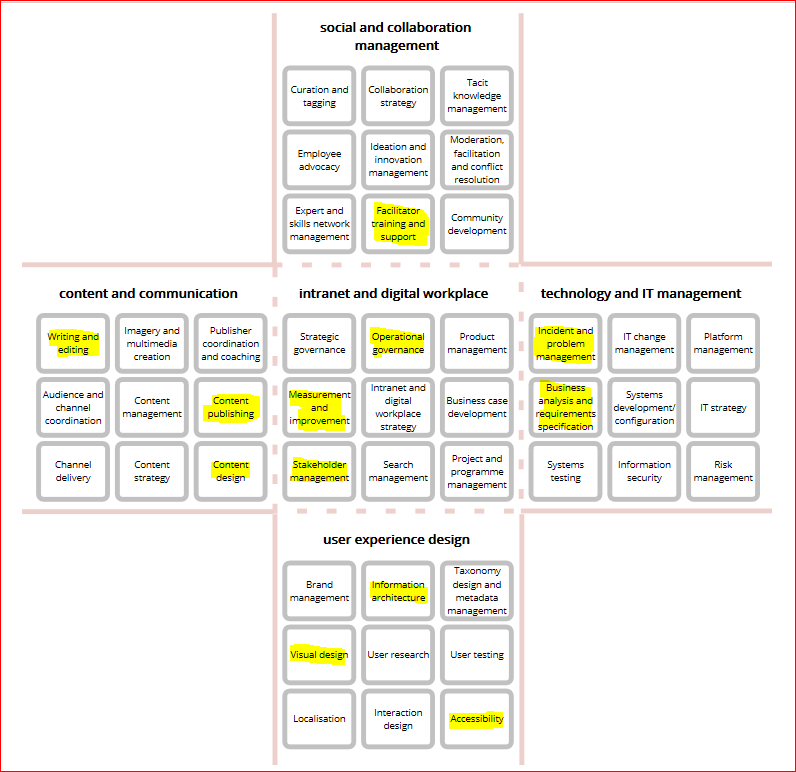
So I thought to share my story, triggered by the workshop that Steve Bynghall and Chris Tubb hosted at the recent edition of IntranetNow. They showed their newly developed “Intranet and Digital Workplace Skills Matrix” which can be used to help teams determine if all relevant skills are covered and if not, which gaps need to be filled. But…it can also be a useful and fun exercise for yourself. In the workshop, Steve and Chris asked us to mark those boxes where we have experience. It was interesting to see that I have worked in each of the 5 categories and I think I was the only one who could say that. I usually describe my work as “helping people with using SharePoint and Office365” but within that definition I appear to have had very different roles over the years. So, as an example of how to get insight in your own career, let me share my career path with you:
1. Knowledge Management
After 20 years in new (food) product development, I started a role in Knowledge Management in the same organization, which at that time focused on new product development. Part of the project meant I had to share the outcomes on the intranet. This ticked a number of boxes in the Content and Communication “arm” mainly.
The skills I needed in my Knowledge Management role
2. Intranet adoption (awareness and training)
During my Knowledge Management project I met the intranet team and they asked me to help them create more awareness and use of the intranet. In this role I tried to make people aware of the intranet and how people could use it for themselves. I also did some basic troubleshooting, support and training. At that time (around 2003 or so) intranets were generally custom-built and options were limited – apart from a Frontpage website, a home-built “document cabinet” and a Forum tool there was not much else. Still, in an international organization even these limited tools helped to share information with colleagues in other locations and businesses, so a number of people were very active on the intranet. The boxes ticked made a shift to the right.
Skillset moving to the right in my second role.
3. Intranet adoption (configuration)
Then we moved to a SharePoint (2003) intranet and found so many options to help employees, that we decided to act as internal consultants, identifying painful processes and configuring sites to facilitate the processes and make them more efficient. I have blogged about this earlier: That was a wonderful job which taught me a great deal about business processes AND about SharePoint!
Business Analysis and requirements specification was a large part of my third role.
4. SharePoint site collection manager
After being made redundant as result of a reorganization, I found another job at a multinational organization. My role was to act as the site collection administrator, making sure procedures around customizatons were adhered to, the site collection did not grow too large (yes dear reader, in that 2007 SharePoint each site collection was allowed 2 GB, which is not much in current standards), doing housekeeping on empty sites etc. I also configured sites, did troubleshooting and gave advice and trainings.
I was quite a Jack-of-all-trades in this role 🙂
5. SharePoint, Yammer, Video support
When we had launched our new intranet on SharePoint Online, I was part of the support team, figuring out issues with permissions, document management, pages and web parts, Yammer and Video. I also curated and created help materials and was in charge of a successful Yammer group on Office365, where we answered questions and informed people about changes in functionality or issues, and where people shared tips and tricks.
Curation and community development were new skills I needed in this role
6. Office 365 adoption
My last role at that organization was to help people use the various elements of their digital workplace. The focus was on Office 365 but other all-employee tools were in scope as well, such as Adobe Creative suite license changes and a new password reset system. I was helping with software launches and changes by figuring out how much and what type of adoption effort was needed, finding help materials (or creating them if they were not available) and providing communication and training to local support people.
My Office 365 adoption role skills
7. Office 365 functional management
A few months ago I had the opportunity to change jobs..in a big way! After 35 years of working in multinational commercial manufacturing organizations, I now work in an all-Dutch mental health care organization. I am still providing second line support, I am an Office 365 portal administrator, I help people understand all tools within Office 365, I invent solutions for awkward processes, I create training materials if I can not find them in Dutch, co-decide which of the endless changes in functionality needs to be communicated, and everything else about Office 365. So, which boxes have I ticked? Check it out:
Currently needed skills – quite a wide range, which is great!
Conclusion
You can see some skills coming back in almost every role. Of course I have my personal interests that I try to incorporate into each role. But also my (then) existing skillset and earlier experience have influenced the boxes that I have selected. I always try to create a role with maximum interest and learning opportunities for myself. I can heartily recommend this to get an insight into your own career. Give it a try!
When we were designing the new SharePoint intranet, some things needed (?) to be customized. And you know I am a big fan of custom functionality. (NOT)
Collaboration Team sites home pages showed the security classification of the content, the audience and the site owner. (Useful! If applied correctly…)
We added another permissions level to avoid site owners creating subsites.
The document content types had 20 fields of hidden metadata in them, as per our term store. This was to improve the search experience – after all, in a 40.000 employee company with many locations, a few metadata would be most helpful to find the document from the correct business, function or location.
Dude, where’s my documentation?
So, when the intranet was ready to launch, and support was handed over to the regular support team, the Support team manager asked the developers for all the documentation. It was not there and they had not planned for it. Against the advice of Veronique Palmer, he accepted this as a fact and support was handed over to the support team. After all, one of the developers was in-house so we could always turn to him.
Or so we thought, as he left the organization shortly after launch of the intranet…
Support
Support mostly went OK as the majority of issues had to do with permissions. But when the content types started to show issues we had no clue where to go for help, so we ended up installing the regular content types. Nobody wanted to complete 20 metadata fields for each document! And when the organization changed structure, the metadata changed as well and nobody knew where to make the changes in the content types.
What to document?
So, while I agree with everyone that too much documentation is a waste of time and effort, it DOES make sense to document:
Any custom functionality. What is the customization supposed to do? What are the specific settings? Is this set by tenant, site collection, or site? Where are the settings to install and implement it? What can go wrong? What NOT to do (for the admins and the users)? Where to go when support people or architects need to look, change or troubleshoot? Etc.
Anything that is on the roadmap to be improved after the MVP-state. What does it do now? Into which direction will improvements most likely go? Where and how to make those changes? What to look out for? What will break and will need to be fixed when you make those improvements?
Anything that can be expected to need adjustments with organizational change. And trust me, organizational change will happen! The company’s name, the company’s logo, the businesses, there may even be splits, mergers or acquisitions on the horizon. So, make clear where your intranet logo and images live, what effect changing terms in the term store will do to your customizations, and where you need to make the necessary changes to make sure the organizational changes are reflected correctly.
I really liked that idea, but I could not very well imagine how it worked exactly. And as this is another way I can make work easier for my colleagues, who generally do not have the time or the interest to find out these things, I decided to try it and write it all down. The Office 365 and SharePoint Connect conference in Haarlem was a good moment to test it all, using a tablet, but it works the same on a PC.
Any time before the conference (it can be NOW)
Practice with capturing and inserting an image in OneNote from your smartphone. It takes a few steps, and the more familiar you are with the process, the faster you will be at the time of the conference.
I could not find any recent instructions, so I created them myself (iPhone only)
Go to iPhone Settings > OneNote > allow camera and microphone (mobile data optional, depending on your experiences with conference wifi). You can also do this when you are in OneNote, you will be prompted.
Open OneNote on a practice page
Tap on the place on the page where you want to insert the image
Click on the camera icon and select “Take Picture”
Select the “Document” option and direct your phone’s camera to the screen you want to capture. You will see a white line appear around the edges.
Press the picture button and you will see what you have captured within the lines. You can adjust the capture by dragging the lines with your fingers.
Click “Confirm” (bottom right) when you are happy with the capture.
You will now see the capture itself and some more editing options. Click “Done” (bottom right) when you want to add the capture to the page
You will go to the practice page and see that the capture has been inserted.
Make sure you have the OneNote app installed on your tablet/PC and smartphone, and that you are logged in on both devices with the same account.
Practice again by capturing your PC screen
Create a notebook for all conferences
Create a section for the next conference. From there you can create a page for each session.
I have created a Section for the Connect conference, and have one page per session.
Charge your devices and a power bank if you have one. It may be my iPad but it devoured battery. A charger may be useful as well, to use during breaks.
Clean the camera lens on your phone
Before each session
Make sure your devices are connected to the conference wifi
Create a page for the next session
Open tablet/PC and phone on the session’s page
During the session
Make notes on your tablet/PC
Whenever you want to capture a slide, take a picture with your phone while both phone and tablet/PC are on the session page with the cursor below the current notes. Take the picture when border is shown around the slide. The “Document” picture option appears to give the best results.
The picture captured in the lines will be added to the page at the place where your cursor is, on both devices.
I took the picture, focusing on the slide, and this was added to the page. See below for the original photo.
After the conference
Process your notes like you are used to.
Remove the original pictures from your phone’s photo gallery to free up space. Your slide pictures will still stay in OneNote.
This is the original picture which stays on your phone and takes up space.
Conclusion
I really like this option. I love the fact that the cropped image automagically appears in your notes 😊. I also like the fact that you have the slides immediately; of course, you can also wait until the organization makes the decks available, but by that time I generally no longer have the time and patience to cut and paste all this.


 We were prepared…
 With Halloween upon us, here are a couple of fright-inducing wishes for people that manage or support your Office365-based intranet or digitalworkplace. Courtesy of your “Wicked Witch of the Dutch” 🙂


 Delve is an interesting part of Office365.