10 things about protecting documents from being overwritten

Did you know you can Protect a document in SharePoint and OneDrive from being accidentally altered or overwritten? If that has been enabled you will need to take conscious action to edit the document. Very useful for Excel files, especially when “auto-save” is on! This has been around for a few months.
Review mode is a relatively new option in SharePoint, allowing people to only make Comments in your documents, and not change the original text. Together they can be a good way to prevent accidents.

I guess you know me by now: I had to find out how these things work, also related to the permissions you have in the site.

How to protect a document

If you protect a document, you protect it against accidental changes.
Go to the document, click File > Info and then you can select “Protect document”

This is where you protect a document. The yellow bar signifies it is protected.

When you open a protected document, you see this:

When you open the document, you will get a message.

When you want to add comments or edit the file, click on OK and then “Viewing” and you will see these options:

Now you can add comments or edit

How to share a document in review mode

When you want to allow people to give feedback, but as comments only, you can share in review mode. Select the document, click Share and then click on the “People you specify can edit” link on top. This will give you the advanced sharing options. Make sure the “Open in review mode only” is toggled (as in screenshot) and click “Apply”.

Here’s how you allow comments only

This option is only available if you allow editing.
Recipients can only add comments, and can not edit the text itself, so this will keep your original text intact. This is especially helpful when many people may want to add feedback. If everyone is allowed to edit the original text, you may end up with something incomprehensible.
When you write the message to the recipient, the sharing popup will show a little icon next to the “People you specify can edit” link.

This little icon will tell you that you share as “review only”

Test programme

In one SharePoint document library I created 4 new documents from the New button:

  • Plain document as is, shared as is
  • Document with protection, shared as is
  • Plain document, shared in Review mode
  • Document with protection and Review mode

I did that for each of the following apps, both online and desktop:

  • Word
  • Excel
  • PowerPoint
  • OneNote

I shared the documents with each of the following permissions:

  • Owner
  • Member (can edit)
  • Visitor (can read)
  • Someone with no access to the site

Afterwards, I repeated relevant experiments with documents in my OneDrive.

What do you need to know?

  1. You can only protect individual documents, not a complete document library.
  2. You can not protect OneNote documents, in desktop nor online nor that half-baked OneNote for Windows 10.
  3. In the desktop apps you can protect Word, Excel and PowerPoint documents against overwriting.
    (You can also use other ways of protection, but that is out-of-scope for now)
  4. In the online apps you can only protect Word and Excel, but not PowerPoint.
  5. You can protect Word and Excel files in SharePoint and OneDrive.
  6. You can only send with “review-only” in Word, not in Excel, PowerPoint or OneNote (I hope that will change).
  7. You can only send with “review-only” when you share with “people you specify” or “people in [tenant] with the link”.
  8. You can use “review-only” in Word in SharePoint and OneDrive.
  9. When you share the document from SharePoint with an external person who has no access to the site, they receive a code via mail as soon as they try to open the document. Not sure if that is a tenant setting, but I thought I’d mention it.
  10. How does a Word-document open, and which options do you have when you share the document with or without protection, with our without “review-only” and with people with various roles in your SharePoint site? See the table below. The first word is the option that the document opens with.
Full Control Edit ReadNo access
Plain documentEditing EditingEditingEditing
Protected documentViewingViewingViewingViewing
Plain document “review-only”EditingEditingReviewing,
can view,
editing greyed out
Reviewing,
can view,
editing greyed out
Protected document “review-only”ViewingViewingViewing,
can review,
editing greyed out
Viewing,
can review,
editing greyed out
Various sharing options – the first word in the cells shows the “landing” option.

What do I think?

Protecting a document can be a good way to avoid accidental changes, as it opens the document consistently in “Viewing” mode, regardless of your own role in a SharePoint site. ๐Ÿ‘
It also works on OneDrive. ๐Ÿ‘
It is not available for PowerPoint Online. ๐Ÿ‘Ž
It is per document only, while per document library might be nice as well.

The “Review Only” mode is disappointing as you can only use it on Word files. ๐Ÿ‘Ž
Additionally it allows site users with Full Control and Edit permissions to edit the original text, even if you ask for comments only. ๐Ÿ‘Ž
However, this is a useful option for sharing with people who have no access or who can only Read in your site, as they will have no permissions to Edit the original text. ๐Ÿ‘
It is also useful for sharing files on your OneDrive as everyone will be unable to edit the original text. ๐Ÿ‘

I hope there will be some developments in both functionalities, so it can be used with more file types and “people with existing access”.

Are you using this in your organization? Do you have any additional tips or lessons to share?

Curses for intranet and digital workplace peeps

Curses-headerWith Halloween upon us, here are a couple ofย  fright-inducing wishes for people that manage or support your Office365-based intranet or digitalworkplace. Courtesy of your “Wicked Witch of the Dutch” ๐Ÿ™‚

This post has been inspired by Comms Curses by Helen Reynolds.

So, be aware if someone throws one of these spells on you.

Computer and network curses

  • May your bandwidth be forever restricted
  • My your wifi drop when you are presenting your new intranet to your Board of Management
  • May your migrations be throttled due to too much content being migrated at the same time
  • May your computer need a mandatory reboot in the middle of a global webinar that you are hosting
    This happened to me once. Thanks to whoever threw that spell on me!ย 

Office 365 Functionality curses

Office 365 has tons of good, well-designed functionalities that you take for granted. So what if someone curses you with sudden changes?Curses-MayAllVideos

  • May all your embedded videos start autoplaying at the highest volume when you open the page
  • May Search and Delve forget their security trimming
    As if their normal behaviour is not puzzling enough!ย 
  • May all pictures on your SharePoint modern pages be deleted
  • May all your Flows stop working without warning
  • May all SharePoint document and list item permissions be unique

Organizational curses

An organizational change can have an enormous impact on your digital workplace. Trust me, I have been there. So you can create a lot of panic and work when you throw an organizational curse someone’s way:

  • May your intranet need to merge with that of the organization that has just bought your organization
    Are you already looking forward to the discussions about who has got the best one?
  • May part of your organization be divested, making it necessary to move that part of your Office365 content to another tenant
    This happened at my earlier employer, and I tried to write about the project, but it was so much and so complicated that I stopped
  • May your CEO suddenly come up with the suggestion to replace Office365 with the platform of this nice small vendor that (s)he just met at this event
    Good luck with talking him or her out of that brilliant idea! CurseofCustomization
  • May your intranet owner insist on home page customizations
    I wrote The Curse of Customization about this
  • May all your SharePoint site owners leave at the same time without providing successors
    Divestitures or large reorganizations can do that
  • May your organization decide to cut your MVP-improvement budget, forcing you to stay at an imperfect and slowly declining level for the next few years
  • May your Office365 support and/or tenant administration be outsourced
    I wrote Ouch-Sourcing about this – and I may write more
  • May your introduction video, meant for employees only, go viral after being uploaded without hiding or security and being included in my Video Collection
    ๐Ÿ™‚

Microsoft curses

The havoc that Microsoft brings upon us now and then is reality rather than imagined ๐Ÿ˜‰ but just in case you want to scare your enemy, let’s go:

  • May Microsoft introduce new standard functionality that you have just custom-developed yourselfspnewsreader-header
    My previous organization had just spend a lot of time and money on a custom-built News solution, when Microsoft announcedโ€ฆNews!
  • May the latest update turn your MVP into a NVP
  • May Microsoft roll out unwanted changes without warning or without the option to undo them.ย 
  • May all your employees suddenly be able to buy their own licenses. Oh waitโ€ฆ ๐Ÿ™‚
    You can still vote on UserVoice to block this!ย 

What to do when you have been hit by a curse?

I am working on the counter-spells but until now I have not been very successful…

Whoohahahahahahahahahahaha!

Curses-witch2

Pixel witch image courtesy of saphatthachat at FreeDigitalPhotos.net
Noise image courtesy of imagerymajestic at FreeDigitalPhotos.net
Voodoo doll image courtesy of Kheat at FreeDigitalPhotos.net
News image courtesy of rawpixel.com on pexels.com
Witch with pumkin image courtesty of Lekkyjustdoit on FreeDigitalPhotos.net


10 things to know about Copy to and Move to (in SharePoint Online)

CopyMove-header
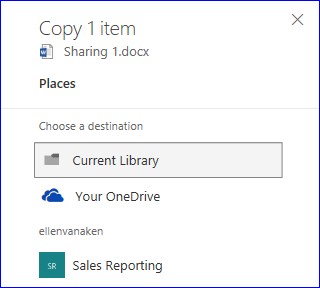
Of course you all know a number of ways to move documents from one place of SharePoint to another, such as Open With Explorer*, Content and Structure** and 3rd party tools.

But have you tried the โ€œCopy toโ€ and โ€œMove toโ€ options in SharePoint Online?
(I will use the words Copy and Move throughout this blog as this makes it easier to readโ€ฆand write)

CopyMove-bar
Copy To and Move To become visible when you selectย one or moreย documents

I knew that Copy has been available for some time in document libraries, but only recently I have also discovered Move. So I decided to find out how it works and how I can explain this best to our audience. The Microsoft Help is accurate and helpful, but it does not mention everything.

1. This is only available in document libraries with Modern Experience.ย 

2. Copy and Move are available for Document, Asset and Picture Libraries.

You can Copy and Move folders or individual documents to other Document Libraries.
You can Copy and Move images from Asset and Picture Libraries, but only to the same Asset or Picture Library or other Document Libraries.
In Pages Libraries, you can only Copy a page and then only to the same Pages Library. This is useful when you want to base a page on an existing one.

CopyMove-Pages
In a Pages library, you can only Copy a page to the same library. No otherย targets are available.


CopyMove-targetoptions
Source and possible target libraries

3. Copy and Move can be done between OneDrive and SharePoint Online and vice versa.

CopyMove-OneDrive
Your OneDrive is always shown as option.

4. Copy and Move can be done between different site collections,ย unlike โ€œContent and Structureโ€.

5. What you can do depends on your permissions.

a. To Copy, you will need at least โ€œAddโ€ permissions in the target site.
You will be adding documents, so you will need Contribute, Edit or Full Control or similar.
“Read” permissions to the source site are sufficient in order to be able to Copy content.
b. To Move, you will need at least โ€œAddโ€ permissions in the target site AND โ€œDeleteโ€ permissions in the source site, as Move deletes the documents in the source site.

CopyMove-Permissions
The roles you need


6. Copy only copies the latest version, Move moves all versions.

This is the same as with Content and Structure, but it does not hurt to mention it again, as this is now available for more users and can have consequences!

CopyMove-Versions
Differences in Copy and Move w.r.t. versions

7. Move keeps the original Created and Modified dates and names.

Copy keeps the original Modified date and Modified By name, but Create date will be now and Created By will be the name of the person who copied. This makes sense, as you are creating a new instance with new Create info.
This can also be slightly confusing, as the Create date can be later than the Modified date.
In the screenshots below, I have used the same Source Library and two different Target Libraries, to show the difference between Copy and Move.
The documents have different dates, people and versions.

First, let us Copy the 3 selected documents

CopyMove-Copy3docs
Version number are 3.0, 2.0 and 5.0, respectively. Different names in Modifiedย Byย and Created By.


This is the result:

CopyMove-3docscopied
Allย documentsย have been copiedย as a new version with the Created date of some minutes ago – while the Modified date is earlier! Created By is me (I did it) while the Modified By is still the same.


Now, let’s Move the same 3 documents to a different library:

CopyMove-Move3docs
Now we are moving these same 3 documents

This is the result:

CopyMove-3docsmoved
The original names and dates are in Created By, versions are the same.


8. You will receive warning messages in certain scenarios.

a. You Move a document to a target document library that has fewer versions enabled than the source. In this case, document Sharing 9 has 5 versions, the target library 3. You will get a useful warning and the option to stop the process. You do not get this warning when you Copy, as this only copies the latest version.
(This will become less of an issue with the changes in versioning coming up)

CopyMove-VersionWarning
Warning about fewer versions

b. You Move a document to a document library with fewer/different metadata. In this case, I am moving a document that has a Topic column to a target without that. Again, you can Copy it with no warning.

CopyMove-metadatawarning
Warning about different metadata

c. You Copy or Move a documents to a target location that already has a document with the same name.

CopyMove-Titlewarning
You can not Copy or Move when a document or folder with the same name exists in the Target library

d. You Copy or Move a document to/within a document library that has Content Approval, and do you not have sufficient permissions to approve content.
Added April 21, 2019, thanks to this blog by Paul Matthews.

041319_1828_accessdenie2
Not enough permissions to approve new content, in this case.

e. When you Move content, you delete content in the source. When you Move (and therefore delete) many documents in one go, you will receive a warning message. This is very considerate, but please be aware that it may freak some users out!
Added April 21, 2019, thanks to a screenshot from Joanne Klein:

IMG_0178
I think this is a helpful email, because it creates awareness of what you have done.ย 

9. This functionality is not available for guests.

Guests who want to Copy or Move get an error message, even if they have the correct permissions and see the options. Judging from the error message, the sites shown in the panel are sites you follow and/or have recently visited. As externals have no OneDrive to store their Followed sites, nor Delve to see the recently visited sites, this makes sense.
This may get awkward for long-term trusted external partners, though.

CopyMove-MysteryGuestIssue
Even though the option to Copy or Move is displayed, external users/guests can not do this.

10. The sites that are suggested as targets are based on the Office Graph.ย 

A good reason to Follow your sites – theyย show in the targets panel and save you searching. The suggestions are based on the Office Graph and thisย explains why external guests can not Copy or Move – they have no Office Graph. Thanks to Greg Zelfond for providing me with thisย info!ย 

CopyMove-followed sites
What is shown here depends on your Office Graph.


My two cents

I am quite happy with this functionality. It is very simple and it will be very useful in case of organizational change or archiving a project.
I now use it all the time when I move instruction and help documentation (that I write using a Word template on my laptop) from my OneDrive to SharePoint. Somehow it feels easier.

However, I would not be me if I did not see some risks. But as this is already quite a long post, I will leave that for next time.

Special characteristicsย of other ways to move documents

*Open with Explorer
โ€ข Microsoft help
โ€ข Needs Windows on your PC as it opens Windows Explorer
โ€ข Needs Internet Explorer 32 bits, does not work with any other browser
โ€ข Only works with Classic SharePoint
โ€ข Content takes Create/Modify dates and names from the person performing the action and the date/time of the action
โ€ข No versions can be copied or moved

**Content and Structure
โ€ข Only accessible for people with Contribute or higher
โ€ข Only available to copy and move within the site collection
โ€ข Only available when your site collection has publishing features enabled

Image courtesy of Baitong333 at FreeDigitalPhotos.net

SharePoint Holmes and the Missing Metadata

SH-MissingMetadata

After all the recent permissions issues it was nice to get a Document Management case for a change.

The case

The issue was: โ€œEvery time I edit a document and save it, it is checked out and we need to check it in again and add the metadata. We have not set mandatory check-out in this library โ€“ what is going wrong?โ€.

I put onย my SharePoint Holmes paraphernalia and setย out to solve yet another case. Orย so I hoped ๐Ÿ™‚

The investigation

  1. I looked at the recently edited document.ย Indeed, the document was checked out with the yellow box where the metadata should have been.

    SH-MissingMetadata-ClientLibrary
    The document was checked-out and missed required metadata.
  2. I checked the Library Settings. Set to modern view, to open documents in the Client application, indeed no check out required. Theย “Topic” field needed a value.
  3. I uploaded another document and edited it without any issues โ€“ the document stayed checked in and retained the metadata. I edited the properties, no problem.
    Hm.
  4. I selected the checked-out document to view the properties. I quickly scrolled down the details pane to see the metadata. Yes, no topic selected, as expected.
  5. I Googled on the check-out issue as I had no clue what happened here.
    The solutions all pointed to something with โ€œmetadataโ€ so I selected the document again to have a closer look at the metadata, andย hoped thatย permissions and edit history would provide some extra clues.
  6. Someone called me on Skype so I left the details pane open without scrolling down.
  7. When I came back from my call, the answer stared me in the face.

    SH-MissingMetadata-NoPreview
    No preview available – aha!

The solution

I had seen this “No preview” message before on aย password-protectedย Excel file. The owner confirmed this.
Afterย some searching I came across several posts describing this behaviour. Apparently, SharePoint does not only respect the content ofย a password-protectedย document,ย but also the metadata. Hence, you have to re-add the metadata after each edit.

A request to change this behaviourย has been submitted to Office 365 User Voice.

I discussed with theย owner whether password protection was really needed as SharePoint has its own protection. As it turned out, the people who had the password were the sameย people who had access to the document and the document library, so she decided to remove the password.

I alsoย checked what happens if this would have been a document library that opens documents in the Online version.
First, you get a warning message:

SH-MissingMetadata-Online


After editing in the client, you have the same result in the document library: the document is checked out and has missing metadata.

Another reason not to use password-protected documents in SharePoint!

Image courtesy of Simon Howden at FreeDigitalPhotos.net

7 SharePoint permissions bloopers

Permissions bloopers 4

The other day I came across an interesting tweet:

Yes, been there, done that! And this made me think of all those other times that I, or my users, have made a mistake with permissions, either by forgetting to think andย doing this onย routine, or by ignorance.
Here they are, for your learning and enjoyment.ย ย Laughing is allowed; sharing your ownย bloopers is encouraged!

2. Deleting a group

Did you know that deleted Groups do not go via the Recycle Bin, so they are gone for good?
So, when you want to do this, first checkย to whichย contentย the group has access. If that is only to your site, you can safely delete it; if is has permissions to other sites, please talk to the owner(s) of the other site(s) first!

How to check: Click on the group name on your permissions page, click Settings >ย View Group Permissions and you will see a pop-up like this:

accessforgroups
In this case the group only has access to one site, so it can safely be deleted if needed.

3. Removing a group from a site and forgetting its name

Good luck finding that in your site collectionโ€™s list of groups! (which likely contains at least 3 x as many groups as there are sites, and most likely many more)

A good naming convention, as well as keeping some documentation or screenshots of your permissions setup may help limit the damage. Another good idea is noting the MembershipGroupID’s of the group’s URL. These can be found in the group’s URL, e.g.

…/Share/_layouts/15/people.aspx?MembershipGroupId=165

The 3 default groups of a site are created with subsequent numbers, so if you remove one of those you can probably find them by changing the MembershipGroupID at the end of the group URL. In the screenshot above, Owners, Members and Visitors group have numbers 164, 165 and 166, respectively.

4. Clicking on “manage parent” to edit permissions

You need to change permissions of a site that has inherited permissions.ย Without thinking you click on “Manage parent” and start making changes, not fully realizing that you areย now changingย the permissions for both sites. You should have clicked on “Stopย Inheriting Permissions” first!
The damage can vary.
Iย have once changed the top site of a site collection that way. The good news was that I finally got rid of a lot of outdated “Limited Access” users, but it was only later that I realized I had also removed everyone’s permissions from various site collectionย galleries.

5. Removing yourself from a group, site or library

This is generally annoying but benign, as long as you have quick access to a site collection administrator who can add you back. ย I get about one call a week from someone who has locked themselves out.

6. Not clicking โ€œShow Optionsโ€ when youย  share something with โ€œEveryone”

Sharesitewitheveryone
Do click that “show options” link on the bottom of the Share screen!

Thisย sends an email to all the company (and gives them contribute permissions if it is a site). Well, at least people know you and your site exist, but I do not know if “Everyone” will appreciate your marketing tactics! ๐Ÿ™‚

And (in my opinion) the most disastrous of them all:

7. Inheriting the permissions from the parent site

You click โ€œDelete unique permissionsโ€™ without realizing you are not at the document library, but at the site level. The permissions of your site will now be the same as the parent site.
You may not be the site owner of that site. Even worse, you may not even have access! An even if someone is kind enough to create unique permissions again and give you back your access, all unique permissions are gone.

An example: this site has unique permissions.

UniquePermissions
If you see “This Web Site” you are at site level!

This site has some content with different permissions

UniqueExceptions

When I click “Delete unique permissions” in the site I get a warning in a mix of English and Dutch – which is the first time I have seen this:

UniquePermissionsWarning

Andย if you click OKย the permissions are inherited from the parent and there are no unique permissions anymore. The original groups also have no access anymore.

Uniqueafterinherit
No content with unique permissions after inheriting permissions from the parent site.

While this may be a good reset of your site if you have completely lost the overview of the permissions,ย it can be a nightmare if you have a well-managed site with confidential content that needs well-managed unique permissions.

General recommendations

  • Make sure you have an overview of the permissions of your site. It can be aย simple mention in the description of the list or library (“this list is only accessible for the MT”), or a separate document with a detailed description.
  • Stop and think before you hit a button – if in doubt contact your help person.

Have you made any other permissions management mistakes? Do share!

Update March 2018:
Via Twitter I received some more gems from Stefan S:

8. Renaming a SP group that is used in the Target Audiences setting of a webpart; it will disappear. You should re-enter the group.

9. Forgetting that Members groups have the permission level Edit instead of what used to be Contribute.


7 steps to clean up unique permissions

cleanup-headerIn my latest post I showed you how you could limit the options to share the content in your site. I hope that you have made some decisions, so now it is time to clean up the mess.
Let me remind you whyย too many options to share canย turn into a problem:

  • Sharing a document or list item, or using the “Get a Link” option, creates unique permissions, andย that means that the permissions of a document or list item no longer follow the permissions of the site.ย So if you add a newย group (recommended) or a new personย (not recommended)ย to the site, this group or person will not automatically get access to those items.
  • This will lead to unexpected access denied messagesย and therefore Access requests.
  • Approving Access requests may lead to more unique permissions AND they give people Contribute permissions by default, which may be too much.
  • Unlimited sharing (especially with external users) canย lead to your documents falling into the wrong hands.

So, how to take back control of your site after you have changed some of the settings?

Have a note-taking system ready โ€“ paper, OneNote, Notepad, document โ€“ whatever is your thing. You willย need to make some notes.

1. Process pending Accessย requests

Go to Site Settings > Access Requests and Invitations and see who has requested access.
Click the โ€ฆ next to each name and add people to site groups as much as possible.ย If you do not see the site group mentioned, note down their names with the group that you want to add them to.

2. Remediate content with unique permissions

a. Go to Site settings > Site permissions and click on this link:

Cleanup-Show items
Show the items with unique permissions, intended and accidental. Very useful functionality!

b. You will get a pop-up with all lists and libraries that have different permissions.

Cleanup-showitemsiwhtuniquepermissions
Focus on the lists with “View exceptions”. Those containย the items where you have created unique permissions by accident.

c. The items marked as “manage permissions” are usually lists and libraries that have different permissions by design. Skip these.
d. Click on “view exceptions” for theย first listย or libraries thatย has this mentioned. You will see all documentsย (including pages and images) or list items that have unique permissions.

Cleanup-Documentswithuniquepermissions
List of documents (or items) that have unique permissions. Rightclick “manage permissions” and open the link inย a new tab.

e. Using Rightclick > Open in new tab, click “manage permissions” for the topmost item. ย (If you just click “manage permissions”, you will have to start at a. again for the next document or list item)
f. Check if there are any people mentioned that you may want to add to one of the site groups, and note down their names + intended site group.
g. Clickย “Delete Unique permissionsโ€ to re-inherit the permissions from the list or library.

Cleanup-deleteuniquepermissions
After noting down Kimberley B as a potential Visitor click “Delete Unique Permissions” to bring the document’s permissionsย in line with the rest of the document library and site.

h. Repeat stepsย e, f and gย for the next document or list item.

3. Weed out “limited access”

Limited access is an annoying thing that tells you that there are, or have been, unique permissions โ€“ or it may mean nothing at all.
If this site has existed for some time and you do not know it very well, you can skip this step for now because you mightย remove people who are there for a good reason.

a. Go to Site settings > Site permissions and click on this link:

Cleanup-Show users
Show people with limited access. This can be caused by Sharing, Get a Link or accepting an Access request.

b. Check if there are any people mentioned that you may want to add to one of the site groups, and note down their names + intended site group.

Cleanup-RemoveKimB
You can remove Kimberley B from this page. (“Beperkte toegang” means “Limited Access”)

c. Remove any individual users so you are left with only the site groups.

4. Add the newย users

Add the users that you noted downย during steps 1, 2 and 3 to their respective groups.

5.ย Review the Members group

During the time that you had no restrictions, Members may haveย added other Members.ย  Review your list of Members and change their roles or remove them where needed.

6. Replace any “breaking links” on your pages

Hover over every link on every page in your site and look at the link in the bottom-left of your screen.ย Links of the โ€œCan Viewโ€ or โ€œCan Editโ€ typeย ย will generally haveย  “guestaccess”ย  in their link and they will cause unique permissions.

When I did not know all this yet, I had created some Promoted Links with the “Get a Link โ€“ Can View” link to a page.ย As soon as I created the link, the permission inheritance for the page was broken and everyone who clicked on the link was added asย individuals to theย page.

Cleanup-GetaLink
Link “”Document 5″has been created with “Get a Link”. The URL is: …../Team/Share/_layouts/15/guestaccess.aspx?/….

Replace every one of those links with the “Restricted Link” equivalent.

7. Monitor

Reviewย on a regular basis if the restrictions and the cleanup work make you feel more in control of your site. Depending on your choice of measures, you may need to do more approvals from Visitors or Contributors who want to share content.

How have you dealt with the “Unholy trinity of creating unique permissions” ๐Ÿ™‚ ? Would you like to share your frustrations or have you found a good way to deal with this that other readers can benefit from?

Image courtesy of artur84 at FreeDigitalPhotos.net

Limiting unwanted sharing and unique permissions

Preventsharing-fenceIn myย recent posts you have seen that you can create unique permissions for list items and documents very easily, with

Additionally, you often add people with Contribute permissions while your normal Members group has Edit permissions (=Contribute + Manage Apps).
Plus your site members can add practically anyone to your site withoutย informing you.

Why am I making such a fuss?

  • Maintenance and support
    Unique permissions create extra issues with access, and provide extra work for the Site owner.
    You may also need moreย support, although your support team might like thatย ๐Ÿ™‚
  • Information security
    People with Edit or Contribute permissions can share content with external users, who then are often able to share your content with others if given those permissions.ย Your information may be shared with your competitors in this way!
  • Performance
    Having lots of unique and individual permissions may slow down your site.

Office365โ€™s out-of-the-box functionality allows unlimited sharing. My own environment is like that, so all experiences that I have described before are done in the โ€œunlimited sharingโ€ default mode.

Fortunately, there are some options that a tenant administrator, a site collection administrator and a site owner can do to limit the potential damage.

1. Disable anonymous access

Disabling anonymous access lets you get rid of the โ€œno sign-in requiredโ€ options that you have when you get a link, or the โ€œsign in requiredโ€ when you share a folder or list item. While it may not reduce the creation of unique permissions too much, it will make it moreย obvious who has been given access.ย This will allow you to determine whether those people need to be added to a site group, or removed from your site.

Your tenant administrator can disable this at the Office365 Admin center for all Office365 applications, or at the SharePoint admin center forย the SharePoint sites.

Preventsharing-GetaLink
This is Get a Link after I have disabled anonymous sharing. Only 3 options left for the Site owner instead of 5.

2. Disable external sharing

While this also will not prevent all unique permissions, it may limit them, because of sheer numbers. Chances are your colleagues will already have access to your site, making the chances of unique permissions during sharing a bit less.
Of course this will make it impossible to share confidential stuff with externals.

It is a good practice to reserve one or some site collections for sharing with externals, so you can keep the other site collections for purely internal content.
Your tenant adminย can disable external sharingย on various aspectsย atย the Office365 tenant and theย SharePoint admin level. ย Gregory Zelfond has already documented how to do that.
By the way, Gregory has written more useful posts on external sharing.

This will give the following results, depending on whether the external user is already in your site collection or not.

preventsharing-noexternalsharing-indirectoy
This message will appear when you want to share with an external user who has been added to another (external) site collection inย the tenant earlier.


preventsharing-noexternal-usernotindirectory
And this message I received when I wanted to share with a completely new person.

3. Change Sharing settings in your site

This will probably be in your control, so go to Site Settings > Site Permissions > Access Requests and look at the two check boxes on the top of the pop-up.

preventsharing-defaultsharingsettings
By default the access request and sharing settings are like this. Read the explanation carefully!

This will mostly influence what a Site member can do.

You have four options:

4a. Both checked: I have done my experiments with this setting. You know what that does ๐Ÿ™‚

4b. Top checked, bottom unchecked

Share:
Member: Can share documents without approval from the site owner, but needs approval for sharing the site.
Visitor: Can share site and documents with approval from site owner.

Get a Link:
Member sees “Edit link” option
Visitor sees the “Restricted Link” option

4c. Top unchecked, bottom checked:

Share:
Member=Visitor:ย Can shareย site and documents but needs approval from site owner

Get a Link:
Member=Visitor:ย Restricted Link

This option brings another message to your Site Permissions page:

prebensharing-tiredofapprovals
If you get tired of approvals, you can change the settings again. (But look: no item with unique permissions…until you approve a request)

4d: Both unchecked:

Same as 4c.

So, this setting will help you to “tame” your site members, and give them the same sharing options as your site’s visitors. You will have more approvals to do, but are more in control.
But beware hitting the “Accept” or “Approve” button in sharing requests for documents or list items!

4. Remove access request email

If you can not get access requests, you can not break permissions when accepting them!

Preventsharing-noaccessrequest
You can uncheck the “Allow access requests” box and no email will be sent.

This can work in formal all-company sites with official content and little collaboration.
On the other side of the spectrum, itย is alsoย an option for sites with a strictly defined and controlled audience, e.g. a management team.
It will however be very clumsy in aย project site!

But…your visitors will get aย nasty error message when they try to share a document or site, and when you are combining this with options 4c or 4d, your members will experience that too.

preventsharing-noemail
Not a very nice message, and also not exactly correct. It should say “There is no email address to send the request to”,

Realize that all of these settings have been developed with a reason, so you may want to ponder what is really important for you and if you need to lock down everything or just a few features.

Whileย you think about this, I will go andย write how to check and fix the permissions, where needed, after you have taken your measures.

Image courtesy of winnond at FreeDigitalPhotos.net

Let the right one in (your SharePoint site)

AccessRequest-Knocker
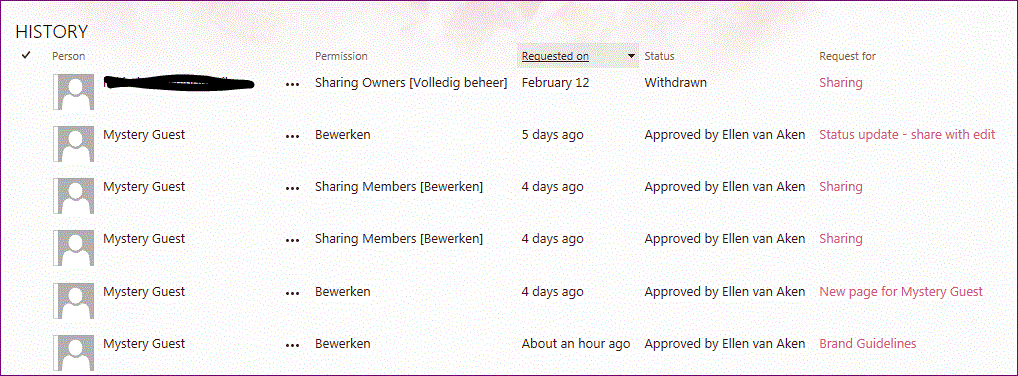
What do you do when you receive a request for access to your SharePoint site? Accept it immediately (because you want to be done with it, or you feel a bit ashamed that you have excluded someone) orย find out exactly whatย they want because there may be more to the request than meets the eye?

Yes, I thought so. ๐Ÿ™‚

Letโ€™s dig a bit deeper into Access Requests. Thereโ€™s quite a lot you can do with them, includingย creating unique permissions. You know that I hate that!

Microsoft explains this in detailย  but of course theyย  they let you figure out all the implicationsย by yourself. Or by me :-).

If your email address is in the Access Request Settings, you will receive access requests via email, and the requests will be replicated in the Site settings > Access Requests and Invitations page.

AccesRequests-Link
If you do not see “Access requests and invitations”, you have not received a request yet.

How does it work?

When you getย the access request in your mail, you willย see the link to the desired content. You can immediately click the โ€œAcceptโ€ button from the email and give them Contribute permissions by default.

Access Requests-request
At the bottom you see the link to the document.

Yes, Contribute. That means they can edit the content.

Hmmm, perhaps clicking Accept immediately is not such a good idea after all. Perhaps Read-permissions are good enough. Or, if you have sent this link assuming they had access, it may be a good idea to give them access to the complete site.

Alternative: the Access Requests and Invitations page!

So, here comes the Access Requests and Invitations page to look at (and manage) the request.

You will see three categories:ย Pending requests, External user invitations and History.

Access requests - page
The page where you can take a closer look at the access request.

Here again, you can click Approve or Decline, or check first what will happen if you click Approve. So, click the … next to the name of the requester. This pop up opens:

Access Requests-open.GIF
“Bewerken”ย  means “Contribute”, sorry, the language settings in my tenant are a bit out of my control.

Here you see some more info:

  • What Office365 has decided about their permissions. In this case Office365 would add them as an individual to this document with Contribute permissions – most unpleasant!
    You can click the drop downย to select the Contributors or Visitors group for the site.
  • Who has asked access and what exactly for. Hover over the link to see the URL.
  • Date and time of the request
  • Approval state
  • Email conversation with the person who requests access. You see I was busy writing this post, so the impatient Mystery Guest asked for permissions again ๐Ÿ™‚

What would have happened…

If I hadย clicked Accept from the email or Approve from the Access Request page, this is what would haveย happened:

Access request - acceptwithoutchanges
You see Mystery Guest nowย has unique permissions and is added as an individual with Contribute permissions.

Exception: Site welcome page

There is one exception to this rule and that is when you send the link to the welcome page of the site. In that case the requester is added by default to the Members group. This also may be more than you want, though.

Access requests-sharesite
If you share the site root or welcome page, the person is by default added to the Members group.

History

After approval, the request ends up under “Show History”. This gives a nice overview of everything that has happened in your site.
If you see a name very often, it may be an idea to give them access to the whole site.

Access Request - history
The Access Request history in this site. I may need to make this Mystery Guest a permanent member ๐Ÿ™‚

Recommendation

When you receive an Accessย Request it may be better to spend some time figuring out the details, than to clickย Accept immediately. This will cost you some time now,ย but will save you timeย fixing unique permissions later (and dealing with even more access requests because too many inheritances are broken!).

Have you found any other “interesting”ย behavior of the Access Request?

Title based on the movie “Let the right one in“.

Image courtesy of cbenjasuwan at FreeDigitalPhotos.net

Get a Link – Get a Break!

getalink-brokenchocolate2As I am writing help materials for our new intranet I do not only have to think about โ€œHOW do you do thisโ€ but also โ€œWHY would you do thisโ€ and โ€œHow can you do this BEST, without spending too much time, adding maintenance or messing things up?โ€

With the migration of content to the new platform, many Site Owners need to rework their publishing pages. Generally these pages contain (clickable) header images, Promoted Links, Summary Links and links in the text.

On the old platform, when you want to grab the link to a document or image, you go to the library, right click on the name and select โ€œCopy Shortcutโ€ from the pop up. This is no longer available in SharePoint Online.

So, how does one get a link in SharePoint Online?

I have found 3 ways to link to a document, page or image:

  1. In Summary Links as well as the Rich Text Editor on a page (Wiki page style), you can browse for the link to a document or image that lives in your site or site collection.

    getalink-insertlink
    Insert > Link > From SharePointย will allow you to browse the libraries and lists in your site and link to the desired content.

    getalink-summarylinks
    When creating Summary Links you can browseย for the content in your site.
  2. You can open the item and grab the URL from the address bar.
  3. There is the new Get a Link option, which you will see when you select a document or image from a library, in the Action Bar (is that what itโ€™s called?) and the pop up menu.

    getalink-actionbar
    The Action Bar shows the Get a Link option when you select an item

    getalink-actionbar-gif-popup
    When you click the … behind an item name, you will see this in the pop up

The users in my company are all accustomed to grabbing a link when they want to share a document via email or on Yammer, so I think this โ€œGet a Linkโ€ will appeal to them.

However, at first glance I see 5 different options. What to select?

getalink-options
5 options to Get a Link? Please note that the “no sign-in required” options can be disabled by the tenant administrator. This allows you to share links with anyone, in and outside of your company.

Letโ€™s find out how this works!

Microsoft has already written about this but it is not very detailed.
So, I have created a brand new site in my own tenant. In this site I have uploaded 5 documents, each named after the action I will take.

getalink-documents

I assume the file type is irrelevant so I have used a mix of Excel, Word and PowerPoint.

Please note I am the tenant admin, so I am not a normal Site Owner.ย Some things may work differently for a regular Site Owner with Full Control.

My tenant is almost out-of-the-box and external and anonymous sharing has been enabled on all site collections.

How to use Get a Link:

  1. Select the document and click โ€œGet a Linkโ€
  2. Select one of the 5 options
  3. Click โ€œCreateโ€ (if the link has already been created earlier you will immediately see โ€œcopyโ€
  4. Click โ€œCopyโ€ and the link will be added to your clipboard
  5. Paste wherever you need it.

You can remove a link if you longer want to share. This means the link will be disabled if someone clicks on it.

For links with โ€œno sign-in requiredโ€ you can set an expiration date. This means the link will no longer work if someone clicks on it after the expiration date.

getalink-expirationdate
For “anonymous sharing” you can set an expiration time.

Results

  1. The links look as follows:

Restricted link:

https://company.com/Sharing/Shared%20Documents/GetLink-RestrictedLink.pptx?d=wa1065f209e79474cb70b1d349a3d5c1c

View Link โ€“ account required:

https://company.com/Sharing/_layouts/15/guestaccess.aspx?guestaccesstoken=g5GzCR4X%2bSQeQkoUVxhvy6ObgkIgAOAwWPxUubf%2bNlY%3d&docid=2_061f40460a0bb4a509b5f126109e2f28e&rev=1

View Link โ€“ no sign-in required

https://company.com/Sharing/_layouts/15/guestaccess.aspx?docid=0d7dc303b58164d169fe1e15c05981740&authkey=Acc4tb7-2Nb5GYqUQPj4Oy0

Edit Link โ€“ account required

https://company.com/Sharing/_layouts/15/guestaccess.aspx?guestaccesstoken=OygCzI%2f3Nkr8YKUhpYNPucCNr3H7x4zTfJowLrST0lI%3d&docid=2_17f6bad80545a42428c32907a3503e6f4&rev=1

Edit Link โ€“ no sign-in required

https://company.com/Sharing/_layouts/15/guestaccess.aspx?docid=11bf22e7919224e2987caf7ea39f9f4f5&authkey=AReBJ-AIIrhwFnuFeCqR1e

2. Using the โ€œViewโ€ and “Editโ€ links will break permission inheritance for the document as soonย as you hit โ€œCreateโ€.

getalink-what
Pardon my French, but what did you just write there?

Yes, you may want to read this again:

Using the โ€œViewโ€ and “Editโ€ links will break permission inheritance for the document as soonย as you hit โ€œCreateโ€.

I was a bit worried about the word โ€œguest_accessโ€ that I saw appearing in 4 of the 5 links, so I decided to check the permissions of my site.
Microsoft mentions this in the small letters of their post, but it is easily overlooked.

You know you can now see immediately if you have items with different permissions in your site. That is very convenient. Normally, only the Microfeed has different permissions, but now my Documents have too!

getalink-brokenpermissions
The document library has “exceptions”. That means: some items have different permissions.

getalink-4outof5
Only the “Restricted Link” does not break permission inheritance!

4 of the 5 docs have broken permissions inheritance! The permissions have not changed yet, but the inheritance has broken. This may not appear to be a big deal now, but if you ever happen to add a new group or individual to your site, which is not unlikely, you will have to remember to give them access to these documents.
Do you seriously think any Site Owner will remember this? Or have the time for that?

More scary and inconvenient findings

  • As soon as someone clicks on a link they are added to the permissions of the document, regardless of their existing role in the site.

getalink-added-after-clicking
I am the tenant admin, and have Full Control of this site, yet I am added as soon as I click the link.

  • People in the Members group get all the options for “Get a Link” as well!
    I have tested this in my work environment and it turns out Members can see and use the โ€œviewโ€ and “editโ€ options so they can break the permission inheritance of documents without the Site Owner being aware!
  • You can only find out which links have been created by checking the options for each document. Clickย “remove” if you see that an unwantedย link has already been created. Now go find out which of your links (In a text, in Summary Links etc.) used this link ๐Ÿ˜ฆ
  • You can remove the link, but the permission inheritance is still broken.
  • You can only “delete unique permissions”ย  per document, so you have to go to Site settings > Site permissions > Show items with different permissions > View Exceptions > Manage permissions > Delete unique permissions.
    This is a tedious process.

I think this can turn into a serious issue. I have found that manyย Site Ownersย do not fully understand the consequences of broken permission inheritance, and do not understand the extra maintenance and support issues involved. I have tried to tell them NOT to break permission inheritance unless it is really needed, and to never do this on a document or item level.
Andย even if they know, it is a time-consuming job to reset the permissions.

Also, why all this complexity for just getting a link? I think only the โ€œRestricted linkโ€ would be sufficient. Who would ever want to use the “editโ€ options when linking to an image? Why would you use the “Get a Link” option to share via email if there is also a โ€œShareโ€ option which sends an email? (and which, in some cases, asks permissions to the Site Owner first?)

Whatย would I recommend if you need a link?

  • Use the “Insert > Link > From SharePoint” option to link to a document or image when working in the text editor of a page
  • Use the “Browse” option when creating Summary Links
  • Use โ€œGet a Link > Restricted Viewโ€ when you want to get a link otherwise. This respects the permissions of yourย library.
  • Instruct your site Members about the dangers of Get a Link and ask them to use the Restricted Link.

What are your experiences with the Get a Link functionality? Have you been able to reduce the scopeย and if yes, how? I would appreciate to hear and learn from you!

Kitten image courtesy of Top Photo Engineer at FreeDigitalPhotos.net. Text added by myself.

Site Permissions Breaking Bad, episode 3

The Folders.

BrokenGlassNow and then youย read a blogย post that makes you think: “I wish I had written that”. Veronique Palmer has done it often, Dan Adams has done it a few times, and now I have found

Gregory Zelfond’s “12 reasons folders in SharePoint are a bad idea”.

It is a really good list of why you should avoid folders on SharePoint.

My own planned post onย this topicย is now completely redundant ๐Ÿ™‚ . Butย I would like to illustrate his point 4: whyย maintaining permissions on folders can be a nightmare.

What are the issues with folder permissions?

  1. If you break permissions and add โ€œDifferent permissions!โ€ to the folder name, as I always suggest to do, the URL of the folder and all its documents changes. People who haveย this linkย in their Favoritesย and use it after the change,ย will get an error.
    That is another reason why folders are a bad idea: Links to folder, sub-foldersย and all documents in the hierarchy change when you change the name of the folder.
    Libraries and lists have a description field for that type of info, folders have not.
  2. Broken permissions are not easily visible, so unless you add something to the folder name (causing issue 1), you will not know what permissions your folders have. The only way to find out is by going to each folder and finding out. If you have a deep nest, you will have to start at the bottom of the hierarchy. Not a fun job ๐Ÿ™‚
  3. People often are in a hurry to give someone access, without thinking about a sustainable setup, or writing down what the permissions are exactly.
  4. Having many folders with broken permissions, especially with individual permissions, may cause performance issues.

ย Time for an illustration!

We have already seen the default permission setup, and what happens if you break permissions for one library. Here they are again:

This is the default permission setup of a site - the site and all lists and libraries have exactly the same permissions.
This is the default permission setup of a site – the site and all lists and libraries have exactly the same permissions.

Broken permissions- one library has different permissions.
One library has different permissions, and Visitors no longer see or have access to the library.

Now let us zoom in to one document library (the yellow block) in a site. What if it has 4 folders, 2 with inherited permissions (yellow) and 2 with broken permissions, each differently?

This is a site with one document library with folders. The individual users are also in the Visitors group, so they have access to the site.

OK, this is getting complicated, right? Now what if one of the folders has 4 sub-folders with different broken permissions? And sub-sub-folders? Or if the folder and sub-folder inherit permissions from the site or the library, but the sub-sub-folder has broken permissions?ย  The potential issues multiply with each sub-folder.
You can imagine that managing and supporting that kind of setup becomes a difficult task – if a new person enters the team, where do you have to add him or her? And where do you need to remove their predecessor?

In one of my next posts, I willย share some examples where breaking permissions in folders has led to misunderstandings, problems, urgent phone calls and me having to spend lots of time on cleaning the mess that someone else had made ๐Ÿ™‚ .

Image courtesy of Suat Eman / FreeDigitalPhotos.net