Why can Frontline Workers not add a Teams meeting to their meetings?

The other day I received a comment on my post “Some quirks of the F3 license“. The commenter’s Frontline Worker F3 colleagues do not have the option to “Add online meeting to all meetings”. Apparently the option is not visible in the Outlook web app.

Enter a new Microsoft365 detective: Teams Thorne*. Will he become as famous as SharePoint Holmes, you think?

Let’s find out! Here’s what Teams Thorne did to see if he could find out if this was user-, admin, or license-related.

1. Is it a user thing?

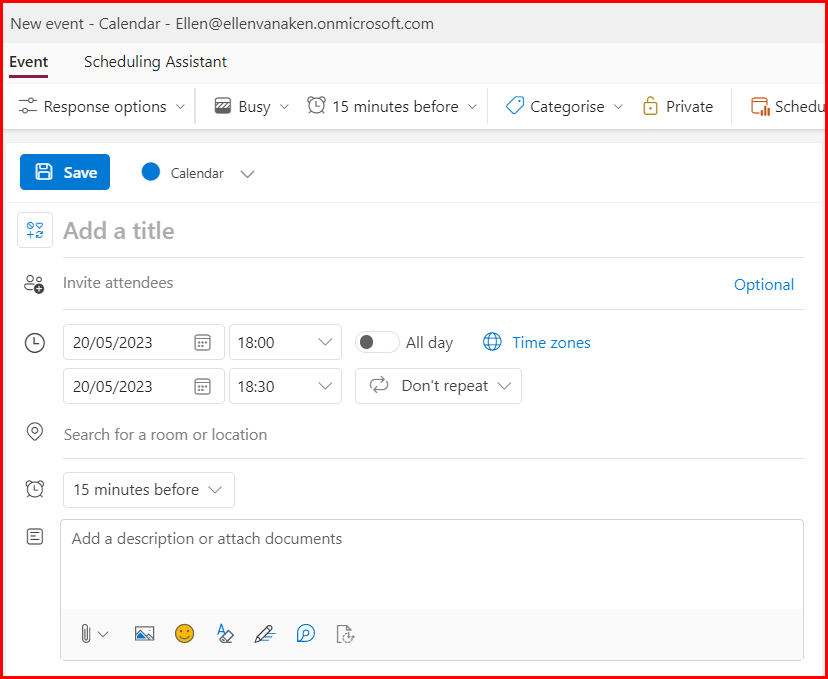
Teams Thorne has a Small Business License, which, like the F3 license, is 100% online. He opened Outlook (on the web, obviously), and first checked what the normal behaviour of his Calendar was with regards to organizing meetings. He created a new event.
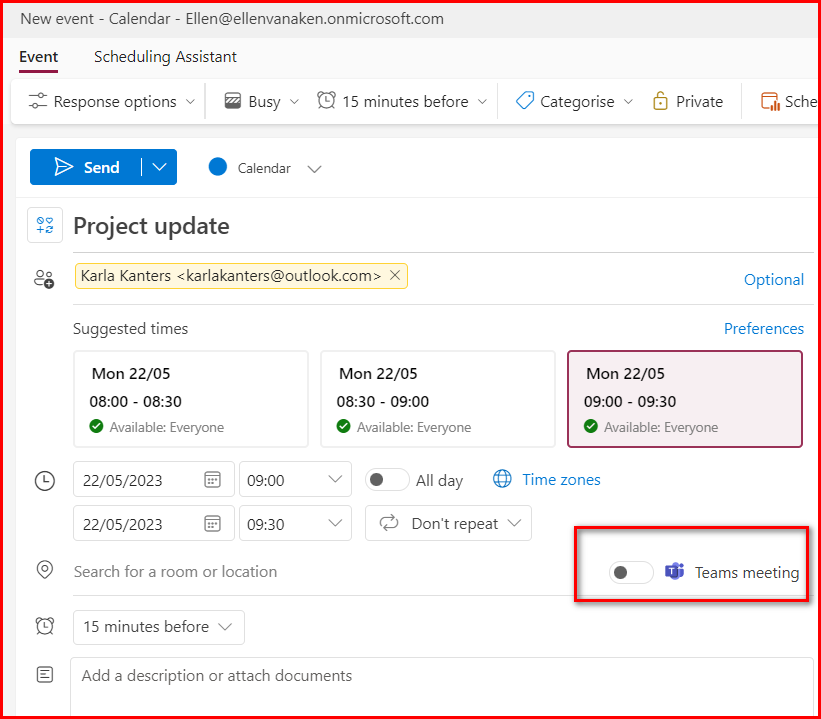
The “Teams meeting” was visible, but not checked. But as soon as he added a person to the invitees, the box got checked.

The Teams meeting checkbox is automatically checked when you add another person to your meeting.

He then looked at how things were after disabling it in his settings.
In Outlook or Calendar, click the Gear Wheel > View all Outlook settings > Calendar > Events and Invitations. The option to add an online meeting was indeed checked, so he unchecked it and waited for some time.

When this box is unchecked, you do not automatically add a Teams Meeting. You do it manually.

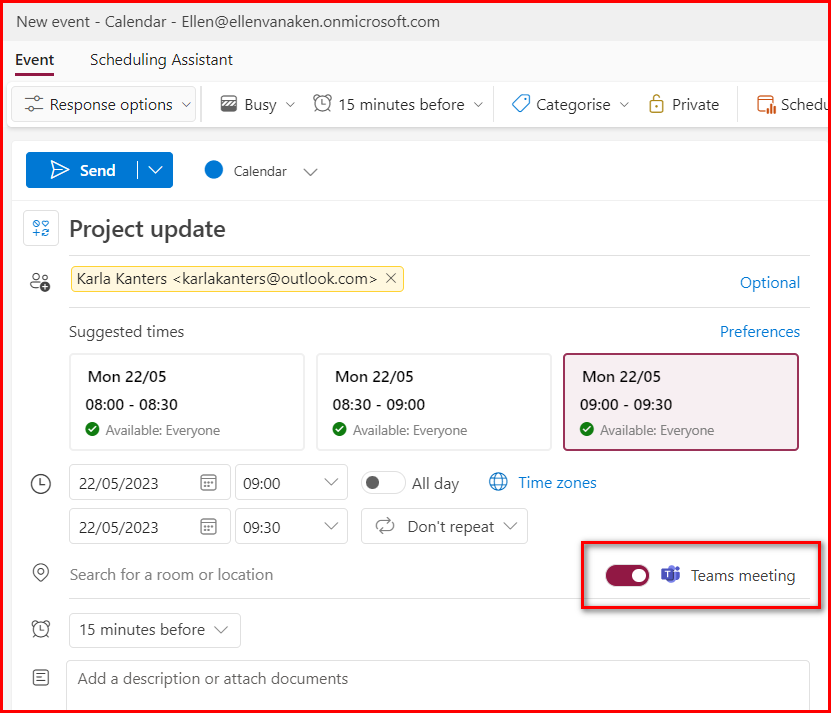
He went back to his Calendar, created a new event and noticed that the box did not get checked when he invited someone. But he could enable the Teams Meeting manually by clicking on the button.
With the setting disabled, you can still add a Teams meeting, but you have to check the box yourself.

This did not match the issue described. Teams Thorne had the option to add an online meeting to all meetings, so there must be something that disables that button entirely. In any case, this did not appear to be an incorrect user setting.

2. Is it an admin thing?

The next thing to investigate was the Teams Admin Center. Perhaps there is a setting that prevents that button from loading?

Teams Thorne opened the Admin center and headed to the Teams Admin Center > Meetings. The Meeting Settings did not give any indication, but the Meeting Policies looked promising. He opened the Global (Org-wide Default) policy and looked at the options available. Hmmm, there was permission given for the Outlook Add-In, could that be the thing that made the connection between Teams and Outlook?

The Meetings > Meeting Policies menu items contains a setting for an Outlook add-in. Is that a clue?

He disabled the Outlook add-in, logged off and waited some time for the new policies to “settle”. It now looked like this:

The Outlook add-in has been disabled.

The next day, he opened his Calendar and started creating a Meeting. Hey, that Teams box was not there!

There is no “Teams Meeting” option to the right.

He went back to his Outlook settings and noticed that he could not check that box, apparently because there was no provider mentioned.

As there is no meeting provider mentioned, it is impossible to activate this setting.

So, it looks as if you need the Outlook add-in in Teams to have that option.

But…in the Global Policy, which is the Default for everyone who is not in another policy, it is enabled. I hope that organizations will not edit their Global Policy unless they have a very good reason. I can not imagine why you would want to disable adding a Teams meeting to all meetings – you do not HAVE to meet with Teams, but it is pretty convenient to have it just in case something goes wrong with your face-to-face meeting.

3. Is it a policy thing?

Teams Thorne had never tinkered with the Meeting Policies, in fact this was the first time he ever looked at them. So he concluded that the option to use the Outlook add-in is standard. But perhaps there was a special policy for Frontline Workers?

He went through the Teams Admin Center to see if there was anything else that could shed some light on whether this might be different for other groups. Hey, there was a Policy Packages menu item – could that help? He saw a number of policies, including a Frontline Worker Policy:

In the Meetings > Policy Packages there are a number of policies for different roles.

Upon clicking the Frontline Worker Policy Package, it showed a number of options:

The different policies for Frontline Workers

When he opened the Meeting Policies he noticed the following settings. The items were the same as the Global (default) policy, but a lot of things are OFF, including the Outlook add-in.

The Outlook add-in has been turned off for Frontline workers.

But when he compared it to, for instance, a Higher Education Student, or a Healthcare Clinical Worker, you see that the Outlook add-in is available for them.

In other roles, such as the Higher Education Student shown here, the Outlook add-in is enabled.

Unfortunately, it is not possible to make changes to the Policy Packages, unless you have a Teams Premium or Advanced Communications license.

Conclusion

So, there is a number of things that we have found out.

  1. Your colleagues need to have the Outlook add-in in order to be able to add a Teams meeting to a meeting they schedule.
  2. The Outlook add-in is enabled in the Global (Organization-wide default) policy and is therefore available for all employees, unless they have another policy applied to them.
  3. The standard Frontline Workers Meeting Policies have the Outlook add-in disabled, so employees with this policy package are unable to add a Teams meeting to their scheduled meetings.

So, in the organization of the person who made the comment, it is most likely that the Frontline Workers have the Microsoft Teams Frontline Workers Meeting Policy Package applied to them, or another policy without the Outlook add-in.
In theory the Global (Org-wide default) Meeting policies could also have been changed, but in that case all employees would be unable to add a Teams meeting. That was not what I understood from the comment.

But why you would want to exclude Frontline Workers from adding a Teams meeting, is totally beyond me. But that is another topic.

So, what do you think of Teams Thorne’s first case?

* About Teams Thorne:
Part of my role was solving user issues. Sometimes they are so common that I had a standard response, but sometimes I needed to do some sleuthing to understand and solve it.
As many of my readers are in a similar position, I thought I’d introduce Teams Thorne, Teams investigator, who will go through a few cases while working out loud. Teams Thorne is based on Tom Thorne, a British detective, who was created by Mark Billingham and has featured in books and a TV series.

Please note: Due to an exciting, but rather time-consuming private project (moving house) I am currently posting a bit less frequently than usual.

5 Tips to keep your OneDrive lean

Microsoft365 may be introducing all kinds of shiny new functionality, your good old OneDrive is as important as ever. More and more information is being stored on OneDrive automatically and by default, so it may grow even without you consciously adding and uploading Word, Excel and PowerPoint files.

This could be an issue especially for users with an F3-license as they have only 2 GB of storage space at their disposal. Their OneDrive may get full quickly and that is rather a nuisance.

But also the 1 or 5 TB of E-licensed users will fill quickly if they have a long career in this organization and never a clean-up moment.

So, the following may be of interest for all:

1. Understand what is “private” and what is “shared” (and what is in between)

Although information on your organization’s OneDrive is never truly private, we consider files and documents that are only for you, private. This can be drafts of documents you are writing, your yearly objectives and evaluation, correspondence with your manager, etc.

Documents or files that you work on with others, are shared and should therefore live in a shared environment such as Teams or SharePoint. Or Viva Engage (the application formerly known as Yammer).

That said, there are still many items stored on your OneDrive that may be shared, but are still added to your OneDrive by default, such as Recordings and Whiteboards of Team Meetings and Files and Loops that you have shared in private Teams chats, and attachments from Forms.

Suggestion: instead of creating a new draft document in your OneDrive, create it in SharePoint, if it will be shared at the end. You may want to set up a document library especially for drafts. You can move it to its final place once it has been reviewed and made official. This way you will not have any old and forgotten drafts in your OneDrive.

2. Understand what is stored on your OneDrive

OneDrive has the habit of creating new Folders by itself when you do certain things in Microsoft365. The most well-known may be the folder Attachments, for files you have received as attachments to Outlook. Microsoft Teams is also a good source of automatically created folders, as Recordings, Microsoft Teams Data, Microsoft Teams Chat files, Transcribed Files are all added from your work with Teams.

Again, content you share with others in private Teams chats, will be stored in your OneDrive. It makes perfect sense, but it is annoying if your OneDrive is prone to overflowing.

Some time ago I wrote about the folders that are automagically created in your OneDrive:

Who created those folders in my OneDrive?

These folders have all been created by my use of Microsoft365. I have not created any of them myself.

Suggestion: Avoid private Teams chats and work in Teams Channels where possible. Create Channel meetings (when you know they will be recorded), chat and share files and Loops etc. in Channels so they will be stored on SharePoint rather than your OneDrive.

3. Understand the new Syncing

A new way to sync documents is on its way. I do not know the details yet, but keep an eye out, please! I learned this from Paul Keijzers’s video.
Synced SharePoint folders will then be stored in your OneDrive on your PC, if I have understood correctly. This may mean that your OneDrive also gets clogged up with SharePoint files. It may also mean that just the links will be shared, so I am curious to learn more.

How will SharePoint sync behave in future?

4. Understand what happens when you leave

Your next career move may not be top of mind right now, but it is good to know what will happen to your content when you leave the organization and your account is deleted. This may help you create new habits now.

I wrote about this earlier:

Leaving the organization gracefully

Suggestion: check on a regular basis if there is any content that would need to be in a SharePoint site or Teams, in case you would leave. It will save you time when you actually leave.

5. Clean up your OneDrive on a regular basis

Yeah, I know this is not exactly a fun task, but if you do this regularly, let’s say once a month on a quiet time of the week, it will be less work and will save you from the panic that will engulf you when you get a message that your OneDrive is full and you can no longer add new info.

I have also written about this topic:

9 steps to clean up your OneDrive

Other tips, tricks and suggestions?

Please let me know if there is something that you do, or your organization does, to keep OneDrives in check.

Number 5 by Pramit Marattha on Pixabay

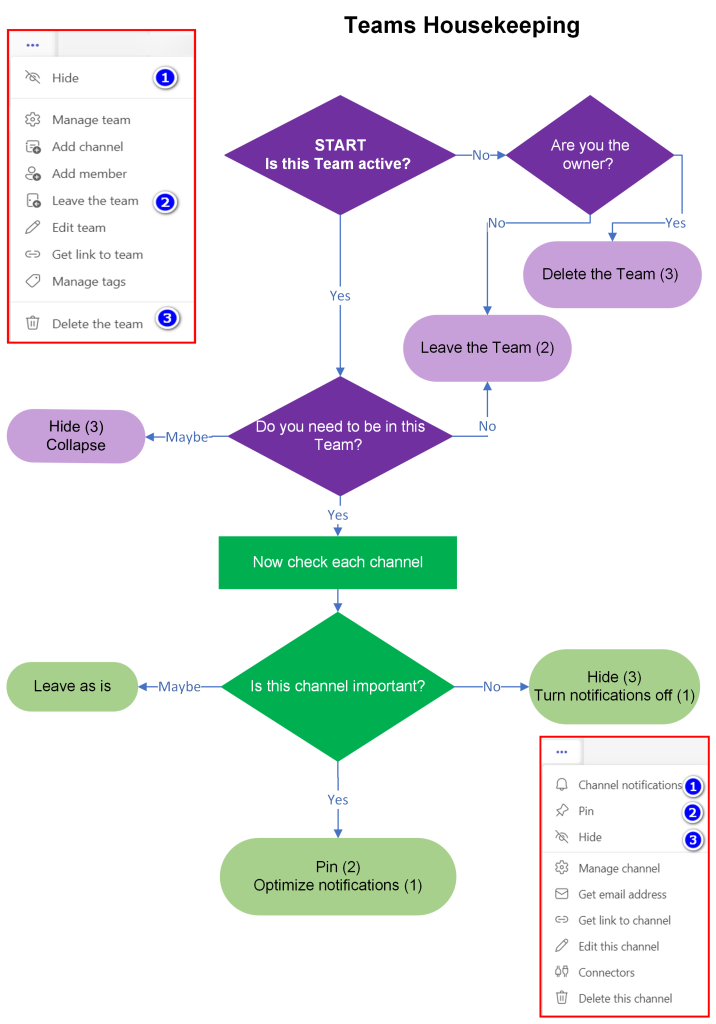
Teams Housekeeping for beginners

Most organizations will have been working with Teams for about two years now. There was an explosion of usage early in the pandemic in March/April 2020. I remember getting tons of requests for new Teams, as many people thought you need a Team site for chatting and conferencing. 😒

Many of these Team sites have never been used, at least not in my organization. Of course, the Microsoft365 admin has a role in deleting obviously unused Teams, but that is not sufficient. Team Owners and users have their own responsibility in making sure they are in the right Teams, but I know very well that not everyone has, or wants to spend, the time to do a good review and cleanup. And sometimes they do not even know how to go about it! (The psychiatrists and therapists I worked with, were not all very digitally savvy)

So, in order to avoid confusion and mess in your colleagues’ Teams setup, and colleagues complaining that “their Teams is a mess and that is Microsoft’s fault”, please help them checking their Teams on a regular basis. There are many ways that you can make Teams work for you if only you spend some time on it.

I have created a simple housekeeping flowchart. I love flowcharts and it was a good way to test-drive Visio Online! The functionality is great, but I miss the “arrange nicely” option that is in the desktop version, so please forgive me if things are a bit askew. 😊

Underneath the flowchart you will find a more elaborate description with texts and screenshots.

Feel free to use this flowchart with your audience.

You will find some more detailed instructions and screenshots below.

Step 1: Review the Teams that you are a member of

You will find all your Teams in the left-hand rail of Teams. You can manage most Team-level actions by clicking the … next to the Teams name and selecting the desired action from the popup.

The 2 Teams in my tenant.
The Team actions, with highlights on the ones that are relevant for this post

Is the Team still in use?

For each Team, first check if it is still in use. If not, you can Leave the Team and it will no longer be in your list. If you are the Owner of the Team, please Delete the Team, except when the Team has Private or Shared channels. In that case, please check with the owner and users of those channels, as those are managed differently than the regular channels.

Update 16-11-2022: You can also Archive the Team and make it read-only. This can be an intermediate solution when you want to keep the info from an important project for some time, or when someone is afraid to delete the Team altogether. My personal experience is that nobody ever looks at an Archive, so you may as well just delete the Team, but not everybody knows that yet 😁.
Instructions for archiving. Thanks to Thierry Barthel for pointing this out.

Do you still need to be a member?

❌ If you have changed jobs since you were added to this Team, you may no longer need this. Or perhaps the project in this Team has been completed or stopped, or any other change may have occurred that makes this Team no longer relevant for you.
If you do not need to be in this Team anymore, Leave the Team.

❓ If you do not know, you can Hide it. The Team will then be moved to the bottom of the list of Teams, under Hidden Teams. You can occasionally check if something has happened by clicking on the Hidden Teams and checking the Team. If the Team is useful after all, you can unhide it by clicking … next to the Team’s name and selecting “Show” from the popup.

The Demo Team is hidden and no longer clutters my list of Teams, but can be made visible easily

Alternatively, you can keep it where it is and check now and then whether you still need this. It may be a good idea to collapse the channels so you only see the Team’s name. You do this by clicking the little triangle to the left of the Team’s name. To reverse this, click the triangle again.

Teams expanded, so you see the channels that are not hidden)
When you hover over the Teams names, you will see the triangle to expand or collapse the Teams.

✅ If this Team is still relevant for you, please check the channels as in Step 2.
If you have many Teams, you can drag the most important Team(s) to the top of the list by selecting the Team name. By default, they are sorted in order of creation.

Step 2. Review the channels in the remaining Teams

If you are certain this Team is important for you, check each channel in this Team. You cannot leave a channel, but you can hide it to make it less visible (except the General channel). It is also possible to mute notifications.

You can manage most channel-related actions by clicking the … next to the channel name and selecting the desired action from the popup.

The channel actions, with highlights on the ones relevant for this post

You will have the following options:

The channel is not important
Please Hide it. Once there is a new message, the channel name will show in bold letters, but if you have hidden the channel, you will not see that until you click on “Hidden channels”. You can also decide to turn off notifications.

When there is a new message in a hidden channel, you only see it when you click on “x hidden channels”. 3 channel names are bold, so there are new posts.

You do not know yet whether this is an important channel.
Just leave it there until you know. You can also Hide it to see if you are missing something and decide to turn off notifications.

The channel is important.
Make sure you can easily find it and get notified whenever something happens in the channel.
You can Pin it to the top of your Teams list so you can quickly find it.

A Pinned channel on top of the list, so I can easily find the most important one. 😊

With the Notifications you can make sure you will quickly know when something has been added or you have been mentioned.
You will set notifications for all your Teams and channels in your Teams settings, (click the … top right of your Teams app, next to your name, and select Settings > Notifications) There are quite a lot of options so please check it out yourself.
You can deviate per channel where necessary by using the Channel notifications in the channel actions popup.

Channel notification settings. You can set these in general in your Teams settings, and individually per channel where necessary.

Hopefully this is a good first step for most colleagues! You may want to remind them once a year that they should spend some time reviewing – once Teams have been set up properly, it will most likely only need a small revision.

From Stream (Classic) to Stream (on SharePoint) – summary

Redirecting the Stream tile to Stream (on SharePoint) will roll out to standard release tenants from now.

Office365 support folks may ask themselves what to do – enable it now or wait until more is known? Please note Stream will only be decommissioned when the functionality in SharePoint is comparable to Stream now – which is not the case at the moment. I expect you will have a year at the very least.

I have done some experiments in the last few weeks (June 2022), to give you a better idea of the current consequences of this change, and this is my advice:

  • Is Stream new for (or not yet used by) your organization?
    Redirect the tile as soon as possible, and instruct everyone in the new ways of working (video creation and storage, web parts etc.) via SharePoint, OneDrive and Teams.
  • Is Stream an important app for your organization? E.g. you have created a video portal?
    Wait until more is known. At the moment there are quite some functionality gaps, although these are being addressed as we speak.
    • You may want to do some pre-work such as checking out how many videos you have, which department is the most active, and which sites would be the receptors for videos migrated from Stream. Housekeeping could also be a good idea, if you own many videos.
    • You could also start instructing people where to create new videos and how to embed videos on pages, how to manage video in SharePoint etc.
    • Do you have an idea about how to approach the migration project when it is time? You may want to think about that now as well.
  • Do you have a few active pockets of video on Stream, and the number of likes, views and comments are not very important for the owners?
    Suggest a manual migration (download from Stream to PC and upload to SharePoint) to the owners, which will reduce the complexity of your migration project later, by doing a few things now.

I have written a few posts to help you with each of these scenarios:

What experiments have I done?

  • I have redirected my Stream tile in Office365 to Stream (on SharePoint).
    I found that this redirects to a new page in SharePoint, comparable to the Office365 homepage, where you can see all videos on OneDrive, Teams and SharePoint you have access to.
    Videos that are in Stream stay there and will eventually be deleted. This means any video on Stream that you want to keep, needs to be migrated by you.
  • This means you suddenly have a migration project. Although I expect it will be some time before Stream gets decommissioned, it will take thought, preparation, communication and other work.
    I have a few suggestions for that project.
  • Microsoft will provide a Migration tool, which I have not seen yet. I expect this will move videos with all their metadata (including comments, views, likes), but YOU will have to decide where the videos will go.
    If you do not want to wait, and/or if you have a few Stream channels where the metadata are not terribly important, you can reduce complexity by moving those videos manually. I have checked what happens when you download from Stream and upload to SharePoint.
  • Do you have Stream videos embedded on your SharePoint intranet and other pages? You will need to change web parts and link to videos in SharePoint.
    I checked which web parts are best:
    • Highlighted Content for videos from one site
    • Quick Links for a hand-picked selection of videos
    • File Viewer for a single video, illustrating a News post
  • As video is treated as a document, I have also checked if the Document Library web part would be a good web part to display video, as you can configure it more than the Highlighted Content. However, it is a lot of extra work and it is not better than the Stream or Highlighted Content web parts.
  • Do your colleagues use Stream (desktop or app) to create video’s? You may want to wean them off and suggest another app from the Office365 suite. These are my recommendations:
    • the OneDrive mobile app for their impromptu and personal videos
    • a recorded meeting on Teams desktop for more official videos, such as instructions or speeches.

When you have access to the SharePoint Admin and Message centers, you can see some improvements for Stream being planned, e.g. inline playing in the Hero web part.

The SharePoint message center will keep you informed about Stream (on SharePoint) improvements

What’s next?

I hope I have saved you some time by doing and sharing my experiments. If anything new pops up, like further improvements to Stream (on SharePoint) I may create a new post.

Good luck!

Where to create a video in Office365

This Stream project is a gift that keeps on giving. There are so many things I want to find out and write about! Not just for myself, but especially for you, to help you understand what this change will mean.

This change also means that you will have to change the ways your colleagues create videos. I do not know if many people in your organization are using Stream right now, but even if they don’t, you may want to create a campaign on video creation, as video is an important medium and it may be a good idea to increase the creation and usage of it in your organization.

My goal for this post is to help Office365 support folks guide their colleagues in a simple way to other video tools. “Please no longer use Stream, use …”

I have reviewed the options.

Where can you create videos in Office365?

  • Stream Classic (desktop and app – please note F3-licensed users can only view, not add!)
  • Teams (desktop and app)
  • OneDrive (app)
  • Yammer (app)

At this moment the Office mobile app does not support creating videos, but I have just learned this will be added in future as the Office mobile app is very much focused on documents. You will be able to create 90 second videos with annotations.

Stream (Classic) – desktop

You can record a screen or a video with your web cam. (Instructions from Microsoft)
You can trim the video, but it can only be 15 minutes max.

👍 Trimming options

👍 Stable image as this is usually done from laptop

👎 Max. 15 minutes

👎Type of videos is limited to web cam options or screensharing

👎 Created and saved in Stream which is Office365 but an app that will be discontinued, so you will have to move it to SharePoint

Stream (Classic) – app

The Stream mobile app is a bit more flexible than the desktop version. There is no time limit, and you can use the smartphone camera.

Instructions from Microsoft

👍 Quick to start

👍 Freedom in topics as this uses the smartphone camera

👍 Created and saved in Office365 (but in Stream, so you will have to move it to SharePoint)

👍 Editing options, see example below: (Not sure if I need to add that I am not an experienced video creator 😀)

👍 Trimming options (in the Stream desktop app)

You can add some effects while creating your video.
You can use the effect buttons at the bottom of your screen during recording.

Teams – desktop

Using a Teams meeting recording option, you can create a

  • meeting recording
  • “talking head” video (using the webcam)
  • screensharing recording, e.g. for Office365 instruction videos

When you use a Live Event and/or add a different camera, you can also create face-to-face event videos, such as conferences, lectures and physical town halls.

I generally use the Meet Now option to create a screensharing video.

Meet Now is a quick way to start a meeting with yourself

Instructions from Microsoft.

At this moment, it is not possible to trim or edit your video in Teams or SharePoint. You need to download your video, upload it to Stream, trim and then download and upload to SharePoint. I hope that this will be available on the other apps shortly!

👍 Created and saved in Office365 (OneDrive > Recordings folders or in a Teams channel)

👍 Stable image as this is usually done from laptop

👎 No trimming options, so the video generally starts with the standard Teams meeting screen

👎 No effect options

👎 Type of videos is limited to web cam options or screensharing

👎 You need to start a meeting first and then push the record button

Teams – app

The Teams app uses your camera phone, so you are more flexible when it comes to the topic of your recording. You can use the options from the desktop, but also flip the camera from self-view to world-view.
Instructions from Microsoft

👍 Freedom in topics as this uses the smartphone camera

👍 Created and saved in Office365 (OneDrive > Recordings folder or in a Teams channel)

👎 No trimming options, so you start with the standard Teams meeting screen

👎 No effect options

👎 You need to start a meeting first and then push the record button

👎 Video quality is not so good

👎 You need to give your microphone access to Teams – if you forget this there will be no sound, as in this example:

No sound, video in Teams mobile app of part of the Singel (city moat) in my hometown Utrecht
Create a “Meet Now” by tapping the camera top right.

OneDrive – app

The OneDrive app allows you to record audio or video with your regular phone camera. You are very flexible. You can flip the camera from self-view to world-view. Your video is saved in your OneDrive (root folder) and can not be edited. You can move it from there to a suitable SharePoint/Teams site for sharing. (Moving deletes it from your personal OneDrive).

👍 Automatic upload to Office365 (OneDrive root folder)

👍 Freedom in topics as this uses the smartphone camera

👍 Quick to start, compared to Teams

👍 Good video quality

👎 No trimming options

👎 No editing options

Example:

Video created with the OneDrive mobile app

Yammer app

The Yammer app also works with your phone camera. Just click the “new message” button

You can use self-view and world view, and add texts, emoji etc but it is displayed vertically, even if you film horizontally. Check out the example below. You can create a video from your feed, a community or your inbox, and the end result is stored in Yammer. The resulting message (=video + other info) can be moved to another community, but not to SharePoint, so you will have to download the video to PC and upload it to SharePoint. It is also not shown on the Stream (on SharePoint) landing page.
I expect that with native Yammer (which I am not using at the moment) you will be able to move it to another SharePoint site.

The effect options in the Yammer app

👍 Automatic upload to Office365 (Yammer)

👍 Effect options (texts, emoji etc.)

👍 Quick to start – just open Yammer and create new message

👍Freedom in topics as this uses the smartphone camera

👎 Needs downloading to share outside of Yammer (when using New Yammer in any case)

👎 No trimming or editing

👎 Effect options are shown vertically, even when you film horizontally

👎 Video quality is better than Teams, less than OneDrive

Video created with the Yammer mobile app. You can add text, emoji, drawing but only vertically.

Phone video

You can also use your phone camera to create a video and then upload it to OneDrive or SharePoint/Teams. I have not made an example as most people will know how this works.
It takes discipline to upload work videos to Office365 and delete them from personal records. If you think this is a challenge for your employees, you’d better teach them using the OneDrive app as the preferred option.

👍 Editing options including trimming, colours, filters, formatting

👍 Quick to start

👍 Good video quality

👎 Needs discipline to remove video (if it is a private device) after upload to Office365

Recommendation: Teams desktop or OneDrive mobile app

Stream will go away, so you will have to use another way to create videos in your organization.

In my opinion, the most useful options are

  • Teams desktop, for more formal videos, such as demo’s and talking heads
  • OneDrive app, for impromptu videos or when on location

We are really missing trimming and editing options, so I hope Microsoft will add them to SharePoint soon! This Excel file with functionality planning does not have info about the editing options. (Unless I am overlooking something). But Marijn Somers told me that a good tool (Clipchamp) will be built into Windows 11, so we can look forward to that!

Of course there are a zillion other video tools available, with excellent editing options, but my goal for today is a simple swap of Stream with another app from the Office365 suite.


How have you or will you tempt your colleagues to move away from Stream and use another option instead? Please let me know!

How to transcribe a meeting with Teams or Word

I am quite happy with the speech-to-text options that the Microsoft365 suite provides, such as Dictation and Transcription. And while the Dutch language is apparently not fully out of beta yet, I am impressed with the accuracy of Dictation. It has saved me a lot of time, for instance when writing instructions or reports.

Transcription is a recent addition to the stack, and it comes in handy when you want to report an interview, create subtitles for a video or when you need a word-for-word report of a meeting, one with legal implications, for instance.

There are 3 ways to create a transcript:

  • Transcribe an existing recording in Word online
  • Transcribe directly in Word online
  • Transcribe directly during a Teams meeting

1. Transcribe an existing (meeting) recording in Word online

This is useful if you have an older meeting recording, if your organization does not have automatic transcription enabled, or if it is a non-Teams recording. You can transcribe up to 300 minutes per calendar month. This is calculated from the length of the video, regardless of the amount of spoken content.

  • You need to have a recording of your meeting, or other recording in .wav, .mp4, .mp3 or .m4a format
  • In your location of choice (OneDrive, SharePoint, Teams) open a new Word online document and give it a meaningful title
  • Click on the microphone on the Home tab, and select “Transcribe”
  • Make sure you select your desired language
  • Click “Upload audio”
  • Upload your recording and the transcription will begin
  • When the recording has been transcribed, click “Add to document” and you will be asked to add time and speaker name, if that makes sense
Clicking “Add to document” will create a popup with the options.

The document will then look like this. You can edit the text where necessary.

Your transcript from a recording.

Please note that the recording you upload will be copied to your OneDrive in a new folder, “Transcribed documents”, even if it is already in the “Recordings” folder! As recordings are generally large files, this can cause storage space issues. Remember, colleagues with an F3 license only have 2 GB of storage space.
Remove at least one copy of your video.

I have this video also in my OneDrive but a copy gets added to a newly created folder: “Transcribed Files”

This was only a small upload to transcribe so it only took 2 minutes of my monthly allowance!

Language and minutes left.

Tips:

  1. If you find 300 minutes is limiting, check if you can win time by cropping your video as much as possible (you can do that in Stream if you have no other software).
  2. Alternatively, you can use the free Word online that comes with your Outlook.com email address! (If the topic of your meeting and your company policies allows to store data there)
  3. If your recording is >200 MB and resides in your OneDrive, you may want to download it to your Downloads folder or Desktop before uploading. We have found that this reduces error messages on file size.

2. Transcribe directly in Word online

Check out the first of these two videos.
This will be useful for an interview, as shown in the video, but it can also be used for a meeting. Please make sure to warn the meeting participants that you are going to do this, as they will not get a system warning when you do!
Open a fresh Word online document and click Start > Dictate > Transcribe.
Click “Start recording” and your online meeting will be recorded and transcribed.
Next to the Word file with the text, you will get an audio file in the “Transcribed documents” folder in your OneDrive. There appears to be no limit in the amount of transcriptions you can execute this way.

3. Transcribe directly during a teams meeting

If you want to use this option, your Microsoft365 admin must have transcription enabled in the Teams admin portal, under Teams > Meetings > Meeting Policies.

Where to enable Meeting transcription

You can check whether it is available by clicking the … in your meeting control bar and then looking for “Start transcription”. This is available in the Teams desktop app only! If it greyed out, it has not been enabled.

Where you start to transcribe

When you click Start Transcription all participants will get a notification, just as when you start a recording.

All participants will get a warning that they are being transcribed.

During the meeting, you can watch the transcript by clicking … in the meeting control bar and selecting “Show transcript”. This will be shown in a panel on the right side of the meeting screen.

Open the transcript
The transcription pane opens on the right-hand side. With the … top right you can select the language.

After the meeting, you will find the transcript on the Chat tab.

All info is condensed on the Chat tab.

You can also see the transcript in the meeting itself in the Teams agenda, on the Recording and Transcriptions tab. The text is written on the tab, and you can download it as .docx or .vtt

The transcript is also visible on a separate tab in the meeting in the Teams agenda.

Tips:

4. You can download the transcript in .docx or .vtt format. The latter can be uploaded to the recording in Stream to provide subtitles.
5. Make it easy for yourself and your colleagues to identify you in captions and transcriptions. Toggle the button to automatically identify you. Anything you say will then be attributed to you.

If you have this setting enabled, your name will be added to everything you say. Otherwise you will be “Speaker x”.

My experiences

We have enabled option 3 as a test, but we have disabled this after a few weeks, as it was very confusing for our users:

  • Transcription in Dutch works well, but you will need to change the default language for every meeting you want to transcribe. Not everyone knows or remembers this, so chances are that you will end up with a Dutch meeting transcribed into English – and trust me, that is very very weird! 🙂
  • We found that F3-licensed users do NOT see the “Show transcript” in their menu, but it may be that our experiment was too short to fully roll out to my test account. According to Microsoft, they should be able to. They can use the Word options, though.
  • You can start a Transcription without recording but…
  • You can NOT start a recording without starting transciption. This can be confusing.
When starting a recording, all participants will get a message that they are not also recorded, but also transcribed. You may have some explanation to do!

We may try again when we can enable Dutch as the default language, either by following the language settings of transcription starter (see this Feedback item – please vote!) or by following the tenant language.

Conclusion

If you need a word-by-word report of your meeting, Transcription can be a great help.

The Teams options is the easiest way to create a transcipt, but currently it works best if your organization speaks English and you have instructed your colleages about the use of transcription.

If your organization does not have English as their preferred language, and/or you do not have it enabled in Teams, you can still record the meeting and use Word online, or transcribe it directly in Word (but this is a bit sneaky). It is a bit more work, as you will have to adjust the speakers names, and you will get a additional audio file in your OneDrive, but it still works well.

Have you been using it and do you have any experiences and tips to share?

Pin, save, follow, favourite the “Microsoft365 stuff you like”

While writing my latest post I came across the different words, icons and mechanisms to store “content you like and/or want to be able to find quickly later”.

So, I wrote this overview to know what is what. You may be able to use it when writing help texts and do not want to go and look what it’s called, or it may help you to understand what a colleague means exactly. There’s quite a few words and icons used for the same functionality.

I have captured the following for every application:

  1. Terminology for the action
  2. Terminology for undoing the action
  3. Icon
  4. Where you can find it later
  5. Anything remarkable

Homepage:

  1. Add to favourites
  2. Remove from favourites
  3. ⭐ (star)
  4. Favourites tab on the M365 homepage
  5. You can add everything that appears in the list to your Favourites. This is one way to save any interesting OneDrive or SharePoint documents for later.
    The other way is on the respective Word, Excel and PowerPoint online landing pages, where you can add them to favourites. These will be shown on the Microsoft365 homepage as well.
    There was an extra option in SharePoint but that has disappeared.
On the Microsoft365 homepage, you can add all content types shown to your Favourites by clicking the … . You can find them under the Favourites tab

Delve

  1. Add to favourites (popup text when you hover over it)
  2. Remove from favourites
  3. 🏷 (label)
  4. Left-hand rail in Delve under Favourites
  5. Not sure about the exact words in 1. and 2. as I had to test this on my work account and that is in Dutch. (My own tenant only has me, and that means no suggested content)
    You can also create Favourite Boards.
Screenshot from my work account, so it is in Dutch. You can click the label below a document and you will be able to find it under “Favourites” in Delve.

Forms

  1. Add to pinned
  2. Remove from pinned
  3. 📌 (pin)
  4. Forms Homepage under Pinned
  5. This action does not influence what is on your Microsoft365 homepage and vice versa
You can Pin a form from the Forms homepage and you will then see it under the Pinned tab.

Lists

  1. Favourite this list
  2. Remove this list from favourites
  3. ⭐ (star)
  4. Lists Homepage under Favourites
  5. This action does not influence what is on your Microsoft365 homepage and vice versa
You can favourite a list from the Lists Homepage or in the list itself. This one works like SharePoint sites, right? You can see your favourites on top of the Lists homepage.

OneNote

  1. Add to pinned
  2. Remove from pinned
  3. 📌
  4. Pinned Notebooks are shown on the OneNote landing page, under the tab “Pinned”.
  5. So this is different from Word, Excel and PowerPoint while they are usually in the same range.
OneNote uses Pinning, contrary to Word, Excel and PowerPoint which use Favourite.

Outlook

  1. Pin
  2. Unpin
  3. 📌 (pin)
  4. Pinned mails are shown on top of your Inbox, see also my post “12 reasons why I 💗 Outlook on the web (owa)
  5. Only available in Outlook for the web, not in Outlook desktop
One of the reasons I love Outlook on the web! You can pin mails you want to keep to the top.

Planner

  1. Add to favourites
  2. Remove from favourites
  3. ⭐(star)
  4. Left-hand rail in Planner
  5. Plans only; you can not favourite an individual task
You can add a Plan to your favourites by clicking the star next to the name, or by clicking the … and then selecting Add to favourites. You will see your favourite Plans on the left-hand side.

SharePoint Sites:

  1. Not following
  2. Follow
  3. ⭐ (star)
  4. Follow block in left-hand rail on SharePoint homepage, world icon in the SharePoint app bar
  5. Followed sites also appear as target sites when you copy or move files from OneDrive or SharePoint
You can follow a site from the SharePoint home page or in the site itself, by clicking on the star. In this screenshot, I am NOT following the Communication site. You can find your followed sites on the top left of this page and in some other places.

SharePoint News:

  1. Save for later
  2. Remove from your saved items
  3. 🏷 (label)
  4. See my earlier post
  5. Will be shown together with favourited documents, see my earlier posts
One way to see your “Saved for later” items is on the SharePoint homepage.

Stream

  1. Add to watchlist
  2. Remove from watchlist
  3. 📄 (list)
  4. My content tab > Watchlist
  5. You can also “like” a video but there is no list of your likes – “likes” are a compliment to the creator
You can add a video to the watchlist – all added video’s can be seen under My content > Watchlist

Sway

  1. Add to pinned
  2. Remove from pinned
  3. 📌 (pin)
  4. On the Sway homepage, tab “Pinned”
You can pin a Sway and it will appear under the tab Pinned on the Sway homepage.

Teams

  1. Save this message
  2. Unsave this message
  3. 🏷 (label)
  4. Profile picture top right > “Saved”
  5. You can also Pin a message, but that means you will add the message for everyone in a specific place, so this has a different purpose.
You can Save a message for later by clicking the … on the top right of the message, You can find all saved messages by clicking on your profile pic and selecting “Saved”.

Yammer communities

  1. None, just an icon underneath the community image + description
  2. Remove from favorites
  3. 🧡 (heart)
  4. Left-hand rail under “Favorites”
  5. There is also the option to Pin a post, but that is done by the admin for everyone, so this has a different purpose.
You can “💗” a Yammer community, it will be shown in the left-hand rail.

Conclusion:

The functionality to save a specific content item for later is available in most apps. I could not find it in Whiteboard, ToDo or Power Automate, and please let me know if I have missed anything.
Next to this personal action, there is often a group action where you can make something easily available for your team. This is usually called “Pinning” 📌

The nomenclature and imagery vary widely, and I would appreciate some more consistency. Personally, I tend to prefer “Save for later”. That is very clear, even more so than “Add to favourites”. We can then use the word “Pinning” for group actions, such as pinning a document to the top of a SharePoint library, a message to the top of a Yammer groep or a chat to the right of a Teams channel.
I also notice that the location where you can find your darlings varies widely too.

So, Microsoft, is this in the roadmap for a little more streamlining? 🙂

And while we are on this topic, I would also like to be able to categorize or group things using my own words, when I have more than 10, for instance. I seem to remember you could do that with SharePoint sites in earlier SharePoint versions. (On-prem, perhaps) And I know that Forms will have Collections (check out Mike Tholfsens’s video) in the near future, but I am looking forward to be able to do that with other content.

Many roads lead to your Teams meeting

The official English saying appears to be “there is more than one way to skin a cat” but as I love cats and do not support their being skinned, I have translated the good old Dutch saying that “many roads lead to Rome”.

What I want to show is that you can start your Teams meeting in many places, to make it easy for you to join your meeting.

Let’s see if I know them all, and let me know if I have forgotten one! Or more!

1. Teams calendar

This is my regular way to access. The meeting is displayed on your calendar and when you click on it, a popup will show you the details and the link to join.

Popup with meeting details

When the meeting is about to start, or in progress, the link will be shown on the calendar, saving you a click, so you can access immediately.

As the Weekly meeting is currently in progress, the Join link is already displayed.

2. Invitation in Outlook

In this case, I have created the meeting myself so I can only show the “sent” mail, but every invitation email contains two links to the meeting. When you accept the invitation, the email is removed from your Inbox, so this is not the most frequently used option, I guess.
Unless you make it a habit NOT to respond to invitations of course…but I hope you are not that kind of person 🙂

There’s a button top left, and the link on the bottom of the email.

3. Outlook calendar

As your Teams calendar syncs with your Outlook calendar , your meeting will be displayed here too. If you “live” in Outlook, you will probably use this most often. Again, when you click the meeting, you will get a popup with the meeting details, including the link.

Regular calendar view – the Join link will show in a popup
Again, as this meeting is in progress at the moment of screenshot, the link to Join is already available.

4. MyDay in Outlook/Microsoft365 landing page

If you click on MyDay, you will see your schedule for today and more, including your meeting. If you click on this message, you will get a link to the meeting. If your meeting is already running, you will see the Join link straight on the MyDay popup.

5. Outlook notification/reminder

Do you see the notification at the top right of Outlook 15 mins before start? Click on it and you will see the meeting link in the MyDay screen.

You will see this reminder in your Outlook email and calendar

6. The Microsoft365 landing page

When your meeting is about to start, you will see it in the Recommended documents on top of the page. It disappears shortly after meeting start time. Does anyone ever use the MyDay button on the top of this page? It’s there too!

OK, so the reminder is not a document, but it has frequently saved me a late entrance! 🙂

7. My Feed webpart on SharePoint

If you have a MyFeed webpart on SharePoint, the meeting will show up there, with a link to Join. The MyFeed shows your stuff, see my earlier post.

It is a “you” thing, so this reminder will also pop up in your My Feed webpart

8. Desktop notification

When someone else starts the meeting, you will see a purple banner on the bottom right of your screen, when enabled. You can Join from here, too, or send a message that you will be a tad later. Again, this has been a life-saver when I forgot I had a meeting! 🙂

As I am the only person in my tenant, I can not share the usual screenshot (that your colleague has started the meeting) but this one from an external guest is almost the same.

The banner will show you when someone else has started the meeting.

9. From OneNote (if you have sent the invitation to OneNote)

You can send an email or invitation from Outlook to OneNote, which gives you a very nice page with all info in a nice structured way, and the link to the meeting is included as well.

OK, it is in Dutch but you will get the gist.This page in OneNote is also an excellent starting page for your meeting notes.

Have I missed anything?

Please let me know in the comments! I know there’s probably a few extra places on mobile, but I do not use that very often now that I am mostly working from home.

Things I don’t like about Office/Microsoft365

You know I am a total Microsoft fangirl. I can drive people crazy by asking why they are using SurveyMonkey or Google Forms instead of Forms, why they are using expensive dictation software when they have built-in dication in OneNote and Word Online, and I have tons of other irritating questions 🙂

There are a few things however, that I do not like so much.

1. Lack of accurate timing on the Roadmap

We have a Roadmap-into-Planner setup, so every day I check what is new, what is relevant for IT and/or users, and if and how we will promote this.

While I can live with the sheer amount of change and the inconsistent content of the items (sometimes it is just a line, sometime it is a complete article, sometimes it has screenshots (yes, that is really helpful, more of those please!)) I do have a problem with the timings.

Sometimes we seem to have to wait forever. For instance, I have not yet seen the option to make every meeting a Teams meeting in the Outlook desktop at work, but I have seen it in Karuana’s demo’s and I have it in my home tenant. It should have been launched in March, but it is July and I still do not have it in our tenant. I, nor my team, have a clue when it will enter our tenant.

Right now the highlighted line is not in our work tenant for Outlook Desktop users.(Screenshot from my personal tenant). The functionality has been available for Outlook Web users for months. If anyone can tell me when I can expect this for my work tenant, or what we have to do to make it visible, please do!

Another example: my F3-licensed test account still does not have the text options in Forms (Bold, italics, underscore, lists) in Forms that I have had for months in my E3-work account. But nowhere it is mentioned if and when this will become available for F3-users.

On the other hand, sometimes my colleagues ask me questions about something that I have not even seen yet. And my E3-work account is on Targeted Release, so I should have had it before them!

So, please make that timing a little bit more accurate, so we know what to look for, and promote, when!

2. The hype around PowerApps

This is an onpopular opinion but I am not very impressed with Power Apps, with the exception of Power Automate, although it is getting more and more complex, after nicely starting out as “the Microsoft alternative to IFFFT”. (which is a very simple workflow tool).

In many cases I simply do not see why you would create a PowerApp when you can do it perfectly well on SharePoint. Yes, a Power App will generally look better, and may be easier to use on your phone, but is that worth the extra complexity, the extra licensing, the extra consultant costs?

Additionally, it is being marketed as a “low code/no code” product. Well, as someone who does know a bit of code and generally picks up things quickly, I must say that creating a PowerApp is quite a lot of work and definitely not “low code/no code”, especially not in my type of organization. Our Microsoft partner has installed a few PowerApps and they have been hell to set up, get to work, and maintain.

3. No delegation options in Teams

Yes, I am perfectly aware of the fact that every manager should be able to make their own appointments and view their own meeting documents, but in real life things may be different. You do not want to bother managers with organizing a meeting with people with full agendas. A secretary/personal assistant can do that. A secretary/p.a. can take a lot of work out of a manager’s hands so the manager can focus on the skills they were hired for. Call me oldfashioned, but I think the secretaryp.a. still plays a valid role in organizations.

While Outlook has a ton of options to share mailbox and calendar and what not between manager and secretary/p.a., Teams, especially private chat, is very much a personal tool. It does not allow delegation and it does not accomodate group mailboxes or group accounts. Yet, Teams is being promoted as “THE new place to do your work”. If we want Teams to be the only work tool you need, there should be delegation options for secretaries/p.a.’s, otherwise there is not much point for those people to move away from Outlook.

There’s a User Voice item out there: Delegate capability – Welcome to UserVoice!

4. Differences desktop/online

I told you before that the majority of our users has an F3-license and works exclusively with the web apps. (Except for Teams, where we have the desktop app installed for everyone).

While the web apps are very good and getting better quickly, they lack some functionalities of the desktop apps, and that can lead to questions and irritations. These often come from people who have worked at another organization where the desktop apps were the norm, and they sometimes have difficulty switching to the web apps.
We always try to come up with either the way to do it (some things are just in a different location, you need to check View > Reading View to see the final document) or with an alternative, such as the Watermark. We do not know every small package of functionality so we are often surprised by a question and then have to investigate the options. Sometimes we redirect people from Word or Excel to PowerPoint (e.g. when they use a lot of graphs or pictures), sometimes we replace a document with a Form or a SharePoint list, etc.

The ribbon in Word for the web. Fewer tabs, and in some tabs fewer options, especially for designs and layouts. That does not mean things can not be done, sometimes you can do it in a different way.
The ribbon in Word desktop. More options, especially for graphics and designs.

While this is often fun and challenging, it can be a nuisance when people really need the desktop app because they work with another software that only works with the desktop apps. Some people need to sync an Excel file from another system once a week, or once a month, and then they need the desktop since the web app does not do that. If we switch them to an E3-license for those 5 minutes a week, chances are that they will never learn to appreciate the web apps.

So, to Microsoft: the fewer differences there are between the two app versions, the better. And to Microsoft partners and developers of software and apps: please make your products compatible with the web apps, not with the desktop apps.

Are there any things you do not like about the 365 suite?

Please let me know!

Leaving the organization gracefully

We all know that your personal mailbox, agenda and personal documents will be deleted some time after you leave the organization.

But recently we have seen that more and more team content is stored (and automagically shared) on personal OneDrives, which means that when someone leaves, that shared content will be deleted and lost.
Owners may not be aware that they are the owner of the video, file or Whiteboard, and that these resources live on their OneDrive.
Colleagues of leaving employees may be in for several unpleasant surprises.

I tried to compile a list of things to look for, so if you are the leaver, you can check these items and decide if they needed to be handed over. You will save your colleagues, your manager and your Microsoft365 admins a lot of hassle!

Yes, the manager will have control of your OneDrive for some time after you have left, but

  • do they know enough about the details of your work to know what to keep and what to let go?
  • do you really want to burden them with this?
  • do you want to leave your remaining colleagues in the dark about team stuff?

If you know that a colleague is leaving, you may want to help him/her with checking NOW which content you need after they have gone.

Step 1: Teams Meetings

Are you the organizer of a regular Teams meeting? The meetings will keep running, but nobody will be able to change dates or times, add or delete invitees, or manage the meeting details. At this moment it is not possible to transfer the ownership, but I think that is in the Roadmap.
It is therefore important to either

  • Stop or cancel the meeting, and ask a colleague to re-schedule it. This will mean that meeting links and resources will change. This is the best suggestion for smaller meetings.
  • For meetings with many attendees, a collague can duplicate the event by opening the meeting, clicking on the … and then “Duplicate event”. The meeting will the be copied with the same invitees. The new owner can then remove the old organizer and make sure times and recurrence is OK. This will send a message to all people in the meeting, but in any case you do not have to add them all again.
    This will also change link and resources.
  • Check meeting chats for important files or attendee reports or recordings that needs to be safe-guarded in SharePoint.

Step 2: Regular files – copy or move to Teams/SharePoint or delete

  • Documents
  • Attachments (from Outlook)
  • Notebooks
  • Pictures
  • Office Lens
  • Transcribed files

Step 3: Special files

I have based this list on the various OneDrive folders as described in my earlier post “Who created those folders in my OneDrive?

Microsoft Teams Chat Files : everything you have shared in private chats

Do you realize that all those screenshots, funny videos and other stuff, that you have ever shared in a private chat (which means: not shared in a Teams channel) live on your OneDrive and will therefore be lost when you leave? It will not be big issue for that silly gif that made your colleague smile when they were feeling down, but there may be relevant documents or screenshots that your colleagues want to keep.

So, you can either check the Microsoft Teams Chat Files folder in your OneDrive, or scroll through your private chats. Upload the files to a relevant Teams/SharePoint site or send them as attachment to your colleagues. (Usually not recommended, but they will need their own document)

Now you will understand why Matt Wade, in his Definitive Guide to Everyday Etiquette in Microsoft Teams, says: “Work should not be completed in private chat”. (Page 14) 🙂

Microsoft Teams Data: Meeting notes from Teams meetings

This contains the Meeting Notes you have created in Teams meetings. I personally do not use this very often to take notes, as I think the functionality is rather limited, but it is helpful in emergencies. Additionally, it does not open easily from OneDrive, I had to select an app to open it (it is an .mht file).

Do you have Meeting Notes that you would want to keep? Copy the text into a Word or OneNote document in the relevant Teams/SharePoint site.

Recordings: Videos from Teams meetings

Another shared resource that is being stored in a personal location. Make sure you move the video(s) that need to be kept to Stream or Teams/SharePoint.

Whiteboards: Sketching sessions (can be from Teams meetings)

At this moment Whiteboards are still stored in Azure, but they will follow the Recording path and be stored in the OneDrive of the person who creates the Whiteboard. This is expected to happen in October 2021, according to the Microsoft Roadmap.

I expect you will be able to copy/move Whiteboards, and I will update this post when I know more.

Step 4: Applications

Forms – the Forms themselves

Please check out my earlier post on how to handle Forms when you leave.

Forms – files from “File Upload” questions will be in a folder called Apps

If the Form will still be running after you leave, please move ownership of the Form to a relevant Teams/SharePoint site as mentioned above.
If you still need these uploaded files, whether the Form is still running or not, please move them to the appropriate Teams/SharePoint site.

This question type will create a folder in your OneDrive to store the documents – please make sure they are preserved if they are still needed!

Workflows

Power Automate workflows are not stored in your OneDrive, but they are personal. Your Flow will keep running (if it is not something in your personal apps, of course) but if it needs an authentication, or needs an edit, it will need a new owner.

You can simply share the Flow with a colleague, so you co-own the Flow.

In your “My Flows” you can select the workflow and share it with your successor. Make sure they have permissions to the source info!

If you have not done that before you leave, your Administrator will be able to hand it over to your colleague. But hey, your Admin is usually busy enough and all those individual fixes take a lot of time! 🙂

How to manage orphan flows when the owner leaves the organization (microsoft.com)

Stream

Do you have any instruction videos that may be useful later, or do you have any old meeting recordings that should be kept?
In Stream, go to “My content” and then “Videos” and see what needs to be transferred. Open the video in question, click the … and select “Update video details”. See screenshot.

More info: Permissions and privacy in Microsoft Stream – Office Support

Here’s how to start changing ownership of a video. Not the most obvious wording 🙂

PowerApps

I do not have too much experience with PowerApps, so I have found a blog that explains how to transfer PowerApps: HOW TO: Change PowerApps Owner | Todd Baginski’s Blog

Lists

For lists in a SharePoint site, you do not necessarily have to change ownership, as generally all Owners will be owner of the List.

For personal lists, that live somewhere in your OneDrive, it may not be so easy. You will have to recreate the list in a SharePoint site. You can use the Excel file as a basis (see my earlier posts on the topic). I hope Microsoft will make moving a personal list to a SharePoint site easier in future!

SharePoint sites

Make sure you appoint another Owner if you are the only one (which is not a good idea, I always suggest to have at least 2 Owners for backup)

You may also want to check the permissions to content that is important for the team, and make sure it will still have an Owner after you have left. Appoint another Owner or, even better, make sure that the permissions of that content follows the permissions of the site.

Have I missed anything?

Or do you have any experiences or suggestions to share? Please let me know!

Update 7 June 2021:

Good addition from Loryan Strant, I do not have too much experience with the apps mentioned (except for OneNote, of course) but be aware if you are using them!