Create a photo album with OneDrive app and client

OneDrive-photo-album-631084_640In my current role I have a slightly wider scope than “just” SharePoint and Yammer. I am now troubleshooting and advising about the other Office 365 tools as well, so I need to expand my skills and knowledge rapidly to stay a few steps ahead of my audience 🙂 .  

The other day one of my colleagues asked if there is an easier way to create the photo albums he needs to make as part of his role. 
The organization I work for occasionally rents out parts of their buildings or hires space from others.  In those cases, my colleague takes pictures of the buildings to document their current state. The pictures are collated into an album which has to be signed off by both parties at the start of the rental agreement. 

What is the current method?

Getting pictures

  1. Take pictures with smartphone
  2. Send pictures to work email (in batches to avoid too large attachments)
  3. File pictures from each email in OneDrive on laptop (Attachments folder)
  4. Create project folder in OneDrive
  5. Transfer pictures to project folder
  6. Remove pictures from phone

Creating the album

  1. Open a new PowerPoint presentation
  2. Make cover slide
  3. Insert pictures from OneDrive into PowerPoint
  4. Arrange pictures on slides
  5. Add end slide (usually, with the dates, names and signatures)
  6. Save PowerPoint as PDF

Well, I thought that I (or rather, Office 365) could make things easier for him. I confirmed he had the OneDrive app on his phone, so I came up with…

The new method

Getting pictures with the OneDrive app

  1. Create project folder in the OneDrive app
  2. Open the folder

    OneDrive-Empty
    Two ways to take a picture: The + button top right and the diaphragm button on the bottom.

3. Take pictures with the + button top right or the diaphragm button at the bottom (make sure you set it to “Photo”) 
4. Pictures will be saved in the folder

OneDrive-savedinfolder
If you keep the folder open, the pictures will be saved here by default.


Creating the album in the OneDrive Client

  1. Create a picture of the cover and end slides
  2. Add to project folder of pictures, making sure that cover and end slide are the first and last items (generally, adding an A and a Z in front of the respective names will do the trick)
    OneDrive-all pictures
    Example of an album – cover image, the pictures taken, and the end images. (with a blank image to make the number even and have a better result)
  3. Select all images in the folder, click “Share” > “Print”

    OneDrive - SharePrint
    You will find the Share > Print option on top of your screen

4. In the screen that pops up,  select “Microsoft Print to PDF” as the printer and determine a layout (generally 2 or 4 to a page)

OneDrive-popup
In this screen, please make sure you select “Microsoft Print to PDF” as the printer. You can  change orientation by clicking “Options” .

5. Click “Print” and save the resulting PDF. You can view it here

Remarks:

  • You can only create the album in the OneDrive Client – the Online and App versions do not have this functionality. In fact, this is Windows functionality and not limited to OneDrive. 
  • You can use a “blank image” just before the last image to make the number even and have a better print result. 
  • You can change the orientation of the pictures/album by clicking “Options” in the pop up screen and then “Printer Properties”.
  • Unfortunately you can only use one display for the whole series. It would have been nice if you could decide to make the both cover and end slides a full page in the series, and provide the pictures in e.g. 4 on a page. This is clearly a limitation of this way of working.

The result

My colleague was especially happy with the camera options of the OneDrive app, which he was not aware of before. Just after taking a few pictures he realized that this will be a big time-saver. 
The second part, creating the album with the OneDrive Client instead of PowerPoint, felt like a bigger change in practice, but he was willing to try it. 

As usual, this is nothing fancy. It is just trying to match a need with existing functionality. And it makes me happy when I succeed. 🙂 

Image by Congerdesign on Pixabay.

How did I get here?

Decorative picture of a diverging path

We have recently seen some blogs about how most of us rolled into this work. (e.g. Mark Jones, Gregory Zelfond, Veronique Palmer, Simon Terry and Simon Allison )

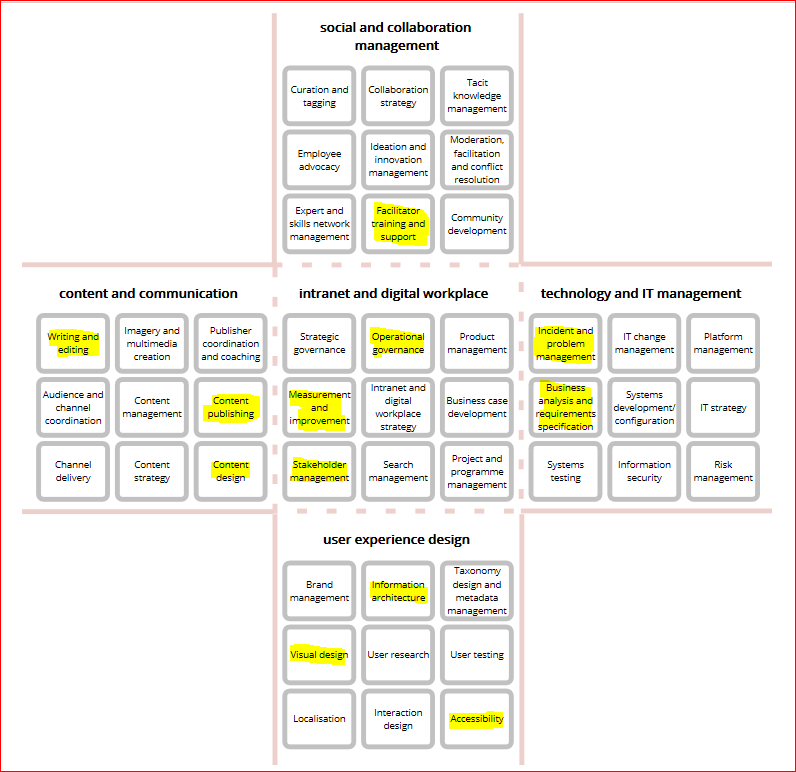
So I thought to share my story, triggered by the workshop that Steve Bynghall and Chris Tubb hosted at the recent edition of IntranetNow. They showed their newly developed “Intranet and Digital Workplace Skills Matrix” which can be used to help teams determine if all relevant skills are covered and if not, which gaps need to be filled.
But…it can also be a useful and fun exercise for yourself. In the workshop, Steve and Chris asked us to mark those boxes where we have experience. It was interesting to see that I have worked in each of the 5 categories and I think I was the only one who could say that. I usually describe my work as “helping people with using SharePoint and Office365” but within that definition I appear to have had very different roles over the years.
So, as an example of how to get insight in your own career, let me share my career path with you:

1. Knowledge Management

After 20 years in new (food) product development, I started a role in Knowledge Management in the same organization, which at that time focused on new product development. Part of the project meant I had to share the outcomes on the intranet. This ticked a number of boxes in the Content and Communication “arm” mainly.

Skills for this role: Writing and editing, Content management, Content publishing, Content design and some Information architecture.
The skills I needed in my Knowledge Management role

2. Intranet adoption (awareness and training)

During my Knowledge Management project I met the intranet team and they asked me to help them create more awareness and use of the intranet. In this role I tried to make people aware of the intranet and how people could use it for themselves. I also did some basic troubleshooting, support and training. At that time (around 2003 or so) intranets were generally custom-built and options were limited – apart from a Frontpage website, a home-built “document cabinet” and a Forum tool there was not much else. Still, in an international organization even these limited tools helped to share information with colleagues in other locations and businesses, so a number of people were very active on the intranet.
The boxes ticked made a shift to the right.

Skills in this role: Faciliating training and support, Operational governance, Measurement and improvement, Stakeholder management, Incident and problem management, Information architecture.
Skillset moving to the right in my second role.

3. Intranet adoption (configuration)

Then we moved to a SharePoint (2003) intranet and found so many options to help employees, that we decided to act as internal consultants, identifying painful processes and configuring sites to facilitate the processes and make them more efficient. I have blogged about this earlier:
That was a wonderful job which taught me a great deal about business processes AND about SharePoint!

In this role I used the following skills: Tacit knowledge management, Facilitator training and support. Operational governance,Measurement and improvement, Stakeholder management, Incident and problem management, IT change management, Business analysis and requirement specification, Information architecture, Visual design, User testing, Accessibility
Business Analysis and requirements specification was a large part of my third role.

4. SharePoint site collection manager

After being made redundant as result of a reorganization, I found another job at a multinational organization. My role was to act as the site collection administrator, making sure procedures around customizatons were adhered to, the site collection did not grow too large (yes dear reader, in that 2007 SharePoint each site collection was allowed 2 GB, which is not much in current standards), doing housekeeping on empty sites etc. I also configured sites, did troubleshooting and gave advice and trainings.

The skills I needed in this role: Writing and editing, Content publishing, Content design, Facilitating training and support, Operational governance, measurement an improvement, stakeholder management, Incident and problem management, Business analysis and requirements specification, Information architecture, Visual Design and Accessibility.
I was quite a Jack-of-all-trades in this role 🙂

5. SharePoint, Yammer, Video support

When we had launched our new intranet on SharePoint Online, I was part of the support team, figuring out issues with permissions, document management, pages and web parts, Yammer and Video. I also curated and created help materials and was in charge of a successful Yammer group on Office365, where we answered questions and informed people about changes in functionality or issues, and where people shared tips and tricks.

For this role I needed the following skills: Content publishing, Curation and tagging, Facilitating training and support, Community development, Operational governance, Incident and problem management, Information architecture and Accessibility.
Curation and community development were new skills I needed in this role

6. Office 365 adoption

My last role at that organization was to help people use the various elements of their digital workplace. The focus was on Office 365 but other all-employee tools were in scope as well, such as Adobe Creative suite license changes and a new password reset system. I was helping with software launches and changes by figuring out how much and what type of adoption effort was needed, finding help materials (or creating them if they were not available) and providing communication and training to local support people.

For this role I needed Curation and tagging, Facilitator training and support, Community Development, Measurement and improvement, Stakeholder management, IT change management, IT strategy, User testing.
My Office 365 adoption role skills

7. Office 365 functional management

A few months ago I had the opportunity to change jobs..in a big way! After 35 years of working in multinational commercial manufacturing organizations, I now work in an all-Dutch mental health care organization.
I am still providing second line support, I am an Office 365 portal administrator, I help people understand all tools within Office 365, I invent solutions for awkward processes, I create training materials if I can not find them in Dutch, co-decide which of the endless changes in functionality needs to be communicated, and everything else about Office 365.
So, which boxes have I ticked? Check it out:

For this role I need Publisher coordination and coaching, Curation and tagging, Collaboration strategy, Facilitator training and support, Community development, Operational governance, Measurement and improvement, Stakeholder management, Incident an problem management, IT change management, Platform management, Business analysis and requirement specification, System development.configuration, IT strategy, Information architecture and Accessibility.
Currently needed skills – quite a wide range, which is great!

Conclusion

You can see some skills coming back in almost every role. Of course I have my personal interests that I try to incorporate into each role. But also my (then) existing skillset and earlier experience have influenced the boxes that I have selected. I always try to create a role with maximum interest and learning opportunities for myself.
I can heartily recommend this to get an insight into your own career. Give it a try!

Image courtesy of James Wheeler on Pexels.com

Meeting Actions in a Team Site

Actions-FeaturedSome time ago I was contacted by an employee from one of our locations.

What was the problem:

The department she worked for had a lot of meetings, and everyone was a bit confused about the actions and decisions that resulted from those meetings. All meetings had different attendees, and meeting information was properly documented and accessible for all, but in various files and in various locations.

This resulted in the following issues:

  • People had no central overview of all tasks assigned to them at the meetings
  • People forgot where the documents were, because they could be in different places
  • Meeting owners had no way to check progress between meetings
  • The workload was not evenly distributed – some people had too many action points and could never finish them all on time, while others had almost none.
  • People were sometimes given conflicting tasks in different meetings (such as:  “we need to keep more stock so we can work around inconsistent raw material deliveries”/ “we need to reduce stock because it costs money”) and because there was no central overview, it was difficult to recognize those.
  • It was not always clear which decisions had been made, by whom and when.

What was the solution?

Well, their team site, of course! 🙂
They wanted to have all the action points in one central place. They thought of an Excel file, but reckoned that that could create issues with concurrent editing, and in fact their first question was if they could do something to avoid that.

Of course I showed them that it might be much easier to use a list.

I started with a Task list, because they liked the idea of an email notification.
I added a few columns, such as “Meeting Name” and “Topic” for  classification.
I created some extra  views: “Open Action Points” grouped by meeting, and a view grouped “By Topic”.

Entering a new action
This is the form to capture Actions from the meeting.

All open actions
All Open Actions – this is the View used during meetings.

This setup was easy to understand and work with for everyone and was implemented in no time. The only reason that they had not done this earlier was because they did not know it could be done this way!

The Decisions List was a separate custom list with similar “Meeting Name” and “Topic”fields.

What were the results?

  • Time savings because all actions and decisions are in one easy-to-find place
  • Consistent progress management of action items and decisions
  • Faster turnaround of action items because everyone knows the list and the process
  • Better distribution of tasks over all meeting attendees
  • Insight in and avoidance of conflicting assignments
  • Insight in decisions taken
  • 3 other departments that want a similar setup (I have already created the list as a template)
  • The project was featured in the local employee newsletter (mentioning me as well :-))

Yes, this is simple standard SharePoint and technically not very challenging. However, this very simple solution has made a real difference to that department and to the company. So I think it is worth mentioning!

While I was recreating this list in my own Office365 environment I noticed the Timeline bar. I do not remember seeing this before so I am curious what it does. Another thing to investigate!

Timeline
The Timeline in the Task List. This is available on every view.

Image courtesy of adamr at FreeDigitalPhotos.net

SharePoint testing for Process Owners – Feedback and Finalization

In my earlier posts, I have helped you prepare and start testing you SharePoint solution. In this final episode we will discuss giving feedback and finalization/implementation.

Step 8. Give feedback to the person who is configuring the site.
First discuss your notes from steps 5, 6 and 7.

Then, also think about the views in your list or library. Now that you have created some items you will be able to see how your views pan out. Views are a great help in managing your process, but they are often not used to the max.

  • Are those columns shown that you need most, are they in a logical order? Can we remove columns for a better overview? Do we need to add some to make the data more meaningful?
  • Are the items sorted in the desired order (e.g. newest on top, highest priority on top, nearest due date on top)?
  • Are the views filtered correctly? (To avoid information overload)
  • Are the views grouped correctly? Would grouping help you with the overview, or does the grouping hamper your understanding of the data?
    (For instance, I do not like double and expanded grouping – it takes up a lot of space. It also makes your sort order less workable)
  • Do you miss any views? Think about how you will manage this process, and what information you will need. An overview of different issue types? The number of open issues? The amount of money associated with these issues?

Homepage View for CRM: overview of number of open incidents and amount of money involved.

Some items of your feedback  will be easy to fix, some things will need a workaround, and some things will not be possible at all. It may take some discussion for both parties to understand requirements and possibilities.
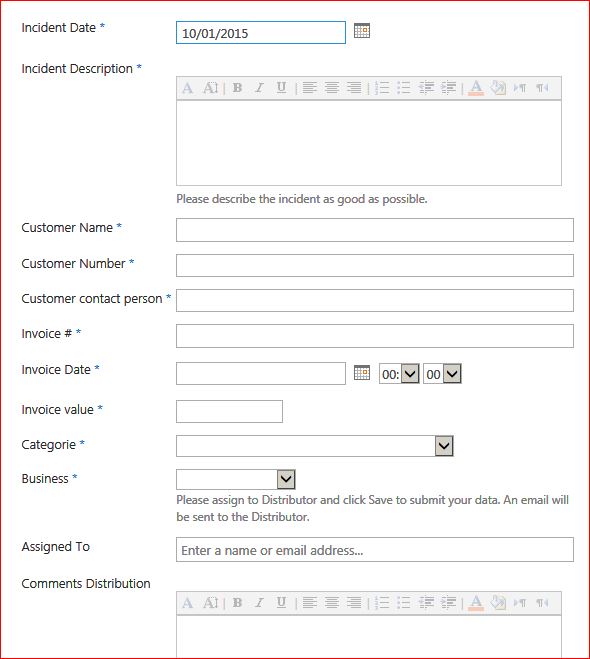
In the case of CRM, we had a lot of debate on the “Assigned to” field. This was used in every step and positioned at the bottom of the first step. If you had a role further in the process, you had to scroll up, and sometimes quite some distance! If you did not do it correctly, you could also accidentally change existing data, especially drop down columns. This could not be fixed, but we gave instructions about HOW to scroll up – “point your mouse somewhere in the white space and scroll up to avoid changing the existing data”.

Step 9. Repeat with the improved solution.
When your configuration person hands over the optimized list, repeat steps 5, 6, 7, 8 until you are satisfied. It may take only one small change (then your testing programme can be focused on that one item) or a massive change that will need a complete retest. (Luckily this has not happened too often).

Step 10. Test with others. 
When you have tested all scenarios and are convinced that this is what you need to manage your process, test it with your intended users.
Repeat steps 5 to 9 in the correct roles until everyone understands the process and is ready to use it. You may need to create some training materials to help new people learn fast and as reference.
Yes, this can be a lot of work. But as mentioned before: Testing your solution thoroughly, and not just “looking at it”, will speed up the implementation and avoid changes later.

Next steps.
I am now going to use this myself 🙂
This text may also lend itself to being made into a one-pager of sorts. That will be another fun project!

Please feel free to use this for your own processes, and let me know how it worked out! Any additions or suggestions are welcome!

Image courtesy of Stuart Miles at FreeDigitalPhotos.net

SharePoint testing for Process Owners – and now for real!

In my last post I helped you make preparations for testing your solution properly. Just having a brief glance and thinking “looks good” is not enough. You really have to “live” the process to see if I have translated your requirements correctly.

So here we go!

Step 5. Run the process as it should run. 
That means you enter an item in the correct way, assign everything to yourself if appropriate, and click on OK at the right moment. Look out for the following:

  • Are the fields in a logical order? (The process starts at the top and ends at the bottom)
  • Are the column names, the choice values and a description/instruction correct and easy to understand for your audience?
  • Are the correct columns mandatory – or not?
  • When you click OK or Save, is the next screen you see logical and expected? (For instance, do you go to “New Requests” or a “Thank You” page?)
  • Do you receive a notification from an Alert or workflow? If you use workflow, are subject line and body text of the email meaningful, and is the attached link accessible?
  • Is the newly submitted request shown in the desired way on the library/list and on any page? (E.g. does it go into the view “New Requests” and not into “Completed Requests”?)

Make a note of all things that are incorrect, not meaningful, that could be improved or that you would like to add/remove.
Now, switch to a different role and do the next step in the process. Start from the notification or the workflow or wherever you need to start from.

Softwre Costs - step 2
The second and last step is to look at the input as the IT manager.

  • For CRM: You will now act as the Distribution Manager, add information and assign it to Quality Assurance.

CRM Step 2
CRM Step 2: Distribution department receives entry from Customer Services, then hands it over to Quality Assurance.

Repeat for the other steps (where appropriate) and make notes of everything you want to discuss.

Step 6. Repeat with different scenarios. 
Run the different scenarios you have created in step 2 and see if it still works as planned. E.g. use some different values and/or reject an item if you first approved one. Make notes.

Step 7. Hack the process.
If you have found a showstopper in steps 5 or 6 (e.g. an error message) skip step 7.

But if it all still works as planned, make a deliberate mistake or two. Think about mistakes that you or your colleagues may make. Enter a value that is not allowed. Forget to fill a mandatory field. What happens? Is it clear that the process is not going well? Do you get enough information about the problem and how to solve it? Make notes.

Up next: Feedback and finalization.
In the next post, we will discuss giving feedback, finalizing and implementation.
In the meantime, if you have suggestions or additions, please let me know!

Image courtesy of Kittikun Atsawintarangkul at FreeDigitalPhotos.net

SharePoint testing for Process Owners

This picture has been inspired by this book: http://it-ebooks.info/book/2079/

When I create a solution, I always casually ask the process owner to “test it”. I have found that I often get change requests when the system has been running for some time. This has made me realize that process owners may not always know HOW to test properly.
Although SharePoint is pretty flexible, it can be hard to make changes afterwards without compromising content and setup. (Ever tried replacing a Choice column by a Lookup column mid-process?) I would like to prevent that.

How should end users test?
I have looked for good websites or “Software testing for dummies” but I have been unable to find something sufficiently practical for this purpose. Remember, my users excel in other things than IT and testing. They do not need a lot of theory. They just want to get it over with as soon as possible.
So I thought I’d write down an average test scenario “for the business”, based on the solutions I usually create. Please let me know if you have additional resources and ideas.

My usual SharePoint solutions.
My solutions usually consists of a list and a few actions.
Someone enters values in the list, clicks OK and then an Alert (or workflow email) is being sent, and the recipient does something. There may be several cycles.
Or, a little more structured:
Data Entry > Save > Notification > Recipient takes action > Recipient enters or changes data > Save > Repeat from “ Notification”  if needed.

I will use two examples, described before:
* Software Cost Reductions. This is a very simple one-step process: Data entry > Save > Notification > Recipient takes action.

SoftwareXentry
Simple process: survey with 2 questions.

* CRM in a TeamSite. This is a multi-step process with different roles, where there are  several cycles of Notification > Recipient takes Action > Recipient enters or changes data > Save.

First part of a Multi-step process

Why do I not do this for my users?
Oh I do. Before I ask the process owner to test I have made sure that it works at least from a functionality standpoint. But I know too much about SharePoint, so I generally know what to expect and where to look, even if the solution is not very intuitive. And I do not know the process as well as my process owner does, and I do not know which mistakes their colleagues may make.
Only the process owner can give me that information.

But it is so much work!
Well, that depends. Some processes are very simple to test and will take 15 minutes. The CRM example on the other hand was a complicated process, and it took several optimization rounds and several weeks to be OK and clear for everyone. The business case was enormous so all effort was worth it! And implementation went very smoothly because it was tested rigorously by several people.

So, here goes:
How to test your SharePoint solution.

Please test your SharePoint solution properly to answer the following questions:
– Have we understood and captured your needs correctly?
– Will this help you with a better and smoother process?
– Is it simple enough to be adopted quickly by your team?
– Do you feel confident with the solution so you can introduce it to your users and own the solution?

Step 1. Check the process.
Have the process description or flowchart ready. If you do not have a flowchart, you may want to write down the different steps schematically, from first entry to finalization. Note the different roles that you can have.

  • Software Cost Reductions: You will be an end user, and the local IT manager.
  • CRM: You will be Customer Services, the Distribution Department, the Quaity Department, the Transport organization (external), the Business Manager and Treasury.

Step 2. Sketch some common scenarios.
Imagine some likely scenarios.
What is the ideal process? What are the different routes an item can take, e.g. approval, rejection, delegation, wait for more info, etc. Are there any mistakes that are often made?
Be prepared to test all those scenarios.

Step 3. Set Alerts.
If this process depends on Alerts, make sure you have the proper Alert(s) set up even if you will not be the recipient of the Alerts in the real situation. You will need to check if all works OK first before handing this process over to others.

Step 4: Plan time!
Plan time in your agenda to do this. You are expected to run the process several times (2-5) in its entirety by yourself. Please allow time to make notes of your findings and give feedback.

  • Software Requests: 15 mins.
  • CRM: could be a day.

OK, these were the preparations. Next time, we will start to test properly!

No company pain, no SharePoint gain

Pain-ManThe conference audience sniggered when I showed a slide with that title a few years ago. It was one of the lessons learned from doing SharePoint configuration projects. I sincerely believe that SharePoint adoption will be easier if your business is suffering.

Here is how:

1. SharePoint can help manage a portfolio of projects that boost performance.
Companies that are underperforming often introduce company-wide projects to analyze processes and find ideas on how to increase top- and bottom-line growth. Managing the programme of those projects can easily be facilitated with SharePoint. I have done that before.

Collction of Tam Sites to manage an improvement programme
Portfolio management can be done easily with a collection of Team Sites, one for each project or topic.


2. SharePoint can facilitate processes.

Every company may be losing money because processes are not optimized. Rich companies may have the budget to buy the best possible tool for every process (they have to be careful not to end up with a quilt of different solutions, of course). But if you do not have that money, and you have SharePoint you can use SharePoint to facilitate those processes.
Remember, SharePoint can generally provide you with at least 80% of your requirements. That is not too bad, is it?
An example is CRM in a Team Site – a system to collect and process customer complaints. In an improvement project, it was found that the company spent large amounts of money on reimbursing customers who complained. It turned out that there was no consistent process to manage complaints. A project was started to map and redesign the process.  The idea was to use SAP, but due to timing and budget restrictions it was decided to use SharePoint as an intermediate solution.
After introduction of the new site and process, the company was able to save millions of dollars by no longer reimbursing every customer regardless. Issues could now be investigated and responsibility assigned. And by keeping track of all complaints in one database they could analyze where internal processes could be improved.

3. SharePoint solutions can easily be re-used.
When budgets are low, companies can drive re-use of existing solutions instead of allowing different business to create their own solutions.
If you have a process facilitated by SharePoint, and you want to re-use it for a different business or team you can generally make a template out of the list, library or site as a starting point for the other business. (You may want to read my 10 Tips for Choice and Lookup Columns because columns behave differently when templated)
The concept of CRM in a Team Site has been re-used for various other processes in different countries, as well as Telesales and Software Reductions.

4. Everyone will learn what SharePoint really looks and works like.
I know it is fashionable to say that SharePoint looks ugly. But I am always scared when I hear intranet managers boast that “our intranet does not look like SharePoint at all”. It means they will not able to use standard training and support, and when they migrate to a new version all those custom changes will likely not migrate well, and they will be depending on 3rd party support and their costs for eternity. (Trust me, I’ve been there)
If your company is on a budget, you will not have money to hire consultants to do “fancy design”.  But then, why should you? With some standard things you can make your site very presentable. Remember, this is an internal tool that should make people’s work easier.  It should be easy to work with first and foremost.

So, if your company is in pain, SharePoint will be used more often and more in its default shape, than if you have plenty of budget for everything. In my opinion that is a good thing. It will allow users to become familiar with SharePoint more quickly because they will encounter it in its native state more frequently. The menus and buttons will always be in the same place. Lists, libraries and will work the same way across the company. It will mean a consistent user interface and show employees that SharePoint can be used for many purposes. You know what? It feels strange talking about “SharePoint” when my last post was so much about not using the word SharePoint anymore.

Perhaps the start of 2015 will be a good time to start using “Office365” more often.

But before that, I wish all my readers a merry Christmas and a wonderful, happy and successful 2015!

Image courtesy of imagerymajestic at FreeDigitalPhotos.net

Monthly Reporting in a Team Site

Monthly reporting thumb

I thought it was time to show you another real-life example of facilitation of a small process.

What was the situation?

All units had to deliver a certain report at the end of the reporting period, before consolidation in their business. It turned out that the units reported different things and delivered their reports at different times.
Of course this was not the way to go, so someone made an overview of the different scenarios that were in use, and from that (and with many discussions with everyone involved) they created the desired process that all units would have to follow for consistent reporting and consolidation.
The process described all actions that had to be completed at certain days around the end of the period. Every unit had to mark the action as completed on the day specified.

What was the solution?

The next step was to think of a place where every unit could monitor their progress. We expected to be many items (x actions * y units), and the items would be edited regularly by many different persons, which might lead to messing up each other’s data, so we first thought we would create a list per unit. That would also make it easy for people to find their own dataset.
However, that would make it harder to see if everyone was on the right track, and it would mean we would have to make changes to many lists if there ever would be a change in the setup.
We decided to go for one central list.  A custom list, of course! I would add some safety measures to prevents accidental deletion or editing of other people’s items. (Few Datasheet views, a custom set of permissions and targeting – see also Dangers of the Datasheet)

Every unit had their own identical set of actions. Next to the actions, there were fields for unit, the responsible, the number of days before or after the end of the period that every step had to be taken (from -3 to +15), a free text box for comments and of course a Yes/No box to note if the action had been completed.

All units have the same set of actions to complete.

I then created one Datasheet view (Update View) with as few columns as possible to make it easy for all participants to update the list. I created a number of Standard Views  for the process owners to keep an eye on general progress.

Before the start of reporting
This is the set of identical actions that every unit had to report. Before the start of the cycle, it would look like this.

Progress view to track if everyone is on time.
Progress View at day 0. It is immediately clear which unit is behind with their reporting.

I also created a SharePoint group for each unit. Every group got a set of custom permissions: “Contribute without Delete”. This was one of the measures to avoid accidents that may occur when a big list is frequently edited by many people.

Targeting option in the web part.

For each unit I created a page, and added the list webpart on it with the Update View. I filtered for the unit, sorted by day, and then targeted the webpart to the SharePoint user group of that unit. That way we made it easier for people to see and update their own actions only – if they accidentally clicked on the wrong page, they would see a blank page.

All actions that have to be completed
This page shows all actions that have to be completed for this unit.

After each period had been reported in the correct fashion, the site owner made an export of the list into an Excel file for archiving, set the Completed fields to “No”, and the system was ready for a new reporting cycle. When “action time” neared, she would add an announcement on the Homepage that the new cycle was ready to start.

What was the result?

After a trial run in a few units, it turned out that this worked well. The pages per unit and the Excel-type update made it easy for people to find and update their own items. It was also easy for management to track progress – the Progress View (showing only items where “Completed is not equal to Yes”)  showed if every unit was on track.

From now on, reporting was done in a uniform fashion and consolidation of the reports was a lot easier than it had been. After some months, another business asked me for a copy of the setup. So I guess it was a success  :-).

Image courtesy of Stuart Miles at FreeDigitalPhotos.net

Teleconference requests in a Team Site

teleconferenceThis is another example of how you can work with external partners via a Team Site.

What was the problem?

The company I used to work for was a big fan of conference calls, with or without a Live Meeting. We were facing some issues:

  • Computer audio did not alway provide good quality, so for calls with 3 or more people it was better to use a “teleconference bridge”: a set of telephone numbers (one per country) with a unique entry code  per meeting. Many employees, departments or project teams had their own permanent conference bridge.
  • Many employees did not use the preferred supplier, often because they did not know we had one or who it was.
  • It was not very clear how one could obtain a conference bridge.
  • Additionally, the Telecom department was unaware of the amount of conference bridges in use, and who owned one.

It was time for the Telecom department to give more attention to the request process.

One of the team developed a form in HTML, which automatically added your Employee ID. Neat! After completion the form sent an email to the Telecom department. Telecom then added the Cost Center number, and forwarded the email to the telecom provider. However, the form was on a local server which could not be accessed by everyone, and the emails had to be manually stored by Telecom as individual requests, making it difficult to create overviews. For other locations, there was a manual process where you contacted Telecom and they completed another form.

They asked my team if this process could be improved. And guess what…it could! 🙂

What is the solution?

The HTML-form was replaced by a Custom List in the employee-facing team site for all IT-related questions and information.
Every requester enters their Employee ID manually, but since you make this request only once (this being a permanent conference bridge), this is not perceived as a problem. I modified the “New Entry” URL so upon completion, the requester goes to a page with the next steps of the process. (Read here how to modify the URL, scroll to 2f.)
The Telecom department has set an Alert for Added Items, so they know about all new requests immediately. They enter the Cost Center code to the request and then the form is ready for the telecom provider.
Of course I suggested to set up an Alert for Modified Items for the telecom provider, but after some tests and discussions we decided to send the content of the request as an email to the provider with cc to the requester. (via Corasworks)
By using “Reply All”  the telecom provider then sends the conference numbers and other information to both the requester and the Telecom department.

(If you see only a very small picture below, please click it to enlarge. If you know how to fix it, please help!)

Employee part of the form
The part of the form that employees have to complete.

Telecom part of the form
The part that Telecom has to enter.
When “Send Email” is “Yes”, Corasworks will send the content of the mail to the provider’s email address. That field does not have a default value to avoid accidental sending of incomplete content.

What are the benefits?

  • The request form is much easier to find and the process is more transparent; this means more people use the preferred way, saving costs and reducing complexity.
  • The Telecom department saves time on entering and managing requests.
  • Telecom department has an overview of the number of bridges in use, and who owns a bridge. This helps them to check if the invoices are correct.

I would have preferred to just give access to the telecom provider, and ask them to add the bridge number to the original request. That would have given the Telecom department even more information without them having to do anything. But well, you can’t always win ;-).

You may also like to read about these examples where we used Team Sites with external partners:

High Tea Reservations

Crisis Management

New Packaging Requests

Image courtesy of Ambro at FreeDigitalPhotos.net

Another 4 processes to streamline with SharePoint

In an earlier post, I discussed 4 very common time-consuming processes that you can make more efficient by using SharePoint. But I guess that the next 4, although perhaps less common, still occur quite often.
You can make your project managers, your business venture managers and your IT department very happy if you can show them that you can facilitate these processes with a SharePoint Team Site.


5. Corporate projects needing input from many countries/businesses

Forget sending large status updates in PowerPoint or Excel per email. For large central projects, use a site where you can collect the status updates from every country or business in a list. If you need security, or want to allow that country or business to share their project documents and other information, you can use a site collection instead, where every country of business has their own site. You can use a Content Query Webpart to collect all updates in another site for the Project Manager.

It helps to create one page where the collective progress is shown – you may lose confidentiality but it will reduce the time needed to create reports and it will help the business to see how their own efforts contribute to the projects’ or company’s goal. Of course everyone will be able to set alerts.

All this will reduce inbox overload, make the project progress much more transparent and save the Project Manager lots of time in reporting.

Some examples:

  • Centralizing the organization
  • Capturing procurement terms and conditions
  • Local milestones for a divestiture
  • Action plans following the global employee satisfaction survey
  • A global sustainability project

Example: PMO in a Team Site

6. Business experiments 

Why spend time and money on dedicated software if you are not 100% sure that your new business venture will be successful? Start with a process in SharePoint and see how things turn out. It will perhaps not do everything you think you need, but as you work with it you will learn more about your eventual software needs, helping you to define better requirements. And if your pilot fails, you do not have to add software costs to your losses.

Example: High Tea Reservations. 

7. Temporary pre-ERP solutions

If your “Problem Process” is not yet in scope for your ERP-system,  why not check if you can move it to SharePoint before making the leap to ERP? It may not be the ideal solution, but you may be able to iron out those process wrinkles, which will make your process more efficient now. And moving to your ERP-system later will be less painful because you have a better process to start with.

Example: CRM in a Team Site, now with screenshots!

8. Legacy processes 

Chances are that you still have a few of those one-trick-ponies from the nineties or noughties in your application portfolio.  The companies that created them have merged ten times or gone bust, there are no updates or support, the manual is lost, the user interface is outdated and they may even need separate log-on. This is a good opportunity to free up a server, use the regular support system, apply SSO and a familiar look-and-feel and generally reduce complexity.
We have used an InfoPath solution to replace an outdated Idea Submission programme, and replaced a visit-pass-request-system by a simple Custom List.

All these examples will help with “The daily dose of SharePoint” that your employees need to become more familiar with SharePoint. The more different uses of SharePoint they see, the more they will learn that SharePoint is a versatile tool that you can use every day, for almost every process.

Image courtesy of tungphoto at FreeDigitalPhotos.net