Why can Frontline Workers not add a Teams meeting to their meetings?

The other day I received a comment on my post “Some quirks of the F3 license“. The commenter’s Frontline Worker F3 colleagues do not have the option to “Add online meeting to all meetings”. Apparently the option is not visible in the Outlook web app.

Enter a new Microsoft365 detective: Teams Thorne*. Will he become as famous as SharePoint Holmes, you think?

Let’s find out! Here’s what Teams Thorne did to see if he could find out if this was user-, admin, or license-related.

1. Is it a user thing?

Teams Thorne has a Small Business License, which, like the F3 license, is 100% online. He opened Outlook (on the web, obviously), and first checked what the normal behaviour of his Calendar was with regards to organizing meetings. He created a new event.
The “Teams meeting” was visible, but not checked. But as soon as he added a person to the invitees, the box got checked.

The Teams meeting checkbox is automatically checked when you add another person to your meeting.

He then looked at how things were after disabling it in his settings.
In Outlook or Calendar, click the Gear Wheel > View all Outlook settings > Calendar > Events and Invitations. The option to add an online meeting was indeed checked, so he unchecked it and waited for some time.

When this box is unchecked, you do not automatically add a Teams Meeting. You do it manually.

He went back to his Calendar, created a new event and noticed that the box did not get checked when he invited someone. But he could enable the Teams Meeting manually by clicking on the button.
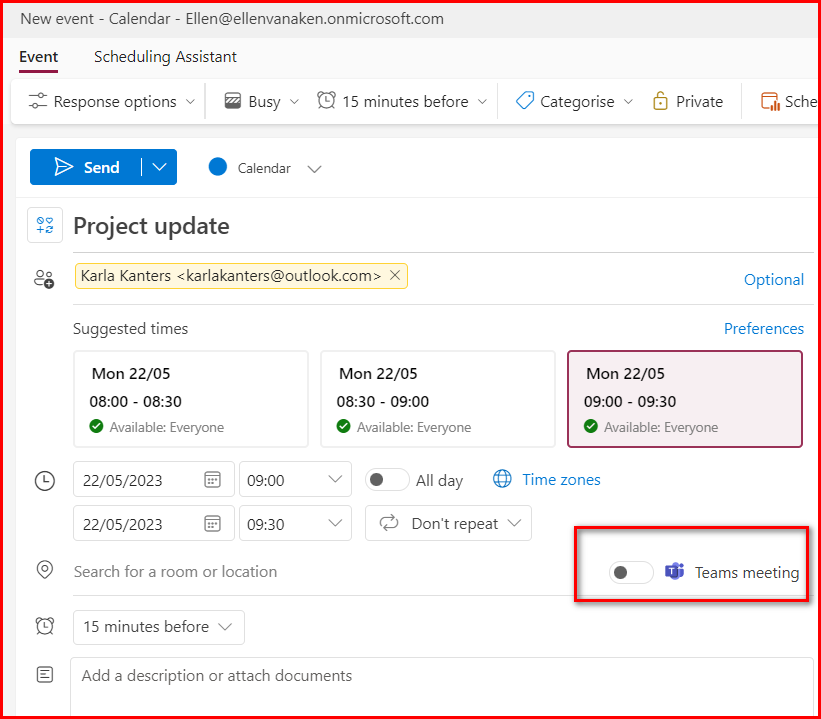
With the setting disabled, you can still add a Teams meeting, but you have to check the box yourself.

This did not match the issue described. Teams Thorne had the option to add an online meeting to all meetings, so there must be something that disables that button entirely. In any case, this did not appear to be an incorrect user setting.

2. Is it an admin thing?

The next thing to investigate was the Teams Admin Center. Perhaps there is a setting that prevents that button from loading?

Teams Thorne opened the Admin center and headed to the Teams Admin Center > Meetings. The Meeting Settings did not give any indication, but the Meeting Policies looked promising. He opened the Global (Org-wide Default) policy and looked at the options available. Hmmm, there was permission given for the Outlook Add-In, could that be the thing that made the connection between Teams and Outlook?

The Meetings > Meeting Policies menu items contains a setting for an Outlook add-in. Is that a clue?

He disabled the Outlook add-in, logged off and waited some time for the new policies to “settle”. It now looked like this:

The Outlook add-in has been disabled.

The next day, he opened his Calendar and started creating a Meeting. Hey, that Teams box was not there!

There is no “Teams Meeting” option to the right.

He went back to his Outlook settings and noticed that he could not check that box, apparently because there was no provider mentioned.

As there is no meeting provider mentioned, it is impossible to activate this setting.

So, it looks as if you need the Outlook add-in in Teams to have that option.

But…in the Global Policy, which is the Default for everyone who is not in another policy, it is enabled. I hope that organizations will not edit their Global Policy unless they have a very good reason. I can not imagine why you would want to disable adding a Teams meeting to all meetings – you do not HAVE to meet with Teams, but it is pretty convenient to have it just in case something goes wrong with your face-to-face meeting.

3. Is it a policy thing?

Teams Thorne had never tinkered with the Meeting Policies, in fact this was the first time he ever looked at them. So he concluded that the option to use the Outlook add-in is standard. But perhaps there was a special policy for Frontline Workers?

He went through the Teams Admin Center to see if there was anything else that could shed some light on whether this might be different for other groups. Hey, there was a Policy Packages menu item – could that help? He saw a number of policies, including a Frontline Worker Policy:

In the Meetings > Policy Packages there are a number of policies for different roles.

Upon clicking the Frontline Worker Policy Package, it showed a number of options:

The different policies for Frontline Workers

When he opened the Meeting Policies he noticed the following settings. The items were the same as the Global (default) policy, but a lot of things are OFF, including the Outlook add-in.

The Outlook add-in has been turned off for Frontline workers.

But when he compared it to, for instance, a Higher Education Student, or a Healthcare Clinical Worker, you see that the Outlook add-in is available for them.

In other roles, such as the Higher Education Student shown here, the Outlook add-in is enabled.

Unfortunately, it is not possible to make changes to the Policy Packages, unless you have a Teams Premium or Advanced Communications license.

Conclusion

So, there is a number of things that we have found out.

  1. Your colleagues need to have the Outlook add-in in order to be able to add a Teams meeting to a meeting they schedule.
  2. The Outlook add-in is enabled in the Global (Organization-wide default) policy and is therefore available for all employees, unless they have another policy applied to them.
  3. The standard Frontline Workers Meeting Policies have the Outlook add-in disabled, so employees with this policy package are unable to add a Teams meeting to their scheduled meetings.

So, in the organization of the person who made the comment, it is most likely that the Frontline Workers have the Microsoft Teams Frontline Workers Meeting Policy Package applied to them, or another policy without the Outlook add-in.
In theory the Global (Org-wide default) Meeting policies could also have been changed, but in that case all employees would be unable to add a Teams meeting. That was not what I understood from the comment.

But why you would want to exclude Frontline Workers from adding a Teams meeting, is totally beyond me. But that is another topic.

So, what do you think of Teams Thorne’s first case?

* About Teams Thorne:
Part of my role was solving user issues. Sometimes they are so common that I had a standard response, but sometimes I needed to do some sleuthing to understand and solve it.
As many of my readers are in a similar position, I thought I’d introduce Teams Thorne, Teams investigator, who will go through a few cases while working out loud. Teams Thorne is based on Tom Thorne, a British detective, who was created by Mark Billingham and has featured in books and a TV series.

Please note: Due to an exciting, but rather time-consuming private project (moving house) I am currently posting a bit less frequently than usual.

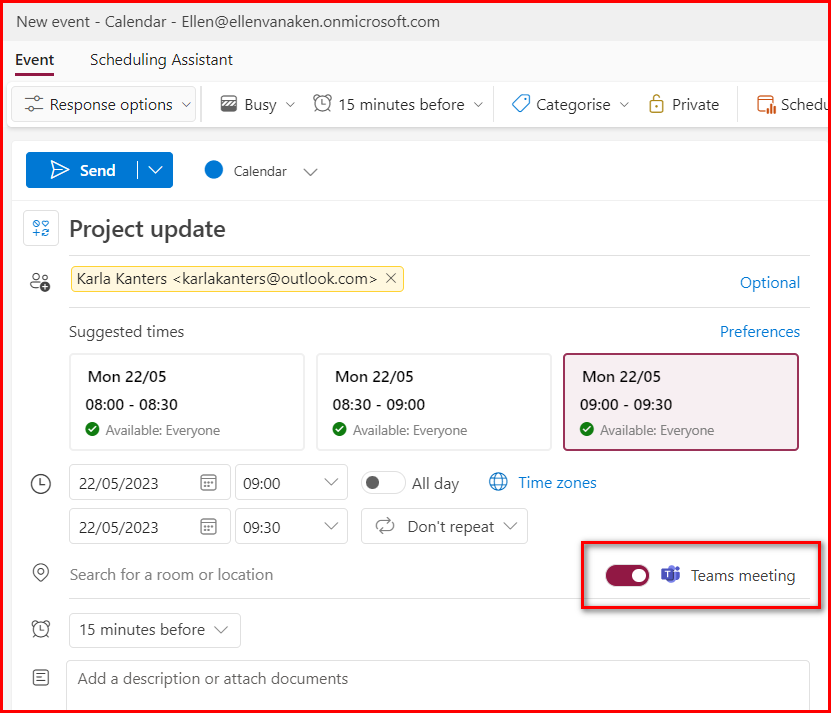
5 Tips to keep your OneDrive lean

Microsoft365 may be introducing all kinds of shiny new functionality, your good old OneDrive is as important as ever. More and more information is being stored on OneDrive automatically and by default, so it may grow even without you consciously adding and uploading Word, Excel and PowerPoint files.

This could be an issue especially for users with an F3-license as they have only 2 GB of storage space at their disposal. Their OneDrive may get full quickly and that is rather a nuisance.

But also the 1 or 5 TB of E-licensed users will fill quickly if they have a long career in this organization and never a clean-up moment.

So, the following may be of interest for all:

1. Understand what is “private” and what is “shared” (and what is in between)

Although information on your organization’s OneDrive is never truly private, we consider files and documents that are only for you, private. This can be drafts of documents you are writing, your yearly objectives and evaluation, correspondence with your manager, etc.

Documents or files that you work on with others, are shared and should therefore live in a shared environment such as Teams or SharePoint. Or Viva Engage (the application formerly known as Yammer).

That said, there are still many items stored on your OneDrive that may be shared, but are still added to your OneDrive by default, such as Recordings and Whiteboards of Team Meetings and Files and Loops that you have shared in private Teams chats, and attachments from Forms.

Suggestion: instead of creating a new draft document in your OneDrive, create it in SharePoint, if it will be shared at the end. You may want to set up a document library especially for drafts. You can move it to its final place once it has been reviewed and made official. This way you will not have any old and forgotten drafts in your OneDrive.

2. Understand what is stored on your OneDrive

OneDrive has the habit of creating new Folders by itself when you do certain things in Microsoft365. The most well-known may be the folder Attachments, for files you have received as attachments to Outlook. Microsoft Teams is also a good source of automatically created folders, as Recordings, Microsoft Teams Data, Microsoft Teams Chat files, Transcribed Files are all added from your work with Teams.

Again, content you share with others in private Teams chats, will be stored in your OneDrive. It makes perfect sense, but it is annoying if your OneDrive is prone to overflowing.

Some time ago I wrote about the folders that are automagically created in your OneDrive:

Who created those folders in my OneDrive?

These folders have all been created by my use of Microsoft365. I have not created any of them myself.

Suggestion: Avoid private Teams chats and work in Teams Channels where possible. Create Channel meetings (when you know they will be recorded), chat and share files and Loops etc. in Channels so they will be stored on SharePoint rather than your OneDrive.

3. Understand the new Syncing

A new way to sync documents is on its way. I do not know the details yet, but keep an eye out, please! I learned this from Paul Keijzers’s video.
Synced SharePoint folders will then be stored in your OneDrive on your PC, if I have understood correctly. This may mean that your OneDrive also gets clogged up with SharePoint files. It may also mean that just the links will be shared, so I am curious to learn more.

How will SharePoint sync behave in future?

4. Understand what happens when you leave

Your next career move may not be top of mind right now, but it is good to know what will happen to your content when you leave the organization and your account is deleted. This may help you create new habits now.

I wrote about this earlier:

Leaving the organization gracefully

Suggestion: check on a regular basis if there is any content that would need to be in a SharePoint site or Teams, in case you would leave. It will save you time when you actually leave.

5. Clean up your OneDrive on a regular basis

Yeah, I know this is not exactly a fun task, but if you do this regularly, let’s say once a month on a quiet time of the week, it will be less work and will save you from the panic that will engulf you when you get a message that your OneDrive is full and you can no longer add new info.

I have also written about this topic:

9 steps to clean up your OneDrive

Other tips, tricks and suggestions?

Please let me know if there is something that you do, or your organization does, to keep OneDrives in check.

Number 5 by Pramit Marattha on Pixabay

360 degrees feedback in Forms

There are many tools in use for asking 360 degree feedback. If you have one at your organization, which works well, this post is not for you. 🙂

If your organization uses a protected Word form, please pay attention, as this can be done more efficiently!

The reasons for protected Word documents has never been clear to me; it may have to do with avoiding that people change the document accidentally or on purpose. In any case, I do not like it, as I think it is an inefficient way of doing things and, even more importantly, a password-protected document can not be opened by someone who has a F3-license!

So, when someone asked for help because he could not open the document in Word Online, I immediately thought of replacing it with a Form.

  • The Form can be made into a template and shared across the organization.
  • As the information collected is for your eyes only, you can personalize the Form if you see fit – in appearance, in introductory text, or even questions. (Although I would be careful with the latter)
  • You can automatically collect names & email addresses of all invited colleagues, without them having to type it. You can also do it anonymously if that feels better.
  • All feedback is automatically collected in one Excel file without you having to cut and paste from various Word documents.

The Word document

It contains the following:

  1. Organization logo
  2. Field to enter the name of the owner of the file (who is looking for feedback)
  3. Field to enter the name of the feedback-giver (so it is not anonymous)
  4. Date
  5. Q1: What does this employee do well? What is (s)he good at?
  6. Q2: What would you like to tell this empoyee? What should they think about? (Good advice, suggestions)
  7. Q3: What can be improved? Is there any behaviour that they might want to change?
  8. Q4: Additional feedback (optional)

The Form

I rebuilt the Form and ended up with just the 4 questions. I aso rephrased the questions to be more personal. (What does this employee do well > What do you think I do well?)

The rest is built into the Form. (OK, I admit that I forgot to add the logo in the screenshot below)

The Form, just 4 questions

Template instructions, for the owner

How to share the Form as a template: Microsoft info

A new place to create a template; it was under Send, then it was a separate person icon, now it is under …
You create the link to the template here

You will get a link, which you can share on a SharePoint page, with some instructions, or someplace else.
Make sure that there are copies somewhere, in case the owner leaves the organization!

Template instructions, for the user

  • Click on the link to the feedback template
  • On top of the page, click “Duplicate It”
Creating the individual Form (with logo this time!) from a template
  • You will now have a copy in your list of Forms.
  • Please click on the title and delete the word “Copy”
  • Check and adjust the introduction text
  • Click on the … top right and check the Settings. Do you collect names and email addresses (or do you prefer anonymous feedback?) and do you have a nice personalized “thank-you text”? Adjust when needed.

Your 360-degree feedback request is now ready to be shared with the selected colleagues.

(I am assuming that the user knows how to work with Forms otherwise, such as sharing the link and collecting the responses)

Do you want to try it?

I have made the Form available for you. As it is now available for anyone, I am no longer collecting email and names as I would when using an internal Form. But please…

Unfortunately templates only work within an organization, so I can not share the template with you, but it is very simple to recreate.

Please let me know if you found this useful!

A collection!

By the way – I finally found a reason to use collections in Forms: I have created a collection called “Forms from my blog” 🙂

Organizing a Teams Webinar with an F3-license

The Teams webinar functionality has rolled out. Many things have already been said about it (Mike Tholfsen’s video says it all really) and basically it is a regular Teams Meeting with a registration form and very limiting meeting options, so it was both a relief to me (“oh good, it works like a Teams meeting”) and a disappointment (“oh, it works like a Teams meeting, what is all the fuss about?”) when I investigated it.

However, F3-licensed users do not have the option to create a Webinar, just as they can not create a Live Event. Our E3-licenses users have three options when they click the New Meeting option: Schedule meeting, Webinar, Live event. F3 users only have New Meeting option.
They can of course use a regular Teams meeting for any webinar, as described in my earlier post, but seriously, they can use the webinar option as well! Here goes:

Webinar creation for E3-users. F3 users only have the New Meeting button.

1. Create the event

  • In your Teams calendar, click New Meeting. The invitation screen will open.
  • On the top right, you will see an option “Require registration”. Select “people in my organization”. “(If you want to make this available for external attendees, you may need to create a Form for registration – remember to make this available for everyone)
Click the arrow and select “For people in your org” to create a registration form. F3-users can not create a registration form for everyone.
  • Leave the registration form for now, as that can be done later when you can give it your full attention.
  • Add all relevant event details, and invite the presenter(s) only.
Make sure you only invite the presenters.
  • Send the invitation to the presenter(s) and the event will be added to the agenda of yourself (the organizer) and the presenter(s), looking like this:
a Webinar looks like this in your calendar

2. Edit the registration form (attendees from your organization only)

  • Open and edit the event from your Teams calendar and click “Customize registration form”.
  • Op the top left, click “Edit”
  • Adjust the registration form – make sure date and time are correct (it does not always copy correctly!!!) and you can add a picture, add speakers, and (optional) ask a few extra questions.
The registration form – you can add all details and even a picture! Check if date and time have copied over correctly!
  • Click “Save” top left, and “View in browser” to see what it looks like. Adjust when necessary. Copy the registration link to distribute to your audience.

3. Adjust the meeting options

  • Open the event from your Teams calendar and click Meeting Options or Change Options
Two places to change the meeting options
  • Adjust the meeting options until they look like the screenshot below and click “Save”.
  • If you do not want to be bothered with adding people from the lobby, make sure you set Lobby to “everyone”.
These are the standard Meeting options for a webinar.

4. Advertise your webinar

Make sure that your audience knows about the webinar. Share the information and add the link to the registration form in and outside your organization. You can use the intranet, a SharePoint site, Yammer, email, social media, an external website, a printed flyer with a QR code, whatever is relevant.

5. Check registrations

The registrations will be added in a nice list in the Details tab of your event.

You can keep track of registrations from your calendar

6. Before the webinar

  • Download the Teams desktop app from the Microsoft Store. F3-licenses users use the web and mobile apps by definition, but the Teams desktop app is free and gives you a ton of extra control options for your event. Download, log in and familiarize yourself with it.
  • Plan your break-out rooms (desktop-app only) and add any Polls that you would like to use during the webinar.

7. During the webinar

  • A little before the start time, open the Teams desktop app and click “Join meeting” from one of the usual places
  • Proceed as in any other Teams meeting
  • You can add Polls, use breakout rooms, and what not, just like any regular meeting
  • If you want to allow live questions at the end of the webinar, open the Meeting options (… in the Meeting control bar) and allow microphones and cameras to be opened up (Teams desktop app only)
Options available for the organizer in the Teams desktop app

8. Attendance report

The attendance report will be on the Chat tab, as usual.

Good to know:

  1. That little lectern icon appears on events which require registration, only in the Teams calendar. Check out the second and third screenshots from the top to see the difference!
  2. When you have selected registration “for people in your organization” only, their names and emailadresses will be added automatically when your colleagues open the registration form.
  3. There has to be a presenter in the Meeting options, otherwise you can not save the Meeting options. When the organizer is the presenter, make sure you select “Only Me” as the presenter.

Conclusion:

Every F3-licensed user can create a Teams webinar, with one limitation and one manual action compared to an E3-user:

  • The F3 license has no option to create a registration form for externals – you will need to use Microsoft Forms to collect registrations.
  • They will need to adjust the Meeting Options manually.
  • Using the Teams desktop app (free from the Microsoft Store) gives you many more options to control the event.

Good luck!

Watermark in Word on the Web

As mentioned earlier, the majority of my colleagues have an Office365 F3 license. This means they work exclusively with the web and mobile apps.

That can be a surprise for new employees, who are used to the desktop variety of everything. The fact that you can not open documents from your desktop Explorer causes a lot of confusion, for instance. And the fact that documents look different in editing and reading view is another frequent complaint, although this can be solved by pointing people to the Reading View. The web apps have improved greatly over the past few years, but they do not have all functionality of the desktop version. So in some cases you really need to rethink your processes to mimic a desktop function in a web app.

Microsoft has an overview of differences. Differences between using a document in the browser and in Word – Word (microsoft.com)

One of the questions we received was adding a watermark to a Word document. This functionality is not available in the web app. When you look for “watermark” in the web app, you get a prompt to open the document in the desktop version.

This shows that the watermark is only available in the desktop app

How to add a watermark in Word desktop

The option is in the Design tab, which is missing from the web version. You can select one of the mentioned marks, or create a custom one.

Adding a watermark in Word desktop

How to add a watermark in Word for the web?

In this case, we needed “Confidential” in a diagonal style.

My colleague and I brainstormed a bit and we came up with three alternatives:

1. Add a blank Word document with the watermark as template in a SharePoint library

This works well when you and you colleagues have a SharePoint site and you regularly need to use the watermark.

  • Ask someone to create a Word document in the desktop version with the desired watermark
  • Add this as a template to a SharePoint document library (item 6 in that post)
  • Whenever you need a document with watermark, create a new instance using the template. You will not see the watermark when in editing mode, but if you click the tab View > Reading View you will see what the final document will look like.
The template is added to the document library, and when you click “New” you can select it to create a blank document with the watermark
While you won’t see the watermark while you edit, you will see it in the Reading View

2. Add an image with the watermark to the document

This works well when you do not use this very often or have no SharePoint site at your disposal.

  • Create an image with the correct words. You can do this in PowerPoint, with a text box, which allows you to rotate to the correct slant. Use soft grey letters. Save the image.
  • When you have finished writing your document, click the Insert tab and select Picture from this device. Then, under Wrap Text (will appear after insertion) select the option “Behind text”.
  • Make sure it looks good before you exit the picture editing, as it is hard to go back and re-edit location and size of image.
  • Repeat for the next page. It can be sensible to decide beforehand where in the document (height) the image sits best so you can create a consistent appearance.
  • It may be wise to save and share this as a PDF document as the image can easily be taken off.
When you select the image, you will get options to add it behind the text. You can also move the image and change size for a good fit.
The end result, viewed with the Reading View. Not bad, huh?

3. Use header and/or footer

A watermark is an established option to create a message about the status of your document, but it is not the only way. Headers and footers will be visible on every page of your document, too! So you can also use those.

  • In your document, click Insert > Header and Footer.
  • Add the text as a header and/or a footer. You can change the font size and colour; just click on the word and an edit menu will pop up.
  • You will not see the texts when you are in editing mode, but the words “header” and “footer” will be visible next to the top resp. bottom of your page to remind you that they are there.
  • Use the Reading View (under the View tab) to see what it looks like.
The header and footer can also be used for a message about the status of your document.
The end result, in Reading View.

Do you have any workarounds for desktop functionality in the web versions? Please share in the comments!

Some quirks of the F3 license

Update April 2022: From January 1st, 2022 I am no longer working at an organization where I have access to both the E3 and F3 licenses. Unfortunately I can no longer update this post.

When people talk or write about Microsoft 365 Outlook, Word or Excel, they generally mean the desktop versions.

However, there are Microsoft365 subscriptions that provide only the web and mobile versions of things. With the ongoing improvements of the web apps these subscriptions are getting better and better.

Most of my therapist colleagues have the Microsoft365 F3 license, which is a good fit for people who mostly work with patients and use dedicated medical software as their main application. F3 has web and mobile apps only.

While the comparison with the Microsoft E3 license (which most secretaries and staff have) clearly display most of the limitations of the F3, (albeit in the small print) there’s a few unmentioned “surprises” so let me list all that we have found so far, while providing support to our F3 collagues.

1. No desktop apps

This is the most obvious limitation. I think Word and Outlook for the web are both pretty good and getting better all the time, but some advanced functions are only available in the desktop apps, e.g. creation of scientific literature citations, or creation of a book index in Word.
An overview of the differences:

2. Storage for Outlook and OneDrive: 2 GB

Yes, it is mentioned quite clearly (also in our own support materials) but we regularly get questions from people who have almost reached the limit. All we can do is provide them with help to clean up their Outlook and OneDrive.

This is also the reason why I was not happy with the recent change to store Teams meeting recordings to OneDrive.

3. You can not upload a video to Stream (Classic)

Update November 2022: With the move to Stream (on SharePoint) I expect this issue to disappear, as created videos will be stored on OneDrive. But with only 2 GB of storage space, it means F3 users will have to be very careful and move videos to SharePoint where possible.

Just to be clear: F3 people can consume videos from Stream but not create them. It is mentioned in the comparison. I do not really get this. Are F3 users not expected to share any videos? Not even of training materials or a team get-together? We have a few colleagues who like to do vlogs for their colleagues – no Stream for them. 😢

With the E3 and other licenses, there’s an upload option top right. No such thing for the F3.

4. Recorded Teams meetings go nowhere

We made the change from storage in Stream to OneDrive and SharePoint early, because we knew that F3-users can not upload anything to Stream. If an F3 recorded a meeting, they got an error message.
So we thought: “Well, OneDrive may not be optimal, but at least they will be able to store their recording in a good place. So let’s make the change, make them aware and suggest to move any recordings to SharePoint at their earliest convenience.”

The other day I recorded something with my F3 test account, and I was totally surprised to see that the recording did not go anywhere. It is in the meeting chat, with a message that it can be downloaded for 20 days.
The good news is that the recording can be saved. The bad news is that this is not as expected, and that people will need to take action to store it.

You need to download a recorded meeting.

5. You can not create a Live Event

This is not a major issue, as organizing a large online event will generally be done by a few selected roles. An executive secretary, our Convention Bureau, communications etc.
An F3 colleague can produce and present, however, as described in this post.

This has nothing to do with the difference between web or desktop app – everyone in our organization has the Teams desktop app.

6. You do not have the Delve app

This is not mentioned anywhere in the comparison, so this was also a surprise when we found this. It is not too much of a limitation, as you can get there via your Office profile.

7. Agenda sharing issues with E3-colleagues

If an F3 colleague shares his or her agenda with an E3-licensed colleague, e.g. a group secretary, the secretary can only edit the agenda when using the Outlook web app.
This may have to do with the fact that there is no “desktop equivalent” in the F3-agenda. It is annoying though, as our secretaries generally prefer to work with Outlook desktop. We are trying to convince them that the Outlook web app is a joy to use, but so far most of them stick to desktop. 😢

Do you know any more quirks?

I have deliberately not mentioned a number in the title. Please let me know in the comments if you know something else, so we can create a shared resource!

This is a great opportunity to use one of the more than gorgeous letters of Simon Koay’s Superbet. F = Flash!

9 steps to clean up your OneDrive

CleanOndrive-headerAs mentioned in earlier posts, the majority of my colleagues have 2 GB of storage space in their OneDrive and some struggle to stay within those limits.

So, we are currently helping them with cleaning up and giving them some tips on how to keep within boundaries. It may be interesting for you as well!

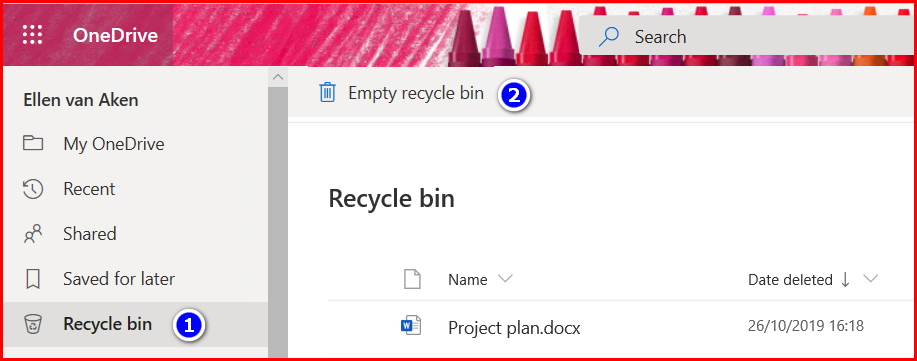
1. Empty the Recycle Bin

You may want to start with a clean slate, so let’s empty the Recycle Bin first. If, during cleaning, you accidentally delete too much, you will have fewer documents to search through for restoring. Also, emptying the recycle bin will free up space!

CleanOnDrive-recyclebin
Click “Recycle bin” on the left-hand side and then “Empty recycle bin”

2. Check the size of your OneDrive

It helps to know how much stuff you have, and how much you need to remove. So, click on the Gear wheel top right, click “OneDrive settings” and then select “More settings”. You will pass a useful screen with notification options – worth looking at but out of scope for this post.
Then click “Storage metrics”.

CleanOnDrive-size
Almost there!

On the next page you will see the lists in your OneDrive site collection (it is a SharePoint site collection, after all) and the amount of free space is shown top right.

Cleanondrive-storagesize
Look at the top right of the page to see how much free space is left.

3. Move shared documents to SharePoint or Teams

Sharing documents in OneDrive to collaborate on is great as long as the document is not final. Once it is final, please move it to a SharePoint site so it can be part of the team’s collective knowledge and make room in your OneDrive.
Do not hoard shared OneDrive documents – if you leave the organization your OneDrive will disappear with all its content. (After a period when your manager can access it.) We frequently get questions about lost shared documents as many people appear not to be aware of this. 😦

Do you plan on leaving the organization soon? Check out this post to see what to do – and start now.

So, check out which documents you share and with whom. Do you still need them at all? Do you still need to share them or are they ready to live elsewhere?

cleanOnDrive-shared
The overview of the documents I share with others – “Departmental docs” sounds like an excellent candidate to be reviewed and moved!

If you want to move the documents to SharePoint, go back to your “My One Drive” section, select them and then click “Move To” from the grey bar and select the SharePoint site where they will live. (Make sure you follow that site so it appears as one of your first choices). The documents will be deleted from your OneDrive in the process. (If you want to know how Copy To and Move To work, read my earlier post and also my post about the risks)

CleanOnDrive-moveto
Moving documents to a SharePoint site

If you have many documents to move, you may either want to do it in smaller batches or use Copy To and delete the documents after you have checked that they have all safely arrived at their SharePoint destination.

And if you no longer need the documents you share, you can just delete them.

4. Create or Request a SharePoint or Teams site

In case you have no location at your disposal, create or request a SharePoint site or a Team (which comes with a SharePoint site) so you can share documents with your project team or department.

5. Find the largest and the oldest documents

Unfortunately you will have to do this by folder, as you can not create views without folders. Although OneDrive is a SharePoint site, it misses some cool SharePoint functionality, such as the option to add metadata columns and create views, or the possibility to add templates. (note to self: submit to User Voice 🙂 )

The following paragraph has been added in May 2020:
* Please be aware that Microsoft365 adds folders to your OneDrive when you use certain applications. The “Attachments” folder to store email attachments is one, but Apps (contains Forms documents), Microsoft Teams Data, Microsoft Teams Chat files and Pictures can also contain a lot of documents that you may not be aware of.  Read my post on this topic*

Open a folder and click on the pull-down arrow next to the File size column and click on “Larger to smaller”.  Determine whether the largest files need to stay on your OneDrive. They may fit on your SharePoint or Teams site as well, so you can Move them there, or perhaps they can be deleted.

cleanondrive-sortlargest

Then sort for the oldest documents by clicking the pull-down arrow next to the Modified column and selecting “Older to newer”. Generally you will have accumulated quite a lot of documents in your career. When projects have been completed or interest has waned, you might as well move them to a SharePoint archive site, a records center (in that case they should have been moved there long ago!) or delete them.

6. Remove versions

This can make sense for very large documents that you have worked on intensively and that you want to keep. There may be several versions that take up space.
Select the document, click the … to the right of the name, and select “Version History” from the menu.

CleanOnDrive-remove version1
How to go to the version history

You will now see the versions.
If you are still working on the document, it may be safer to remove the oldest versions only.

CleanOnDrive-rremoveversion2
Click the version you want to remove and select “Delete Version”. Repeat if needed.

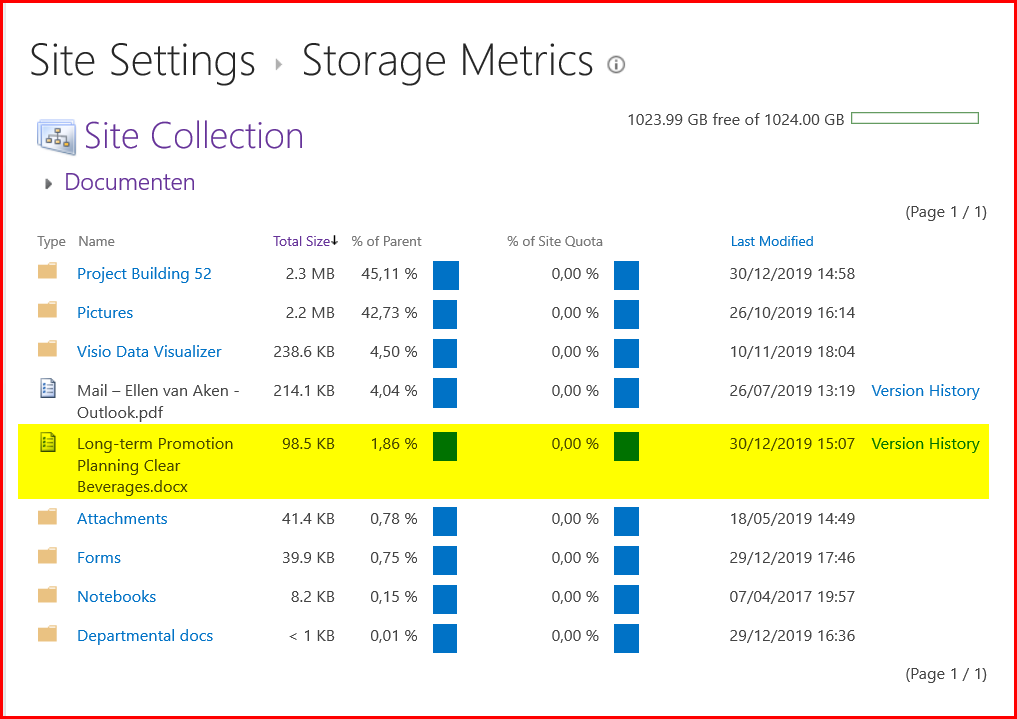
If your document is final, you can delete all versions and keep the latest version only. If there are many versions involved, the quickest route is to go to the Storage Metrics (see par. 2), click on “Documents” and drill down until you see the document.

Ondrive-versions3
This is a good way to remove all versions in one go.


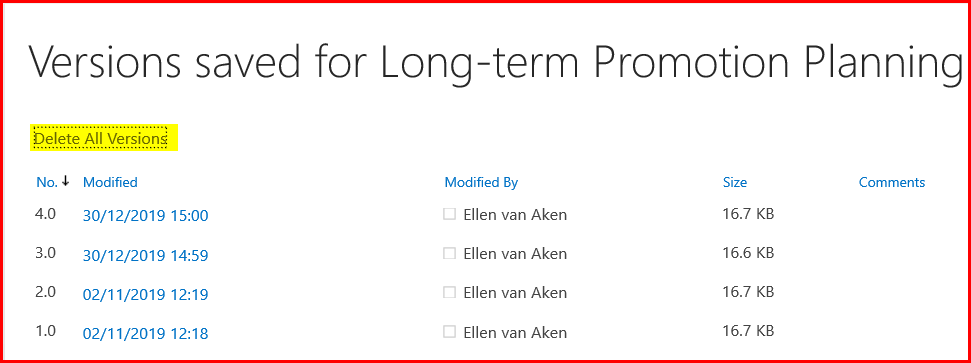
Click “Version history” on the right of the document and then you will see an option to delete all versions in one go, leaving the last one.

ondrive-version4
This is the best way to delete all versions in one go.

7. Move private files to a personal location

While it is all too common to have a mix of private and organizational docs on your systems, your OneDrive is primarily meant for organizational stuff. Your private info should not be here, especially if it takes up valuable storage space.  You also do not want to lose it when you leave the organization, right? So, move your personal files and photo’s to your private OneDrive (now with extra-secure Personal Vault), iCloud, Google Drive, a USB stick or another place.

8. Empty the Recycle Bin and check storage

Hopefully this has helped you get below that 2 GB. If you, you need to repeat and be a little more strict this time around!

9. Repeat regularly

In order to stay below the limit, go through these steps again on a regular basis.

10. Bonus tip: Give your folders different colours

(Added December 2023)

If you have many folders and would like to see in one glance what is what, you can now give your folders different colours. How cool is that?

Greg Zelfond explains how to do it and what to look out for: https://sharepointmaven.com/how-to-color-code-folders-in-sharepoint-and-onedrive/

Do you have tips?

Do you have experience with colleagues whose OneDrive fills up quickly? Any suggestions that we can use?