At the very last “Office365/SharePoint Connect” gathering in Haarlem* I was quite impressed when Rick van Rousselt gave us a demo of Kaizala, sharing his telephone on a large screen.
This may come in useful when we want to provide our colleagues with more information about the Office365 mobile apps. So, I thought I’d write out the steps and practice as I am usually quite clumsy when it comes to connecting devices. 😎
The secret ingredient is…a Teams meeting!
March 2020. As the next weeks will mean “remote working’ for a lot of people, due to the Corona virus, this may also come in useful if you want to demonstrate a cool new app to a colleague, or for helpdesks to support colleagues who have questions about the workings of a smartphone.
A few days before the demo
Make sure you have the Teams app installed on your presentation laptop and your telephone
Schedule a Teams meeting for the time of the demo
Remove any apps on your mobile that you do not want to show – or move them to a separate page – and check if your phone’s background image is suitable for the audience 😉
Create your demo (what do you want to show and which sequence)
Practice sharing your screen on your phone
The day before the demo
Charge your devices (and a powerbank, to be on the safe side)
Remove screen notifications and sounds to avoid disturbance (or embarrassment – you do not want to know what I have seen during all the years I have been working in multi-location organizations 🙄 ) during your demo
Sign in to both Teams apps with the account you want to use for the demonstration
At the time of the demo
Start well before time, if possible
Connect your laptop to the demonstration screen
Mute the sound on both devices to avoid an irritating reverb
Join the meeting on both devices, without microphone and camera
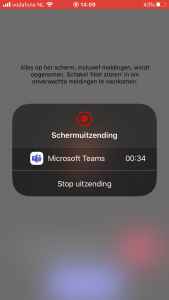
On your mobile, click the … in the meeting bar and select “Share”
Enter a caption
Select “Share screen” (exact words may vary on iOS and Android) and then “Start broadcast”
Dutch again! Click on “Start…” to start broadcast.
Wait until your mobile phone is shown on the screen
Go to the content you want to show (on your mobile) and dazzle your audience!
It is a bit dark but this is my phone (device left), displayed on my laptop (in the middle), while showing SharePoint News.
8. When your demo is over, open the Teams app and click “Stop broadcast”.
To end, click “Stop…”.
Although my (iOS) app tells me that everything is recorded, (it even shows a timer in the red bar on top) it does not mean that a video is created. I guess they mean everything will be shared.
Conclusion
As usual, this is not rocket science, but I thought it might be helpful for myself and for others to share the detailed steps.
Are you ever demonstrating smartphone (apps) to an audience and are you using Teams or something else?
* Office365 and SharePoint Connect, Haarlem/Amsterdam
I am really sad that Office365 and SharePoint Connect will no longer be around, as it was always VERY useful, in a convenient location, well-visited by many people in my network, and not too expensive. Thank you, Nigel and Irene Clapham, for organizing this great event for so many years!
On October 5 I participated in IntranetNow, and a wonderful conference it was!
There were plenty of interesting and enjoyable presentations but below are the ones that resonated most with me:
1. An excellent Yammer use case
Baxter Willis of WM Reply shared a great Yammer use case from one of his clients, drinks business Diageo.
Apparently they have an archive of all bottle types, advertising materials, recipes etc. Nobody was really aware of that department, until recently. They are digitizing their content and the archivist posts something interesting on Yammer every day, e.g.
“Did you know that Pimm’s has been associated with Wimbledon from the 1930’s?” accompanying a picture of a nice old newspaper ad proving her point.
This lady is now the toast of the company and her Yammer group is very popular.
I like this because it is another easy way to share knowledge, which would otherwise be hidden in the archive. Posting it on Yammer costs nothing more than 5 or 10 mins a day. It helps the Marketing and Social Media people in their current work by giving them new insights to the company and its history.
The new Smirnoff label is now based on earlier labels throughout time, and this is also caused by this work!
What I liked about this is that they used a simple but effective approach of lunch sessions, and shared their learnings.
The “let them rant” or “whine and dine” idea resonated with me, as I have also found that sometimes people just want to vent, sometimes not about the intranet itself, but about related things.
In my situation I have heard from several annoyed people who had been handed over a team site due to reorganizations – either because they had a new role and the team site came with it, or because the previous owner had moved on. Someone else’s team site can be quite hard to handle as the setup and especially the permissions are not always documented or intuitive.
I have learned that the best way to help them is to go through their site together, trying to make sense of it (looking at site contents, checking permissions), rather than trying to defend something or taking it personally. 🙂
Using simple tools like card sorting, tree testing and talking to users helped her to improve the navigation of the intranet (better labels and better structure) and some of the content.
Note
I have linked to the Slideshare versions of the presentations as I expect the information on the IntranetNow website will be replaced next year.
Now that we have launched our intranet we constantly receive questions and support tickets from our users. That is not exactly a surprise, as we know that our current intranet is vastly different from our old one. We have SharePoint Online versus SharePoint 2007 and a completely new governance.
We learn a great deal about our users and our environment from these tickets and the discussions in our dedicated Yammer group.
Of course my team knows that I am into KM, so I am currently in a small “Virtual Expert” group on knowledge sharing. Our goals is to “translate experiences into knowledge”.
That sounds pretty formal, but it is quite simple really. And you know, I like simple, especially when it is about KM.
How it works
Whenever we receive an incident, we assign it according to the type of incident. This allows every one of our team to learn about a specific topic or process, and to improve the process or generate knowledge about this topic.
For instance, for a time all incidents dealing with permissions were assigned to me.
When I had gained sufficient knowledge of common permission issues, either by searching online or by doing experiments, I wrote work instructions for the rest of the team. Permissions issues (provided we recognize them when the tickets come in 🙂 ) can now also be assigned to others as we have a common procedure.
Yammer questions that can not be answered by the community receive similar treatment: we do online search and experiments where needed. (Although we ask people to submit a ticket when it looks like something in their site is broken)
We have a regular call to discuss any new and interesting issues.
When we run into a problem that we can not solve by searching online or doing an experiment, we ask our very knowledgeable tenant admins. They show or tell us when they know the answer. My colleague and myself then turn this knowledge into documentation – be it a work instruction for the support team, a manual or a tip for end users, or sometimes a suggestion for extra communication or even a change to the system settings.
Most materials are stored on SharePoint: in our own team site or in the site we have created for end users.
Love all around!
I love this structured approach. Our manager, who is very much into service delivery, formal processes and stuff like ITIL, appreciates the process we are going through.
Our tenant admins like to share their knowledge, knowing this will free them up to do tenant admin stuff.
My colleague and I have great pleasure in capturing knowledge and turning it into something tangible that helps us do our work faster.
The rest of the team is happy to have good work instructions.
SharePoint Holmes
It may be a small process, but it works for us and we enjoy the benefits. And you…you see the SharePoint Holmes cases! 🙂
The other day someone asked me if I could help him set up a SharePoint survey. He wanted to use our nice new intranet and did not even mention the word “Surveymonkey” 🙂
I do not have much time for individual support at the moment so I thought I’d find him some help from the internet. I found a good article from Microsoft about creating a survey but it stopped at the creation of the survey list. All the other blogs that I found on the topic touched very briefly on other settings at most. The best one I found also included a good number of benefits and examples of how to use surveys,
In my experience most problems occur because people think a survey is ready-for-use once the questions and answers have been set up. However, there are a lot of things you have to think about, so I still had to write the complete manual myself.
What will I cover in this post?
This will be a long read, so let me inform you of the topics I will cover:
Determine your needs
Find a site
Create questions
Give your audience correct permissions
Decide on “show names”
Decide on one or multiple entries per person
Visibility of entries
Welcome page and thank you page
Testing your survey
Launching your survey
Monitoring results
Gathering and analyzing results
Deactivating the survey
Deleting the survey
So, here goes!
1. Determine your needs
It makes a difference if you use your survey for a fun purpose (who will win the World Football Cup?), for a neutral business purpose (to collect suggestions for a new product), or for a serious and possibly even sensitive purpose. (How do you feel about this company? What were your experiences with this project?). For the latter, you will need more thinking, more questions, more careful wording and stricter settings than for the first example.
This is beyond this post’s scope, but this article may be a good starting point. Update April 4, 2017: And as serendipity would have it, just after I published this blog this Tweet appeared in my timeline:
A SharePoint survey is a list in a SharePoint site, so you need to have a site. You also need to be a site owner since it is very likely you will be fiddling with permissions and need to monitor responses. If you have one, you may need to consider the survey audience. Is your confidential project site a good place for a survey for all employees? Is your open site a good place for a very sensitive survey for senior management only about an upcoming divestiture? It can be done, but it may be more difficult to set up and manage than if your site has an audience that sort of matches the audience of your survey.
In some cases it is better to have a special site for this purpose.
If you do not have a site, and you are on Office365, an Excel survey may be an option. I have no experience with this, and I do not know if the information below is relevant for this.
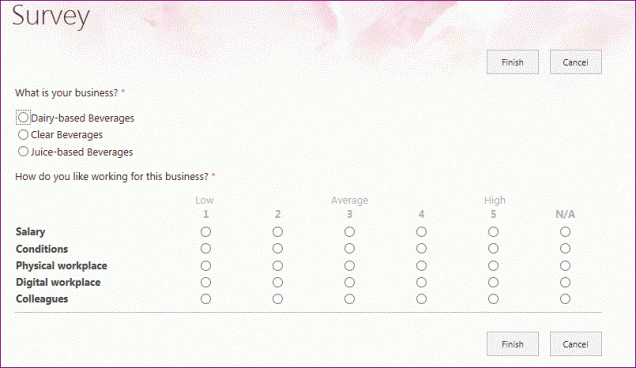
3. Create questions and answers
First of all, plan your survey. Microsoft has some help for that, including an overview of the types of questions and answers.
Secondly, create the survey, add questions and answers and change some settings.
Please be aware that you will be unable to export a Likert scale (rating scale) question/answer to Excel for further analysis.
This is what a survey will look like:
This is what you see when you access a survey from the Site Contents page. Consider it your “survey homepage” and it is the starting point for many actions.
4. Give your audience correct permissions
Many people expect that a survey is automatically set up to receive responses from everyone, but this is a normal SharePoint list with normal SharePoint behavior. So, in most cases you will need to give your audience Contribute permissions to the survey.
If you do not give them Read access to the site, be aware that they can only access the survey via the direct link to the survey and they can not enter the site.
5. Decide on “show names”
This is a setting that you will find in “Advanced Settings” when you create the survey, or afterwards in Settings > Survey Settings > List name, description and navigation.
The default is “Yes”. If you select “No”, all names of people will be replaced with ***.
This is not really anonymous because a Site Owner will be able to switch that at will, making all names visible again. During a survey it may make sense to have the names replaced, and only make them visible when you export the results, but this is also depending on your choices for point 7.
You can decide to show names, or ***; and also to allow one or more responses
6. Decide on one or multiple entries per person
The default is “No” and in most cases that makes perfect sense.
If your survey collects information such as ideas or suggestions, it can be useful to set this to “Yes” so people can add multiple suggestions.
This setting can also be found in “Advanced Settings” when you create the survey, or afterwards in Settings > Survey Settings > List name, description and navigation.
Please note that most people get into a right panic when they want to enter a survey twice and get the error message. If they read the message, it is perfectly clear, but who reads an error message? 🙂
It may be good to tell them they can enter once only, or multiple times.
This message will be shown when you want to respond twice to a survey when you can only enter once. Looks perfectly clear to me! 🙂
7. Visibility of entries
Do you want everyone to see each others responses? This can be a good idea if use your survey for logging issues, so people can see which issues have been submitted already. But for a survey asking for opinions about the company strategy you may want to limit visibility.
Go to your survey, click Settings > Survey Settings > Advanced Settings.
Set the first radio button to “Read responses that were created by the user”.
This way, people will only see their own item. They will still see the total number of items in Site Contents, but they will not able to see anything else.
Also check out the options below about Create and Edit access. By default people will be able to edit only their own responses. In some cases it may be good that they can edit all responses, but to be honest I have never come across the need for this settings.
Never select None because this also means that a user can not add anything, which is rather odd for a survey.
These are the default settings for a survey. Often it is better to select ” read responses that were created by the user” so people only see their own items.
8. Welcome page and thank you page (optional)
I often add a page with some more information about the survey and a nice button or text which leads you to the entry form upon click. After submitting their entry, people can be led to a Thank You page, thanking them for their contribution and informing them about e.g. when the results will be published or the prize will be drawn.
The default return page is the ‘survey homepage” (screenshot above).
It is easy to create as follows:
Create a page and add welcome text and a link or button to the survey
Create a page with a thank-you-and-these-are-the-next-steps-message. Copy the link of this page to Notepad or a Word document.
Click “Respond to this survey” on your survey and copy the link into Notepad or a Word document. Delete all text after Source=
Add the URL of your thank-you-page after Source=
On the welcome page, add the new link to the link or button
Please be aware that your audience needs Read access to both pages, so if you have a confidential site where the audience is much larger than the site’s regular audience, I would not go this way, since it will either mean setting item level permissions (and you know I do not like unique permissions) on those pages OR a lot of error messages 🙂
Example of a welcome page. I have used a Web Part Page for this. When I click on “Enter the survey” I will go to the page below.This is my survey. When clicking on “Finish” I will go to the page below.Example of a Thank-You page. I have used a Site Page for this; strangely enough it takes my Office365 theme instead of my Site theme.
9. Testing your survey
I have created many surveys, but even I test everyone of them before they go live. Ask one or two people, preferably from the target audience (again, depending on purpose and audience and complexity), to go through the complete process and respond to your survey. Do they understand the questions and answers? Have you missed anything obvious, or are some things redundant? Does everything work from a technical/functional perspective?
10. Launching your survey
You can inform your audience in different ways, depending on urgency, topic and audience.
If your survey needs to be executed in a certain timeframe, you will probably send a link in an email or post it as a news item.
If you have a long-term survey, you can add the web part to a (home)page, add the link as a Promoted Link, a Summary Link or in the navigation, so all users of your site are reminded on a regular basis to give their feedback.
You can use
the link to the survey (people will need to click “Respond to this survey”)
the link that you get when you click “Respond to this survey”
the combined link that takes people to the Thank-you page after “Finish” as in item 8 (you skip the Welcome page)
the link to the Welcome page as in item 8
11. Monitoring results
During the time the survey is active, you may want to keep track of the number of replies you get. You can set an alert to keep track of new submissions, or look in Site Contents on a regular basis.
When you are on the Site Contents page, clicking on the survey and then on “Show graphical summary” will show you an overview of the results; clicking “View all Responses” will show you who has completed the survey and their individual contributions.
Those two options are only available for the site owner.
Example of the Graphical Summary. Q1 is a Choice-question, Q2 is a Rating Scale.An “individual response” . Clicking on the … will show you what I entered
12. Gathering and analyzing results
When you need a status update, or when the survey is over, you can either look at the graphical summary, or export the results into an Excel file for further analysis.
Click Actions > Export to spreadsheet.
Again, please be aware you can only make screenshots of any questions that need a response on a rating/Likert scale. These questions and answers can not be exported.
13. Deactivating the survey
Once the survey is over and you are working on the results, conclusions and next steps, you will want to stop people from making new entries. You can do this by changing the permissions from Contribute to Read and/or deleting the unique permissions, or by removing the audience from your survey or site altogether.
14. Deleting the survey
Once you have exported or captured the results and determined next steps, your survey project is completed and you can delete the survey.
Go to your survey > Settings > Survey settings > Delete this survey.
If you have used a welcome and thank-you page, you can delete those as well.
That’s it, folks!
As I said, this has become quite a long post, but I just wanted to take you through the complete process. There’s more to a survey than just creating some questions and answers!
For your next survey project, I would appreciate it if you would follow these steps and let me know if this has been sufficient information to do it yourself, or if I have overlooked something. (and if yes, what)
Good luck!
Image courtesy of fantasista at FreeDigitalPhotos.net
We are moving from an old on-premise SharePoint intranet to one on SharePoint/Office365.
I have been using SharePoint Online from 2011 so I have become quite used to the interface and its regular changes. But I was very curious what my end-user colleagues would think of the new SharePoint and I recently had the opportunity to train a number of them in the new environment. Our goal for this training was to get an idea of how people would react to the new platform, and which elements would be clear immediately and which would need more help and instruction.
All participants (except one) had experience with managing SharePoint sites. They also knew this was an experimental training so they were encouraged to be outspoken about their findings and suggestions. Each got their own test site in our test tenant, which is on first release.
These are the findings of that first classroom training:
1. The Office365 Homepage
When you log on to Office365 for the first time, you get a lot of pop-ups about Office365. While that is helpful for new users, for this purpose it was annoying because people were less interested in Office365 than in SharePoint.
Clicking around opens up a ton of new screens, which was not universally liked.
2. The SharePoint Homepage
This was a bit confusing, because people have never had that, and the page was mostly empty. The test sites did not show in everyone’s page, despite them having personal access. I do not know if that is a search indexing thing or that you must have visited the site before it is shown in your “recent” sites.
As soon as everyone was on their site’s homepage, I told them to “Follow” it to be able to revisit it quickly, and everyone got it.
3. Site Contents
I took them to Site Contents, and then I found that some of my trainees had the old Site Contents with tiles, and some of them had the new experience . That was a bit confusing, but it was a good illustration of the ongoing changes that everyone can expect.
4. Document Libraries
Document Libraries were already in the New Experience, and I was a bit worried if people would be able to overcome the gap in look-and-feel between our old SharePoint and the new one.
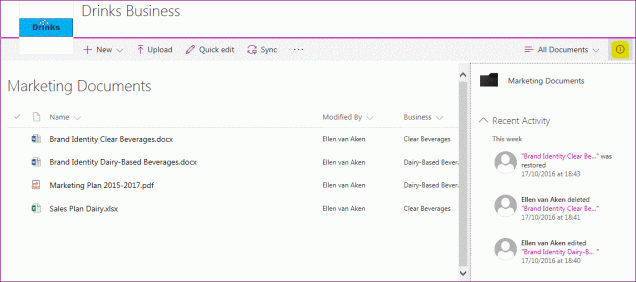
It was a pleasant surprise to notice that, with just limited instructions, people took to it straight away. Everyone saw the benefits of the Pin To Top functionality, and I saw two people nudge each other happily when they learned about the library and document information pane, that also tells you who has deleted a document. No more guessing or blaming SharePoint or IT!
The Document Library with the information pane. Just click the i on the top right of the library. You can see which documents have been created, edited, deleted, restored, by whom and when. Great!
5. Lists
Unfortunately the Lists were still on the “old experience” with the tabs and the ribbon. While I have always loved the ribbon in The Office Suite, I have never taken to it in SharePoint, and I am more than happy to see it go.
My trainees did not use Lists much (an opportunity for later!) but they got it quickly enough.
6. Deleting and Restoring
Deleting and Restoring content is a topic high on my agenda. We often get panicky calls from people who have “lost documents” and have never heard about the Recycle Bin. I added a few exercises with deleting and restoring documents and list items, told them what to do themselves first, and then how to get help. It all went smoothly once people knew how long things will be stored, what goes via the Recycle Bin and what does not, and what they can do themselves and when it is time to contact the site collection admin.
7. Quick Links/Navigation
The Quick Links (team site) and Navigation (Publishing site) caused some confusion since it is a mixture pf settings and edits, and moving the menu items around resulted in unwanted indentation. It is also different from the custom-built navigation many people have used, so this will definitely need some more instructions.
8. Editing a page
Editing a site’s homepage turned out to be quite easy for the trainees. Everyone in the audience had experience with managing Publishing sites. They sighed happily when I showed them they can now insert images from their PC in the Content zone without having to upload them to SharePoint first.
Everyone had already embedded a video before I even talked about it 🙂
Editing the (basic) team site homepage was even easier.
Inserting a picture from PC appears to be so much easier!
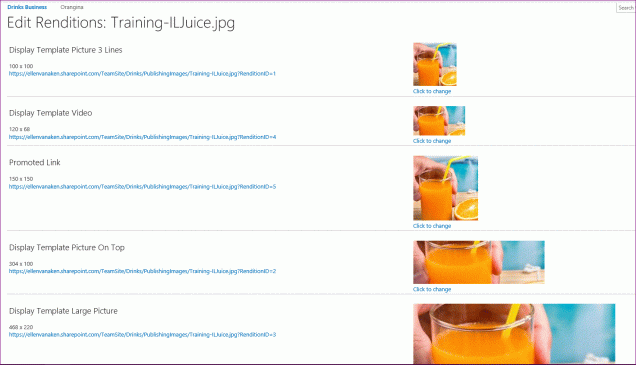
9. Image Library/Image Renditions
We have some recommended image sizes preconfigured in the Image Renditions and the trainees thought that was pretty useful. (It shows you how an image will look in that size). In our current environment, you only see it when you have added it to a page, and that can lead to surprises. 🙂
The image renditions show you how a picture will be displayed in different formats.
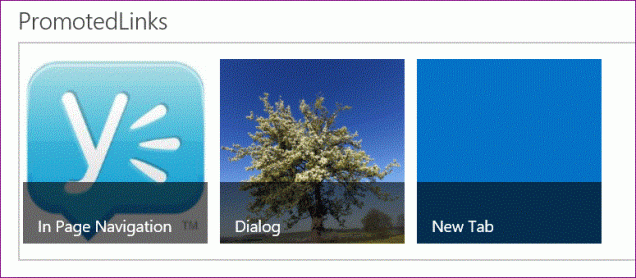
10. Promoted Links
Promoted Links have been designated as an important tool for nice looking links to other content in formal sites. Oops, this was a bit hard. Of course this is a new functionality so people did not know it beforehand. But I also think that the default configuration can be improved. That will be another blog.
Promoted Links with 3 different opening options.
Conclusion
All in all, my trainees did quite well. But then they were experienced and motivated. I think they benefited from my little bit of hand-holding and assuring them that most was still there, just in another place or with another name.
The only person who was a bit lost was the person with no earlier SharePoint experience.
So, I am actually quite content. After all this, I think the ongoing changes will be the largest hurdle, more so than the delta between the old and new SharePoint. (with the exceptions mentioned)
Have you introduced Office365 recently and if so, what have been the largest hurdles for your audience?
In my earlier posts, I have helped you prepare and start testing you SharePoint solution. In this final episode we will discuss giving feedback and finalization/implementation.
Step 8. Give feedback to the person who is configuring the site. First discuss your notes from steps 5, 6 and 7.
Then, also think about the views in your list or library. Now that you have created some items you will be able to see how your views pan out. Views are a great help in managing your process, but they are often not used to the max.
Are those columns shown that you need most, are they in a logical order? Can we remove columns for a better overview? Do we need to add some to make the data more meaningful?
Are the items sorted in the desired order (e.g. newest on top, highest priority on top, nearest due date on top)?
Are the views filtered correctly? (To avoid information overload)
Are the views grouped correctly? Would grouping help you with the overview, or does the grouping hamper your understanding of the data?
(For instance, I do not like double and expanded grouping – it takes up a lot of space. It also makes your sort order less workable)
Do you miss any views? Think about how you will manage this process, and what information you will need. An overview of different issue types? The number of open issues? The amount of money associated with these issues?
Homepage View for CRM: overview of number of open incidents and amount of money involved.
Some items of your feedback will be easy to fix, some things will need a workaround, and some things will not be possible at all. It may take some discussion for both parties to understand requirements and possibilities.
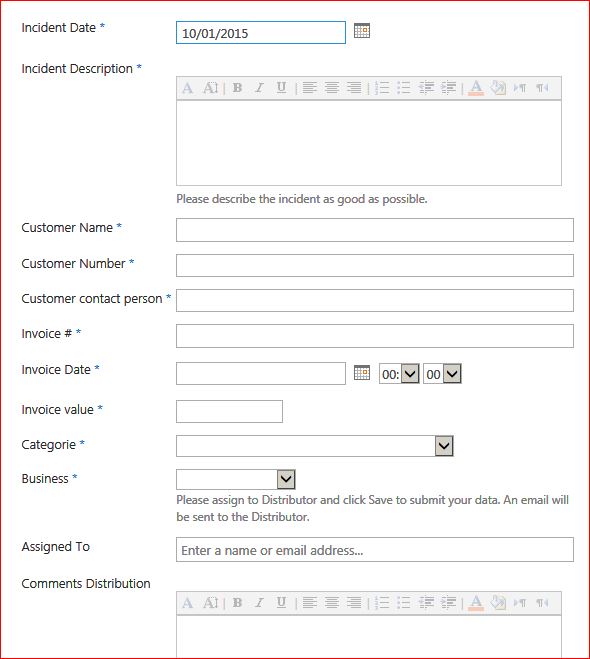
In the case of CRM, we had a lot of debate on the “Assigned to” field. This was used in every step and positioned at the bottom of the first step. If you had a role further in the process, you had to scroll up, and sometimes quite some distance! If you did not do it correctly, you could also accidentally change existing data, especially drop down columns. This could not be fixed, but we gave instructions about HOW to scroll up – “point your mouse somewhere in the white space and scroll up to avoid changing the existing data”.
Step 9. Repeat with the improved solution.
When your configuration person hands over the optimized list, repeat steps 5, 6, 7, 8 until you are satisfied. It may take only one small change (then your testing programme can be focused on that one item) or a massive change that will need a complete retest. (Luckily this has not happened too often).
Step 10. Test with others.
When you have tested all scenarios and are convinced that this is what you need to manage your process, test it with your intended users.
Repeat steps 5 to 9 in the correct roles until everyone understands the process and is ready to use it. You may need to create some training materials to help new people learn fast and as reference.
Yes, this can be a lot of work. But as mentioned before: Testing your solution thoroughly, and not just “looking at it”, will speed up the implementation and avoid changes later.
Next steps. I am now going to use this myself 🙂
This text may also lend itself to being made into a one-pager of sorts. That will be another fun project!
Please feel free to use this for your own processes, and let me know how it worked out! Any additions or suggestions are welcome!
Image courtesy of Stuart Miles at FreeDigitalPhotos.net
In my last post I helped you make preparations for testing your solution properly. Just having a brief glance and thinking “looks good” is not enough. You really have to “live” the process to see if I have translated your requirements correctly.
So here we go!
Step 5. Run the process as it should run.
That means you enter an item in the correct way, assign everything to yourself if appropriate, and click on OK at the right moment. Look out for the following:
Are the fields in a logical order? (The process starts at the top and ends at the bottom)
Are the column names, the choice values and a description/instruction correct and easy to understand for your audience?
Are the correct columns mandatory – or not?
When you click OK or Save, is the next screen you see logical and expected? (For instance, do you go to “New Requests” or a “Thank You” page?)
Do you receive a notification from an Alert or workflow? If you use workflow, are subject line and body text of the email meaningful, and is the attached link accessible?
Is the newly submitted request shown in the desired way on the library/list and on any page? (E.g. does it go into the view “New Requests” and not into “Completed Requests”?)
Make a note of all things that are incorrect, not meaningful, that could be improved or that you would like to add/remove.
Now, switch to a different role and do the next step in the process. Start from the notification or the workflow or wherever you need to start from.
The second and last step is to look at the input as the IT manager.
For CRM: You will now act as the Distribution Manager, add information and assign it to Quality Assurance.
CRM Step 2: Distribution department receives entry from Customer Services, then hands it over to Quality Assurance.
Repeat for the other steps (where appropriate) and make notes of everything you want to discuss.
Step 6. Repeat with different scenarios.
Run the different scenarios you have created in step 2 and see if it still works as planned. E.g. use some different values and/or reject an item if you first approved one. Make notes.
Step 7. Hack the process. If you have found a showstopper in steps 5 or 6 (e.g. an error message) skip step 7.
But if it all still works as planned, make a deliberate mistake or two. Think about mistakes that you or your colleagues may make. Enter a value that is not allowed. Forget to fill a mandatory field. What happens? Is it clear that the process is not going well? Do you get enough information about the problem and how to solve it? Make notes.
Up next: Feedback and finalization. In the next post, we will discuss giving feedback, finalizing and implementation.
In the meantime, if you have suggestions or additions, please let me know!
Image courtesy of Kittikun Atsawintarangkul at FreeDigitalPhotos.net
When I create a solution, I always casually ask the process owner to “test it”. I have found that I often get change requests when the system has been running for some time. This has made me realize that process owners may not always know HOW to test properly.
Although SharePoint is pretty flexible, it can be hard to make changes afterwards without compromising content and setup. (Ever tried replacing a Choice column by a Lookup column mid-process?) I would like to prevent that.
How should end users test?
I have looked for good websites or “Software testing for dummies” but I have been unable to find something sufficiently practical for this purpose. Remember, my users excel in other things than IT and testing. They do not need a lot of theory. They just want to get it over with as soon as possible.
So I thought I’d write down an average test scenario “for the business”, based on the solutions I usually create. Please let me know if you have additional resources and ideas.
My usual SharePoint solutions.
My solutions usually consists of a list and a few actions.
Someone enters values in the list, clicks OK and then an Alert (or workflow email) is being sent, and the recipient does something. There may be several cycles.
Or, a little more structured:
Data Entry > Save > Notification > Recipient takes action > Recipient enters or changes data > Save > Repeat from “ Notification” if needed.
I will use two examples, described before:
* Software Cost Reductions. This is a very simple one-step process: Data entry > Save > Notification > Recipient takes action.
Simple process: survey with 2 questions.
* CRM in a TeamSite. This is a multi-step process with different roles, where there are several cycles of Notification > Recipient takes Action > Recipient enters or changes data > Save.
First part of a Multi-step process
Why do I not do this for my users?
Oh I do. Before I ask the process owner to test I have made sure that it works at least from a functionality standpoint. But I know too much about SharePoint, so I generally know what to expect and where to look, even if the solution is not very intuitive. And I do not know the process as well as my process owner does, and I do not know which mistakes their colleagues may make.
Only the process owner can give me that information.
But it is so much work!
Well, that depends. Some processes are very simple to test and will take 15 minutes. The CRM example on the other hand was a complicated process, and it took several optimization rounds and several weeks to be OK and clear for everyone. The business case was enormous so all effort was worth it! And implementation went very smoothly because it was tested rigorously by several people.
So, here goes: How to test your SharePoint solution.
Please test your SharePoint solution properly to answer the following questions:
– Have we understood and captured your needs correctly?
– Will this help you with a better and smoother process?
– Is it simple enough to be adopted quickly by your team?
– Do you feel confident with the solution so you can introduce it to your users and own the solution?
Step 1. Check the process. Have the process description or flowchart ready. If you do not have a flowchart, you may want to write down the different steps schematically, from first entry to finalization. Note the different roles that you can have.
Software Cost Reductions: You will be an end user, and the local IT manager.
CRM: You will be Customer Services, the Distribution Department, the Quaity Department, the Transport organization (external), the Business Manager and Treasury.
Step 2. Sketch some common scenarios. Imagine some likely scenarios.
What is the ideal process? What are the different routes an item can take, e.g. approval, rejection, delegation, wait for more info, etc. Are there any mistakes that are often made?
Be prepared to test all those scenarios.
Step 3. Set Alerts. If this process depends on Alerts, make sure you have the proper Alert(s) set up even if you will not be the recipient of the Alerts in the real situation. You will need to check if all works OK first before handing this process over to others.
Step 4: Plan time! Plan time in your agenda to do this. You are expected to run the process several times (2-5) in its entirety by yourself. Please allow time to make notes of your findings and give feedback.
Software Requests: 15 mins.
CRM: could be a day.
OK, these were the preparations. Next time, we will start to test properly!
 At the very last “Office365/SharePoint Connect” gathering in Haarlem* I was quite impressed when Rick van Rousselt gave us a demo of Kaizala, sharing his telephone on a large screen.


 On October 5 I participated in IntranetNow, and a wonderful conference it was!
 Now that we have launched our intranet we constantly receive questions and support tickets from our users. That is not exactly a surprise, as we know that our current intranet is vastly different from our old one. We have SharePoint Online versus SharePoint 2007 and a completely new governance.
 I love this structured approach. Our manager, who is very much into service delivery, formal processes and stuff like ITIL, appreciates the process we are going through.
 The other day someone asked me if I could help him set up a SharePoint survey. He wanted to use our nice new intranet and did not even mention the word “Surveymonkey” 🙂


 We are moving from an old on-premise SharePoint intranet to one on SharePoint/Office365.