Lessons from producing my first Teams Live Event

Recently I “produced” my first Live Event in Teams: a symposium with the project presentations of three of our students.
The organisation expected around 100 attendees, so I tried to push them towards the regular Teams Meeting with some extra control measures (see my earlier post). But they really liked the moderated Q&A, so a Live Event it had to be.
As I need to learn to work with this anyway, I suggested to be the producer, so I could create procedures and scripts so they know how to do this themselves afterwards.

How a Live Event works

Scheduling a Live Event is easy, however I find being a producer quite some work. Tracy’s video makes it all appear fairly simple, but to be honest, I have been struggling a bit with this tool and needed a number of tests to get to grips with it. Perhaps it was our complex setup, perhaps I need more practice.

What have I learned?

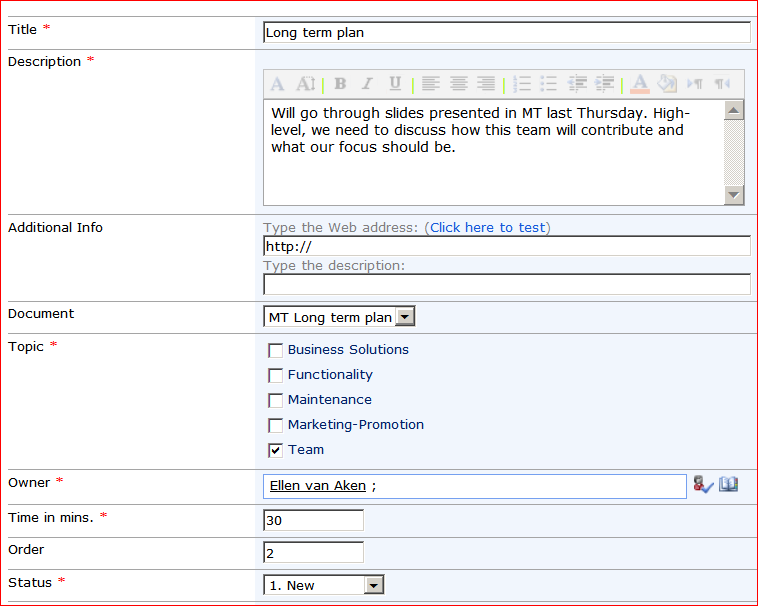
1. Give your event a good title

When your audience is entering the event, and the event has not started, all they see is the title of the meeting. Make it a clear one.

2. The producer should just produce

Although you can be producer AND presenter, I would advise against mixing these roles unless you are an experienced one-person-show. If there is a welcome or break slide to be shared, leave it to someone else.
When you (producer) share content or your desktop you do not see your dashboard, which makes it hard to do your work as a producer. And when you go back forgetting to stop sharing you will end up with a very annoying caleidoscope effect. If you do stop sharing there will be an annoying message that the Event will continue soon. You can not win.

I am sure an experienced producer/presenter can avoid this but I still do not know how – I can share a presentation but sooner or later this shows.

3. Keep the # of presenters to a minimum

When I did my first Live Event, a number of people were interested to see how it worked so I added them as a presenter. That provided some challenges as I could not see them all on my 13″ laptop screen, hence I could not select their video to show.
Additionally, during one of the breaks one of the “curious extra’s” decided to move to another room, accidentally sharing her screen. đŸ˜± She did not have her earbuds in, nor was she looking at the chat, so we could not warn her that her living room was visible for all to see. 😉

The presenters are shown bottom right and on a smaller screen, you can not see them all, and therefore you can not select their video!

4. Schedule a separate Live Event as a test run

As this was new to everyone we decided to do a test-run a few days before the meeting. You need to create a new Event for that, as you can only “use” a Live Event once.

5. Have as few transitions as possible

Transitions are a bit of a logistical nightmare. I had expected that when the next presenter shares their screen, that would pop up in the Queue, so I could add the speaker’s video and set it all Live at the right moment.
But it does not happen that way – presenters generally override their predecessor’s screen during the event, causing a need for the producer to frantically switch to the correct presenter. Or, they stopped presenting and then their face filled the screen.
So try to limit the number of transitions to keep your producer’s sanity 😉

6. Test starts, stops and transitions

We really needed this as presenters had no clue as to what to expect. So we went through the programme of welcome talk, first speaker, etc. People could practice how to share their screen, when to stop, how transitions worked, what they had to look out for, what not to do, etc.

7. Invite an attendee to ask questions

It helps to have an attendee in the test run to ask a few questions, so new presenters can learn how to handle the Q&A’s.

8. Use “desktop” rather than “content” for sharing (depending on setup)

We found that the following combination resulted in “flickering tabs” which is a major distraction:

  • Using Google Chrome as a browser
  • Using PowerPoint Online for your presentation
  • Selecting “content” rather than “desktop” for sharing

So: ask people to present with PowerPoint desktop app (if they have that) or ask them to share their desktop.
Or use Microsoft Edge, of course. 😁

9. Create a script

It may be good to have a timetable with who does what when and the timing of the breaks. It was good for the presenters but also for the producer, as I could then check when I needed focus and when I could relax a bit.

10. The “crew” needs the Teams Desktop App

One of the presenters logged into the test meeting via the web app and she entered the meeting as an attendee. Fortunately all our employees now have the Teams desktop app so all of us can produce or present Live Events (despite the fact that 90% of my colleagues have an F3 license, which is web + mobile apps only).

11. Make sure the producer has a large screen or monitor

As mentioned in item 3, I needed a larger screen to see all presenters, but also to see the Live result better. If your screen is too small, you will get prompts to expand your screen. Fortunately, I have an extra 23″ monitor.

Suggestion to change my screen.

12. Teach presenters how to unmute

EVERY presenter forgot to unmute themselves, so I had to jump in and ask them to unmute. 🙁 It was nerves, I get that, but I did not like having to intervene. However, I later heard people actually appreciated me jumping in, as it showed that someone was noticing, saving a lot of questions in the Q&A.

13. Avoid having an audience in the same room as the presenters

Our students really wanted to have some family in the room, so they would not have to talk into a void, but it posed extra issues:

  • Due to the delay that a Live Event has (about 1 minute) in image and sounds it was impossible to project the Live Event in the room with the presenters.
  • Therefore we needed an extra person to click through the presentations from a separate laptop in the room. We could perhaps have duplicated the laptop screen but it would have to be changed between speakers and I know that some situations/laptops do not support duplication.
  • I was producing from home, and I did not exactly know what tech was available in the convention room, which made it difficult to explain to the presenters what to do in the room (which was not my responsibility anyway – that was producing this Live Event)
  • Presenters got easily distracted by the audience so the MC’s had to make sure everyone was back at their laptops in time for the next presentation – while this will also happen in a physical-only situation it is less annoying there as everyone can clearly see what is going on. People online do not see that.
  • Your laptop’s microphone is not good enough in this situation – it usually sounds rather tinny and will pick up sounds from the surroundings and that can cause an annoying reverb – so your producer must mute you. Presenters, use a headset and keep it plugged into your computer at all times!
  • The presenters also had to find a good position in the room with a good background, which needed time during set-up.
  • Questions from the room could not be heard and needed repeating by the MC, which they sometimes forgot. Which led to Q&A’s.

14. Learn basic sign language

This may seem silly, but as everything the presenters and producers say when you are Live is audible for everyone online, you can not really talk about things, and not everyone was watching chat all the time. So sometimes I wished I know sign language to tell people “get ready to present the break slide” or “unmute”.

15. Producer, mute yourself when going live

Do not say “Here goes” or something similar when you Go Live, because it will be recorded in the video. Guess how I know this? 😂

16. Download the attendance report during or immediately after closing the event

When someone from the “crew” enters the Event after it has closed, it will overwrite the attendance report. By the way, the official word is “Attendee engagement report”.

17. The “crew” can only view the recording from the web app, even when they use the Attendee link

If they click the Attendee link and select the desktop app, they go into the “back end” of the meeting, overwriting the attendance report. See item 15.

18. The video lives in Azure, not in Stream

Do not look for the video in Stream – it is not there. You can download it from the meeting information and upload to Stream if you want to make it available for longer term. (It is available on Azure for 180 days)

There’s some good Microsoft info about post-event actions.

And if you know of a way to make transitions smoother, please let me know! If you have any other “gotcha’s” to share, they are welcome too!

Why this executive liked online meetings

AshtrayDuring one of the workshops at Intranet Reloaded in Berlin  we talked about how to motivate people to use their digital workplace. What really triggers them to change their working habits?

I remembered an example from when we were rolling out Microsoft Live Meeting (yes, this definitely was some time ago 🙂 ).
Our senior managers were flying across the globe all the time for face-to-face meeting, and we wanted to save the business time and money by providing an online alternative.

One of our vice-presidents had a “monthly results” meeting every month with about 25 country managers. They all had to turn up at Head Office for few hours each month, to discuss their financial and market results.
I talked to him and his assistant about the options and if they were interested to give it a try. Of course our team could help them with the first meetings, so they did not have to test this alone. Both he and his assistant liked the idea so we ran a few tests to make them more comfortable.

On the “first monthly meeting new style” I sat with him during the first few sessions to make sure everything was running smoothly, also on the other side of the line.
After the first two meetings had gone successfully he lit up a cigarette.
He leaned back with a big smile on his face and said: “I love this. Finally I can have a smoke during these meetings”.

You see, we had just banned smoking in the workplace. (Did I mention this was some time ago:-)? ). The only room where he was still allowed to smoke was his personal office. Nobody dared to forbid it there.

There’s all kinds of motivation to change behaviour. This was an unexpected one and if I had not been there, I would still think that saving time and money would have been his only incentives…

Image courtesy of Mister GC at FreeDigitalPhotos.net


No more meeting minutes!

NoMeetingMinutesWhen I visit “collaborative” sites, e.g. for a team, a department or a project, I often find a document library called “Meetings”, or even worse, several document libraries, each for one particular meeting date. These generally contain documents for prereading, presentations from the meeting, agenda and minutes. And sometimes they have an action or decision list as well.
The good thing is that these meeting documens are now in one clear online location, and that (hopefully) sending documents via email and printing are reduced.

But now think again. It is 2013.

  • Do you still store everything in document format, while there are ways to do thing directly online?
  • Do you have to open multiple Meeting Minutes or Decision List documents when you are looking for that one decision from early 2012, but forgot the exact date?
  • Is there still someone responsible for writing down “refer to next meeting” for several agenda items in the Meeting Minutes, and then remembering to add them to the next meeting agenda?
  • Are you still emailing various draft agenda’s to your team?
  • Does someone in your team have to collect the progress of the action list and recreate the new Action list?
  • Do you have to chase everyone for approval of the meeting minutes?

A different approach.

It may be time to move to a simpler process. Of course there is the Meeting Workspace, but sometimes you prefer to have everything in one site. The MW will also no longer be supported in SP2013.  An alternative is the Meeting-Agenda-and-Minutes List, combining agenda, meeting minutes and decisions in one list. Our team started this in about 2002 and we have happily used it for our weekly team meeting for years.

The concept is as follows:

  1. Everything you discuss is first an agenda item. The owner of the item creates and manages it themselves.
  2. All items not marked as “completed” are visible.
  3. The meeting owner adjusts the order of the agenda items just before the meeting.
  4. During the meeting, the item is discussed. We always had online meetings, so we viewed items on-screen. The item owner can adjust the item while discussing, and show the updates to the team.
  5. After discussing the item, the decision and date are added to the item and the status is set to “completed”.
  6. All completed discussions are stored in one or more “completed” views, sorted and grouped as needed.

Example.

Does it sound complicated? Let me show you the (Custom) list that I have worked with.

This is an item on the agenda:

New Agenda Item
This is the item to discuss.By default, status is “New”.

This is the agenda, sorted on “Order” and filtered by “Status is not equal to completed”.

Agenda
This is the agenda for the upcoming meeting.

During the discussion, the relevant info and decision are captured in the bottom fields of the item.

During Discussion
During discussion, the relevant information can be added.

This is the view that shows all items that have been discussed. You can easily filter for specific topics, regardless of meeting date. Of course you can also group on other metadata, but this view clearly shows the increased transparancy compared to Meeting Minutes in document format.

Completed
All decisions from earlier meetings, grouped by discussion date.

Of course you can simplify or extend the list to fit your own meeting style and goals.

What are the advantages?

  • No need to send agendas via email; if everyone sets a notification you wil get a message when a new item has been added or changed.
  • The meeting owner can easily adjust the order of items
  • During the meeting, the item is open and any next steps can be added straight away
  • When something is not discussed or no decision has taken place, it simply stays on the list. You do not have to specifically state that it is “moved to the next meeting”.
  • One archive of individual decisions means you do not have to look through documents by date. Now that you have one “online database” it is much easier to find any decisions relating to your topic, since they can be found by date AND by creator AND by tag if you have used those.
  • Everyone has seen the decision so there is no need to circulate any meeting minutes for approval.

Will this work for all meetings?

Of course this needs change management. If your organization is relying heavily on documents, not used to PC’s and projectors in the meeting room, or has been pampered by people sending things to them, this will be a big change that will need discussion, training and an extensive trial period.
It may be wise to measure time involved in the current meeting setup beforehand and to compare that to the new setup. This information will also help you to convince others.

For some meeting types this setup may not be appropriate. There may be legal requirements to have documents, perhaps even printed, with handwritten signatures, or some external participants may not have access to your SharePoint environment.

But for your average team, department or project group meeting, this may save lots of time!

Have you used something similar? Please share!

Note April 2013:  Gene Vangampelaere shares his use of OneNote for meetings. Nice!

Training in a web conference

TrainingAlthough this example is actually about Live Meeting/Lync and not about SharePoint, is does illustrate my point that you can do more with your existing toolset than you think!

What was the problem?

One of our content experts needed to train about 150 people across Europe. She had always visited each country when there were a few people who needed training, but she was now looking for an option that would save time and money.

An official e-learning module was rather expensive, especially if it was for only 150 people.  Also, only an external person would be able to make adjustments to the module afterwards. And she did not need all the functionalities of a dedicated Learning Management System (LMS).

So we had to think of another way to meet her needs.

What is the solution?

We decided to use PowerPoint, a Team Site and a standard Live Meeting (web conferencing) with poll and recording functionalities.

To make her feel comfortable with the tool, we helped her with

  • setting up a meeting with the desired options
  • sending out custom invitations
  • creating and managing polls
  • handling the Q&A panel
  • looking at the meeting reports (attendees and poll results, which would serve as her “LMS”)
  • creating a  recording
  • a “dry run” to fix any functional issues she might encounter, and to give feedback on other aspects of the training
  • attendance at the first session to make sure she felt comfortable and could focus on the content of her training

The PowerPoint, the training schedule and the recording were stored in a Team Site, along with other content on the topic.

TraininginLiveMeeting
The different parts of the training


PollinLiveMeeting
The different parts of the training


What are the benefits?

Of course this saves her time and money, but also

  • All trainees can easily access the training, since there were no password barriers.
  • Doing the training via Live Meeting enables her to have personal interaction with all attendees. This would not have been possible with an e-learning module.
  • The interaction and discussions are much richer than in her one-country-trainings, since every session attracts attendees from different countries.
  • New employees have a faster learning curve because they can watch the recording as soon as they need it.
  • Giving this training several times, and analyzing the poll results, allows her to continuously and quickly adjust the training to the needs of the audience.
  • She can make any changes herself – it just needs an update in the presentation and a new recording.

So, once again it shows you do not always need a lot of fancy new shiny software to be able to meet your business goals! Check what you already have at your disposal, use your creativity and off you go!

Do you have a good example of using web conferencing? Please share it!

Image courtesy of jscreationzs at FreeDigitalPhotos.net.