7 more things to know about the SharePoint News digest

This is an update on my earlier post “10 things to know about the SP News digest” as we have learned many new things about this functionality in the mean time.
I expect that many senders of News digests will also be News publishers and sometimes even Site Owners, so you may also want to read my recent post “10 more things to know about creating SharePoint News” .

1. You must have Contributor or Edit access in a site to be able to create and send a newsletter

A News digest is a page in your Pages Library, and you need permissions to create a page, add an image to the Assets Library etc.

If you are a reader in a site, you will not see the “Create a News digest” option. I wrote about this in “SharePoint Holmes and the Lost Link“.

Screenshot of SharePoint News where person has read access only - they will see the "See all" link on the homepage but when they click it they will not get an option to create a News Digest.
This person only has Read permissions and can therefore not create a News digest.

2. Do not panic when you do not see the “See All” button

There may be a glitch with the web part settings, such as described in my post “SharePoint Holmes and the Disappearing Digest Link

  • The Site owner has used the Hub layout for News (I could not reproduce this anymore, so this may have been a bug that has been fixed)
  • The Site Owner has deselected “Show title and commands” in the web part
Screenshot of News web part where the "Show title and commands" button is turned OFF.
If “Show title and commands” are OFF, you will not see the “See All” link, regardless of the number of posts.
Screenshot of SharePoint News with the "Show title and commands" button OFF, this means you will not see the "See all" link to create a News Digest.
No “See all” after publishing a News web part with the “Show title and commands” OFF.

And then there is the “number of posts” issue. This is the explanation from Microsoft: If you don’t see the See all link, it could be that you don’t have enough news posts published for the option to be available. See all shows only when the number of news posts you have published is greater than the number of posts set to show in the Number of news posts to show option of the News web part. For example, if you have only 2 news posts published, and you set the option to display 4, you won’t have a See all link in the news section.

3. Make it a habit to use the Description field for a good summary of the post

Your audience will appreciate a Newsletter that provides them with useful info and does not waste their time. A good summary in the Description can help, as this will help them determine if title and summary are sufficient information, or if they want to read the full post. The Description from the News page will also be displayed in the Digest.
If you do not publish News posts yourself, you may want to teach your publishers about the use of the Description field.

In the example below, item 1 has a short summary that tells you exactly what Project Peony is about, item 2 blabs on about the project itself and tells you nothing about the purpose.

Screenshot of two identical SharePoint News posts, one with a good summary in the Description that tells you immediately about the post, one with the default description which is not as informative.
Item 1 has an optimized Description, with a nice summary, while Item 2 has the default first lines of the body text.

Read more about the Description field in my post: “7 things to know about the Description field in SharePoint pages and news“.

4. You can send one Digest from various news sites

Suppose you normally publish in and send a Digest from the Intranet site. Now you want to send one Digest from your Intranet News posts, with one or more items from one or more different sites. This can be done by adding a link to news that lives in another site, or even on the internet, or by including all News from one or more other sites permanently.

You have three options, see the screenshots below. You can find more elaborate info in my post “Combining SharePoint News from different sites“.

  • Add a News Link (to one News post from another location) is best for a one-off News post
  • Use News posts from one or more other sites if you want to permanently include News from one or more other sites in your News
  • Use News posts from all sites in the Hub if your site is a Hub site
Screenshot of SharePoint News with the place where you can find the "Add News Link" option.
For a one-time addition of a post from another location, you can use the Add News link option.
Screenshot of SharePoint News web part settings where News from two additional sites has been added to the News from this site.
If you want to show all News from one or more sites, you can add more sources permanently.
Screenshot of SharePoint News web part, where the site is a Hub site so you can select to show News from all sites in the Hub.
If the site is a Hub Site, you can show News from all sites in the Hub

Please remember that links in the Digest will go to the original posts when clicked from the site or the Digest. Make sure that everyone has access to all sites featuring in the Digest!

5. 🥳🥳🥳There ARE options to format the Digest email! 🥳🥳🥳

Microsoft is still in the “promise” phase for any formatting options, but Veronique Palmer has found a way to format it from the Outlook Desktop app – now that is neat! I tried it with Outlook-on-the-web and you can do a few things there as well!

In short, you can reformat while you forward the digest. This is a good way to change the colour scheme and perhaps add different logo’s (I could not make that work but that may be just me or a limitation of Outlook-on-the-web)

So, this is the Digest email that I receive in Outlook on-the-web.

Screenshot of the original News digest email
The original Digest email, it is a bit boring and has a lot of Microsoft branding

When I forward it (and perhaps change the sender from myself to an organizational mailbox such as “Communications” to make it more formal) I can edit the header. In this case I removed the Microsoft and SharePoint logo’s, edited the text and added a background colour.

Screenshot of formatted SharePoint News digest email, without the logo's and Microsoft references, with a different header colour and some edited texts.
I can do some formatting, even in Outlook for the web!

This is the reformatted email after sending:

Screenshot of reformatted news digest email. It looks a bit more colourful than the original.
The reformatted email. It looks a bit less bland!

6. The Digest will always be sent from your personal email address

SharePoint is personal, and any Digest will be sent from your email address. (Unless your Communications Department has a separate Microsoft365 license, but I think that is not good practice).
If you want to send a Digest on behalf of the Communications Department for instance, please first send the Digest to the Communications Department mailbox. From there, you can forward it to the intended audience.
This procedure will allow you to:

  • Shorten the title.
    By default the Digest title will be “[Creator] shared [Digest Title] with you”. By forwarding you can shorten that to just the Digest title.
  • Add the audience to the BCC field.
    This will keep the damage of any “Reply All” actions limited. There is no option to send as CC or BCC from SharePoint.
  • Format the email, see item 5!
  • Treat all emails from the Communications Department consistently (e.g. filing, archiving, etc.)
Screenshot from the Digest creating process. There is only a "To" field in the Digest, no CC or BCC.
There is only a TO field in the Digest, and it will always be sent from the person who creates the Digest.

But make sure to remove any earlier sending info!

Screenshot of News digest email when it is received and being forwarded. At this stage you should edit the title to make it more compact, and remove the sending info from SharePoint to the first mailbox.
When forwarding, please edit the title (1) and remove the sending into from the mail (2).

7. Be aware that not everyone may receive your News digest

That may be because of a problem with your email server, it may end up in Junk Mail, it may be an accident and some readers may have intentionally blocked you because they do not want to receive “more organizational stuff to read”.
I have listed a number of possible reasons and troubleshooting in this post: “Why does my SharePoint News digest not reach my colleagues?

If you are starting with a regular newsletter, I would suggest you inform your audience about the reason and value, and show them how to check their Junk Mail or Archive. It can also be helpful to run a survey now and then, so you can finetune your Digest.

What have I missed?

So, have you found any other “things to know” about the SharePoint News Digest? Please let me know!

The 7 from the image is sourced from https://www.freepnglogos.com/images/number-7-36599.html

Combining SharePoint News from different sites

Sharing News posts from different sites in your site can help you create a good News experience for your audience, as you can share other people’s News without having to publish it yourself. It will also help other publishers by increasing their audience.

We used this extensively in my last role. Communications picked up interesting News posts from other parts in the organization to share that on the intranet Homepage. Reversely, local News publishers sometimes added corporate News posts to their own News.

It is easy to do but there are some things you may want to know.

1. There are three ways to add news posts from other sites to your News

a. One-time only: use the Add News Link

This way you will add one post to your News feed. The item will be displayed on the News web part as if it has been published in your site, it will have the name of your site on top of it.
This link will create a new page in your Site Pages Library, but upon clicking the title or image from the News web part, you will be taken to the original post in the original site. So, you are NOT making a copy, just a reference.

How to do this:

Go to the News web part, click New and select “News link” instead of News post

Screenshot of SharePoint site Homepage with the option to add a News Link.
How to add a link to another News post – use the highlighted option

Enter the link to the News post in the popup. The popup will automatically populate with image, title and description from the News post. You can adjust this where needed. Click “Post” at the bottom of the popup to publish.

You will see the current Page Details and can adjust them when needed.

After you click Post, the post will be added to your News web part as if it has been created by yourself.

Screenshot of SharePoint page with News web part after adding a News link to another news post.
The linked post is added like a regular News item

In the Site Pages Library, a new page will be added that contains only the Page Details, but not the complete item. That still lives in the original site.

Screenshot of page created in the Site Pages Library with just the Page Details.
In the Site Pages library you will get a new page with just the Page Details.

You can imagine that this works well for the occasional post that you want to add. Keep in mind that, when the original publisher deletes the post, your linked news item will give an error message. You may want to check out my post “SharePoint Holmes and the Missing Message” for the details.

TIP: This is a good way to republish an older post from your site. By adding the News Link it will show up as a new item, on top of the feed. This is much easier than fixing the position in the web part which is rather cumbersome.

b. Permanent: Add one or more News sources

In the News web part, by default the News from “this site” will show, but you can select other sites to show their News.

Go to the page with the News web part and click the Edit button. In the web part settings, you can choose “Select sites” and then check the sites you want to add to your News web part. Generally the sites you use frequently will be visible, but you can also search for them.

When you have selected the site you will immediately see their News mingled with your own, depending on Publish date.

Screenshot of how you select the sites that will be part of your News web part.
Upon selecting the sites you will see their News posts mixed with your own. They will have the name of their original site on top.

Unlike the “News Link” options, posts will show the name of their original site above the title, and no reference page will be created in your Site Pages Library.

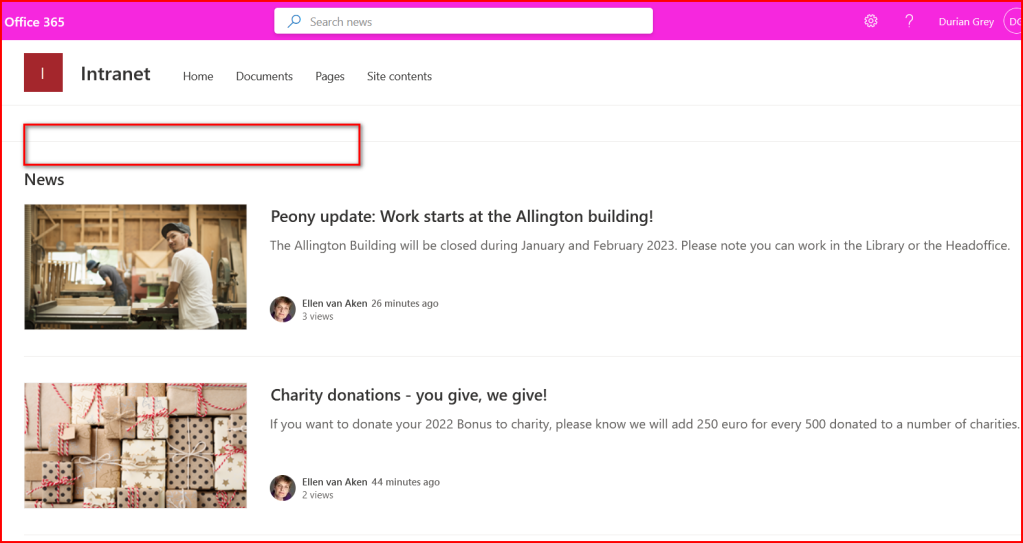
Screenshot of the News of the Intranet site homepage, with News of two other sites added as other sources.
This is the News feed of the Intranet site and two others

c. Permanent: all sites in the Hub

In case you have a number of sites that belong together, e.g. together they form the Intranet or the global HR information, you can create a Hub site to bring them all together with navigation, design, search, News etc.
Gregory Zelfond has a good explanation in this post, so please give that a read if Hubs are new to you: How to create Hub sites in SharePoint online.

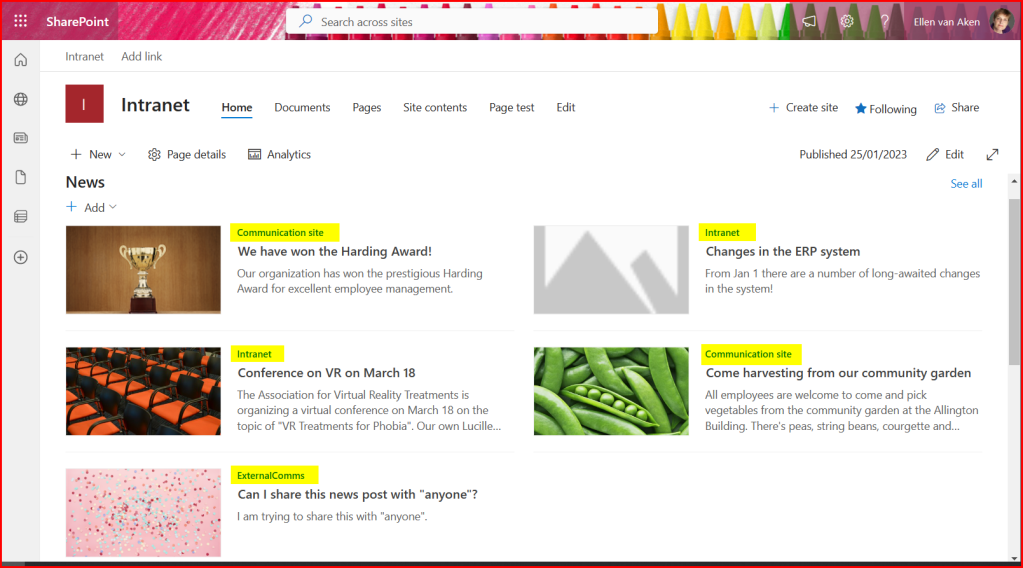
In this case, I have turned the Intranet site into a Hub site and associated 2 other sites with it. You see that each News post has the name of the site where it lives, on top. Again, no reference page is created.
(By the way, you also see that the post I used in my earlier blog now has lost its image, a clear sign that something is wrong!)

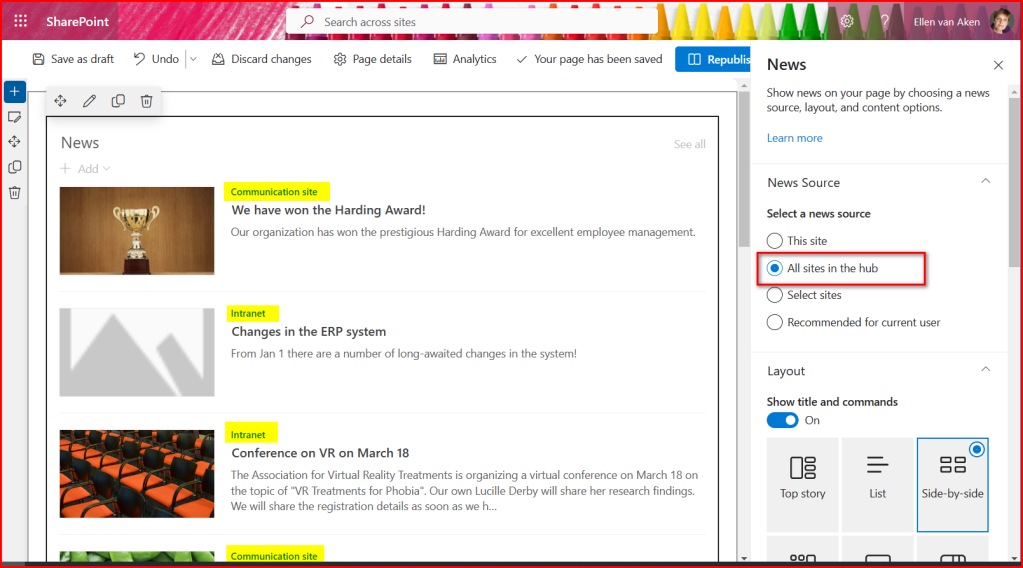
Screenshot of how to show the News of all sites from the Hub.
When you have created a Hub site and associated sites with the Hub, you will get the option to include all Hub sites in the News web part.

Screenshot of SharePoint news web part, with News from the 3 sites that are in the Hub.
You see the most recent News from the three sites that are part of the Hub.

2. You can add Team sites to the mix

All three options above can be done with both Team sites and Communication sites. In the screenshot below, I added a Team site to the Hub and the News post I created is incorporated.

Screenshot of SharePoint news web part, including a News post from a Team site.
Top left is the latest News post from a Team Site, that I associated with the Hub.

3. Mind permissions!

Make sure that any posts or sites that you include in your News web part or News Digest, is accessible for your audience. You may want to check with the site owners about the site’s permissions.

This is especially the case with Team sites which are likely to have more strict permissions than an organization-wide Communication site. Team sites may contain updates from important projects, that you may want to share, but make sure everyone can read them, otherwise you will have to create your own post.

4. You can create a digest from combined News

Regardless of where the News lives, you can turn all News posts that are in your web part into a News digest. In the screenshot below I left out the ERP item, where the original has been deleted, but you see that all others can be included in the News digest. But…please verify that everyone has access to all sites! (see 3.)

Screenshot of the News Digest creation page - all articles in your site can be included in your Digest.
All posts in your site can be included in your News Digest

5. You can add a News web part to more pages than one

You will most likely have the News web part on the Home page of your site, and you want that to be as interesting as possible.
But you can create as many News web parts in your site as you want or need, and configure them separately using option 1b. This allows you to keep track of other posts and pick out any interesting ones.

EXAMPLE 1: Suppose you are a multi-national organization, and each country has a News site for that country. You can create an extra (hidden) page with a Web part, select all the country sites as your Source, so you can keep track of what is going on in each country. You can then use the info from that web part to add News to your own site, or send a News Digest about what is happening in the various countries.
EXAMPLE 2: You can combine the News of different Project sites to keep track of their News (assuming you have permissions) and then make a selection as a Project Update digest.

These are just examples to give you an idea about “keeping track of News” without having to add it to your Homepage.

Below you will see a screenshot of how I added an extra page in the Intranet site, where I added News from two completely different sites than used earlier.

Screenshot of a different page in the Intranet site, with a News page that uses completely different sites than the News source.
A new page in the Intranet site with completely different News items. This can come in useful to keep track of other News.

Do you have any tips or experiences to add about Combining News? Please let me know!

SharePoint Holmes and the Lost Link (to the News digest)

Another occasion where SharePoint Holmes saved the day.

The situation

“I need to send out a News digest today for my colleague and she showed me how to do it, but it does not work for me” I heard on the other side of the Teams call. “It is our Christmas Newsletter and my colleague is already out for the holidays”.

Of course one calls the support desk rather than another colleague when this happens 😊. And as I was quite busy in the end-of-year period, I thought I’d call in SharePoint Holmes. Usually this was a quiet time for him and I expected that an interaction was welcome. Especially a “it does not work for me” as that can be really anything. So on went my sleuthing hat!

The investigation

We shared screens. She opened the site where the News was published, and showed me the items that needed to go into the Christmas digest.

I noticed there was a “See All” link top right, so apparently the web part was configured correctly, and more than 5 items were published. That was not the problem.

Screenshot of a SharePoint News web part, displaying news posts.
The News web part that is the source for the news digest . There is a “See All” link top right.

She clicked on “See All” and the next page opened.

Hmmm, there were no “Manage Posts” and “Email a News digest” links. A page refresh did not help. That was strange.

Screenshot of SharePoint page where you normally create a news digest from. The link to do that is missing.
The page where you normally see “Manage posts” and “Email a news digest”. But not here.

I looked at one of my own sites and compared it to hers.
I asked her to go back to the Homepage. There were no options to add News or something else. (as in the first screenshot in this post)
I asked her to click on the Gear Wheel. That showed only a very small menu.

Screenshot of the Site Settings for this person. Only two menu items, so this person has very limited permissions on this site and can therefore not create a News digest.
The site settings only has a few options. I expect this person is a Visitor and has too few permissions.

Ah, I got it. Permissions!

The solution

In my admin role, I checked permissions for the site in question. And as I expected, she was a Site Visitor, not a member.

You can only create a News digest when you have permissions to add a new Page to the Site Pages library, and add images to the Assets library. It is in the Microsoft support, by the way, but I only learned that later.

Due to the absence of any other Site Owners, I made her a Member and sent a note to the Site Owner that I had given her more permissions in order to create a News digest. I hoped the Site Owner would remember that for next time…
I stayed in the meeting and looked while she created the News Digest. After a page refresh the permissions were OK and she knew what to do.

SharePoint Holmes saved Christmas! 🌲😁

Happy holidays for all my blog readers. All the best for 2023!

About SharePoint Holmes:
Part of my role was solving user issues. Sometimes they are so common that I had a standard response, but sometimes I needed to do some sleuthing to understand and solve it.
As many of my readers are in a similar position, I thought I’d introduce SharePoint Holmes, SharePoint investigator, who will go through a few cases while working out loud.

SharePoint Holmes and the Event Error

Our new SharePoint intranet is getting its final shape, and now that we have the different sites and the news in place, we can start working on other things.

The case

One of those “other things” is the Events calendar, where we share important events within the organization. As these are published on the intranet home page, we needed to give people access to the Events list in the home site only, to avoid them being Masters of the Intranet. 🙂

We created a group of Event Publishers, added that group as Contributor to the Events list, and instructed them how to create a new event. (It works much like creating a page or a news item, just with extra predetermined columns).

The form to add a new event from the Events web part.

Shortly after we gave out the instructions, questions started to roll in. Some Event Publishers had no issues at all, but some reported strange error messages and could not publish their event. It was time to see if SharePoint Holmes was still around!

The investigation

  • I checked permissions. Yes, this group had Read access to the intranet site (this is not a given at this moment pre-launch!) and Contribute access to the Events List. So far, so good.
  • I asked one of the users to show me what she did. She did as instructed – clicked on “Add Event” from the homepage and added a custom image from her PC
This is a custom image that was stored on her PC
  • When she clicked on “Add image” she got the following error message. The same happened when she wanted to add something “from the web”.
I had never seen this error message before!
  • It was a rather mysterious error message, that I had never seen before, but it looked as if it had to do with the image and uploading.
  • I wondered if it could have to do with the fact that she did not have Contribute access to the homepage, so I asked her if she could create an event directly from the Event list. She could add the event without issues, but there was no option to add an image.
The “new event” form from the list looks much different from that form from the webpart
  • I then asked her to repeat it from the web part, this time using an image from the Stock Images. The event was published to the homepage smoothly.
  • This somehow felt like News, where images are being stored in a separate Site Assets library. (Except Stock Images or Organizational Assets; those images do not get stored)
  • I checked if Events were stored in the Pages Library, as they looked much like a page. They were not – they were stored in the Event list.
  • I then checked the Site Assets library, and in the folder “Site Pages” there was a subfolder called “Event”. In that library the Event images are stored.
Apparently Event images are stored in the Site Assets library.

The solution

We did not know that Event images are stored in the Site Assets library when we started, so we had not thought about giving them Contribute access to this library.
We added the Event Publishers group as Contributor to the Site Assets library, and then every Publisher could add events without any error messages.

The Event calendar. The middle item has been created from the Event list directly and has no image.

We could have asked them to use images from the Stock Images or Organizational Assets only, but we felt that was too restrictive. Our education folks have custom images to brand their events consistently, for instance. We could have added those to the Organizational Assets but giving everyone access to the Site Assets is easiest and saves us a lot of instruction and support. 🙂

About SharePoint Holmes:
Part of my role is solving user issues. Sometimes they are so common that I have a standard response, but sometimes I need to do some sleuthing to understand and solve it.
As many of my readers are in a similar position, I thought I’d introduce SharePoint Holmes, SharePoint investigator, who will go through a few cases while working out loud.

Troubleshooting external access to SharePoint sites

We frequently get questions about external contacts that can not access SharePoint sites that they should have access to. Well, access and permissions are troublesome in all organizations, but access issues for external users can have additional causes and solutions, so here’s an overview to help Site Owners and support and admin people (such as myself) to identify and fix issues.

The site owner can check the first 4 items, and if that does not work, the support and admin folks may be able to help with 4, 5, 6 and 7.
It always helps to ask for a screenshot of the error messages, because you can already learn a lot from those.

It is wise to advise external users to log in with their browser in private or incognito mode, especially if they are from an organization that also has Microsoft365. It will avoid account mixups.
Thank you, former colleague Anita, for reminding me!

1. Does the user have access?

Let’s make sure that is not an issue, right? Check if the user is a Guest on Teams, or in case of a stand-alone SharePoint site, check if this person has permissions. Please be aware that external users only become visible in SharePoint permissions after they have been in the site once. So, if you can not find them in the Visitors or Members, it does not mean they have not been added.
In the screenshot below, I have already added someone with a Gmail account, but that person has not yet accessed the site. You may want to check item 2 first.

External users are only visible when they have accessed the site. Most annoying!

2. Has the user seen the invitation?

Warn your user that the invitation may end up in the Spam, Junk email, Unwanted items or whatever their non-regular mailbox is called. My invitation to a Gmail account was considered Spam, and my invitation to a Hotmail account also ended up in Junk mail. Messages in Gmail Spam are deleted after 30 days (see below) and in Hotmail Junk in 10 days, so your external contact may never have seen their invitation!

Invitations easily end up in Spam or Junk mail!

3. Has the user’s invitation expired?

External users need to do their first log in within 90 days, or their invitation expires.
In Classic team sites, the Site owner will see this in Site Settings > Access requests and invitations, under “Show History”. If it says “Expired” you may want to add the user again.
In Communication sites, check Gear wheel > Site Information > View all site settings > Access requests and invitations.
I could not find this option in other site types, and adding “/Access%20Requests/pendingreq.aspx?mbypass=1” to the root did not help either.

Here’s where you see who has been invited.

4. Does the user log in with the exact email address as per the invitation?

This is a frequent cause of problems. If you have added your externals with their Outlook or Hotmail account, they can generally access smoothly; if they have a Gmail, Yahoo or other free mail account you can warn them to expect issues, but if they have an email account for work, using their own domain name, you can not tell whether they can expect issues or not.
Externals should access with a Microsoft account. So if you give someone access with their Gmail account, they are prompted to create or use a Microsoft account. This is not always clear, I have found.

Gregory Zelfond has created a good overview of what the external user sees, and how they should proceed.

Another issue can be if the user has multiple emailadresses, and they access with the wrong one. We recently had an issue where the person had two very similar addresses. It was not clear to both the external and the site owner that he was logging in with @organization.eu, while access was given to @organization.nl ! It was clear from the error message, but you know how people can panic over error messages 🙂

SharePoint admins may use the follwing Microsoft info when trying to help the Site Owner:

Error when an external user accepts a SharePoint Online invitation by using another account

“Access Denied”, “You need permission to access this site”, or “User not found in the directory” errors in SharePoint Online and OneDrive for Business – scroll down to see some trouble-shooting for external users.

5. Is the site accessible for external users? (admin only)

Another reason for issues can be that the site is internal-only. In my organization sites are by default internal, but when external access is needed, we can open them up. When people request a new site and they specify that the audience contains external users, we make it accessible for externals from the start. Otherwise, it needs to be changed when the need is there, but site owners do not always know or remember that most sites are internal-only.
An admin can check the sharing settings in the SharePoint admin center.

This site is accessible for external users.

6. Is the external user listed as a Guest user in the Admin center? (admin only)

External users added to Teams will be visible straight away, but again, for stand-alone SharePoint site they need to have accessed the site first. If they are mentioned, they have access and have been able to access this or another site in your tenant.
If they are not visible, it does not necessarily mean they have not been added.

Guest users have their own list in the admin center

7. Has guest access expired automatically? (admin only)

This is a relatively new feature in the SharePoint admin center. You can limit the time that a guest has access, counting from the moment the guest has been given access. After the time has expired, the site admin receives an email and can extend the period.

You can set an automatic guess access expiry in the SharePoint admin center.

Personally I would welcome the option to set an expiry time after a certain period since the last log-in, but “from the moment you have been given access” does not make much sense to me. You can be in the middle of a project and then get kicked out because it has been 60 days since you were given access and the site admin has overlooked the email or forgotten to extend your access? Most annoying!

8. Has the other organization blocked access to external networks?

Sometimes the employer of your external guest does not allow access to external networks. You will not know, and it is up to the external guest to find out. There’s not much you can do about it, except giving the external person an account from your own organization.

Access to Teams

Although external users can have difficulty accessing a Team as well, access is much easier to check than in stand-alone SharePoint sites. Permissions to a Team are easier to check, and guest users to Teams are immediately visible in the Guest users in the admin portal, while SharePoint users only become visible when they have accessed the site once.

Did I miss anything?

Have you found a frequent issue with external users and how have you solved that? Would you know where to find the Access requests and invitations in modern non-communication sites? Or do you have another question or remark? Please add them to the comments!

Leaving the organization gracefully

We all know that your personal mailbox, agenda and personal documents will be deleted some time after you leave the organization.

But recently we have seen that more and more team content is stored (and automagically shared) on personal OneDrives, which means that when someone leaves, that shared content will be deleted and lost.
Owners may not be aware that they are the owner of the video, file or Whiteboard, and that these resources live on their OneDrive.
Colleagues of leaving employees may be in for several unpleasant surprises.

I tried to compile a list of things to look for, so if you are the leaver, you can check these items and decide if they needed to be handed over. You will save your colleagues, your manager and your Microsoft365 admins a lot of hassle!

Yes, the manager will have control of your OneDrive for some time after you have left, but

  • do they know enough about the details of your work to know what to keep and what to let go?
  • do you really want to burden them with this?
  • do you want to leave your remaining colleagues in the dark about team stuff?

If you know that a colleague is leaving, you may want to help him/her with checking NOW which content you need after they have gone.

Step 1: Teams Meetings

Are you the organizer of a regular Teams meeting? The meetings will keep running, but nobody will be able to change dates or times, add or delete invitees, or manage the meeting details. At this moment it is not possible to transfer the ownership, but I think that is in the Roadmap.
It is therefore important to either

  • Stop or cancel the meeting, and ask a colleague to re-schedule it. This will mean that meeting links and resources will change. This is the best suggestion for smaller meetings.
  • For meetings with many attendees, a collague can duplicate the event by opening the meeting, clicking on the … and then “Duplicate event”. The meeting will the be copied with the same invitees. The new owner can then remove the old organizer and make sure times and recurrence is OK. This will send a message to all people in the meeting, but in any case you do not have to add them all again.
    This will also change link and resources.
  • Check meeting chats for important files or attendee reports or recordings that needs to be safe-guarded in SharePoint.

Step 2: Regular files – copy or move to Teams/SharePoint or delete

  • Documents
  • Attachments (from Outlook)
  • Notebooks
  • Pictures
  • Office Lens
  • Transcribed files

Step 3: Special files

I have based this list on the various OneDrive folders as described in my earlier post “Who created those folders in my OneDrive?

Microsoft Teams Chat Files : everything you have shared in private chats

Do you realize that all those screenshots, funny videos and other stuff, that you have ever shared in a private chat (which means: not shared in a Teams channel) live on your OneDrive and will therefore be lost when you leave? It will not be big issue for that silly gif that made your colleague smile when they were feeling down, but there may be relevant documents or screenshots that your colleagues want to keep.

So, you can either check the Microsoft Teams Chat Files folder in your OneDrive, or scroll through your private chats. Upload the files to a relevant Teams/SharePoint site or send them as attachment to your colleagues. (Usually not recommended, but they will need their own document)

Now you will understand why Matt Wade, in his Definitive Guide to Everyday Etiquette in Microsoft Teams, says: “Work should not be completed in private chat”. (Page 14) 🙂

Microsoft Teams Data: Meeting notes from Teams meetings

This contains the Meeting Notes you have created in Teams meetings. I personally do not use this very often to take notes, as I think the functionality is rather limited, but it is helpful in emergencies. Additionally, it does not open easily from OneDrive, I had to select an app to open it (it is an .mht file).

Do you have Meeting Notes that you would want to keep? Copy the text into a Word or OneNote document in the relevant Teams/SharePoint site.

Recordings: Videos from Teams meetings

Another shared resource that is being stored in a personal location. Make sure you move the video(s) that need to be kept to Stream or Teams/SharePoint.

Whiteboards: Sketching sessions (can be from Teams meetings)

At this moment Whiteboards are still stored in Azure, but they will follow the Recording path and be stored in the OneDrive of the person who creates the Whiteboard. This is expected to happen in October 2021, according to the Microsoft Roadmap.

I expect you will be able to copy/move Whiteboards, and I will update this post when I know more.

Step 4: Applications

Forms – the Forms themselves

Please check out my earlier post on how to handle Forms when you leave.

Forms – files from “File Upload” questions will be in a folder called Apps

If the Form will still be running after you leave, please move ownership of the Form to a relevant Teams/SharePoint site as mentioned above.
If you still need these uploaded files, whether the Form is still running or not, please move them to the appropriate Teams/SharePoint site.

This question type will create a folder in your OneDrive to store the documents – please make sure they are preserved if they are still needed!

Workflows

Power Automate workflows are not stored in your OneDrive, but they are personal. Your Flow will keep running (if it is not something in your personal apps, of course) but if it needs an authentication, or needs an edit, it will need a new owner.

You can simply share the Flow with a colleague, so you co-own the Flow.

In your “My Flows” you can select the workflow and share it with your successor. Make sure they have permissions to the source info!

If you have not done that before you leave, your Administrator will be able to hand it over to your colleague. But hey, your Admin is usually busy enough and all those individual fixes take a lot of time! 🙂

How to manage orphan flows when the owner leaves the organization (microsoft.com)

Stream

Do you have any instruction videos that may be useful later, or do you have any old meeting recordings that should be kept?
In Stream, go to “My content” and then “Videos” and see what needs to be transferred. Open the video in question, click the … and select “Update video details”. See screenshot.

More info: Permissions and privacy in Microsoft Stream – Office Support

Here’s how to start changing ownership of a video. Not the most obvious wording 🙂

PowerApps

I do not have too much experience with PowerApps, so I have found a blog that explains how to transfer PowerApps: HOW TO: Change PowerApps Owner | Todd Baginski’s Blog

Lists

For lists in a SharePoint site, you do not necessarily have to change ownership, as generally all Owners will be owner of the List.

For personal lists, that live somewhere in your OneDrive, it may not be so easy. You will have to recreate the list in a SharePoint site. You can use the Excel file as a basis (see my earlier posts on the topic). I hope Microsoft will make moving a personal list to a SharePoint site easier in future!

SharePoint sites

Make sure you appoint another Owner if you are the only one (which is not a good idea, I always suggest to have at least 2 Owners for backup)

You may also want to check the permissions to content that is important for the team, and make sure it will still have an Owner after you have left. Appoint another Owner or, even better, make sure that the permissions of that content follows the permissions of the site.

Have I missed anything?

Or do you have any experiences or suggestions to share? Please let me know!

Update 7 June 2021:

Good addition from Loryan Strant, I do not have too much experience with the apps mentioned (except for OneNote, of course) but be aware if you are using them!

8 steps to retrieve a lost SharePoint document

SPdocgone-header2We frequently get calls from colleagues whose documents have “disappeared” from their SharePoint site. Over time, we have come up with a few steps to investigate and (often) find them.

They are comparable with the steps taken when you misplace a OneDrive document, but finding lost documents in SharePoint is a bit more complicated than finding them in OneDrive:

  • Other people can edit or delete documents
  • You only have 1 OneDrive (which is one document library), but you probably work in multiple document libraries in multiple SharePoint sites
  • Permissions can vary within and across sites

On the plus side, there is a Site Owner and a SharePoint admin who may be able to help you out!

What could have happened?

These are the most frequent “disappearing acts” of documents:

  • Deleted (deleting a synced folder without disconnecting it first also deletes the documents from SharePoint!)
  • Renamed
  • Moved to another folder in the same document library
  • Moved to another library in the site
  • Moved to another site. This means the original document has been deleted.
  • Moved to your OneDrive
  • Permissions have changed and you no longer have access
  • Metadata have changed so it appears in a different view than usual

Which tools are available?

  • Search
  • Recycle bin
  • The document details pane
  • The site owner or your SharePoint admin

Where to start?

Just like my post about the disappeared web parts and lost documents on OneDrive, I have thought about the best possible order to use the available tools. It may appear to be fastest if you go to the Recycle Bin first, but that may be quite a chore if your site is active, your document has been deleted some time ago and/or document name, the author or the suspected deleter starts with M or N. Sadly you can only Sort, and not Search, in the Recycle bin.

My suggestion would be to first try and find the document in the original library. But please, feel free to disagree! It also depends…:)

1. Search in the Document Library where it used to live

Found it? Open it to see whether this is the document you are looking for. It has most likely been moved from one folder to another, or metadata has changed so it appears in a different view. Take step 2 to find the location if you do not see it straight away and/or confirm with step 7 to see what exactly has happened if you are curious.

SPdocgone-searchlibrary
There are two documents in this library. You can click to open them from there or click “Show more results”

No luck? Move on!

2. Search in the SharePoint site

You can easily do this by clicking “Expand search to all items in this site” on the bottom of the Search results page from step 1.

SPdocgone-searchlibrary2
You do not get any more results in this case, nor the exact location of your documents, but this view allows you to expand search and that will give you more info.

SPdocgone-searchlibrary3
So there is another result if you search in the site. If you get too many results, you may want to use the Files tab and/or the Filters to narrow down. And…this view will show you the path of the document!

Found it? Note down the path and navigate to it to confirm this is the correct document. The document has been moved to another library. Confirm with step 7 if you feel the need.

No luck? Move on!

After this, you can do what is most easy for you.

3. Search from the SharePoint landing page

Found it? Well you are lucky! Unless your document has a very unique name, it will be hard to find between all the other documents in your organization. (Of course, using the Files tab and the Filters should help a little). So, it has been moved to another site. Note down the path and confirm it is the correct document. Confirm with step 7.

SPdocgone-spsearch
Results from SharePoint search. In this case you get results from all of SharePoint, so it will be necessary to narrow down the results by using the Files tab and the Filters. You see there is also a result from OneDrive.

Results from OneDrive are also shown in SharePoint search, so if you have accidentally moved the document to OneDrive, you will find it there as well. Unless you want to know WHEN you did this, there’s no need to confirm with step 7 as you are the only one who could have done this. 🙂

No luck? It has probably been deleted, renamed or had its permissions changed (with or without moving). Take any of the next steps to find out.

4. Search in Office365

Frankly, chances are slim that you will find it here but you can try! If it is not in OneDrive and not in SharePoint (including Teams) it may be in Outlook or Yammer but would you not remember if you have done that? But, just to be on the safe side, give it a try.

Found it? Congratulations! Now move it back to where it belongs!

No luck? Well, you really did not expect to find it after all your other trials, right? Time to look in the Recycle bin.

5. Check the Recycle bin

Found it? Restore it.

No luck? Move on!

6. Ask the site owner if they know, or to search in Library or Site

Found it? It has probably moved to a place to where you do not have access, or you have actively been removed from the access group. Discuss with the site owner to give you access again, if possible.

No luck? Move on.

7. Check the Document Library’s details pane

In some cases you may want to do this earlier, but especially in a busy SharePoint site you need to scroll a lot! If someone knows a good way to export the data into a nice Excel file or something, please let me know.

The details pane is context-sensitive and will display different details depending whether you are on the document library landing page or in a folder.

DisappearedDocs-infopane
Nice icons, clear descriptions and clickable links for documents that are still in this folder or library. Deleted documents are not clickable.

Found it? Confirm it is the correct document and note down the path and/or new name.

No luck? There is one last option…to be done when all else fails.

8. Ask your SharePoint administrator

Your SharePoint admin will likely have permissions to everything so if they can not find the document in Office365 search, it will not exist in its original shape anymore.
Additionally, they can also check the 2nd stage Recycle bin to see if it has been deleted.

Found it in Office365 Search? Confirm it is the document, note down the path and ask the site owner to give you permissions again.
Found it in the 2nd Stage Recycle bin? Ask your SharePoint admin to restore it.
Confirm what has happened with step 7 and give your SharePoint admin a compliment on Yammer or Teams for everyone to see! 🙂

No luck? Sorry….

Any other thoughts?

Did I miss something? Do you think there is a better order? Any other tricks to share? Please let me know!

Image courtesy of ronnieb on Morguefile.com

An alternative way to dive into Delve

Delve-headerDelve is an interesting part of Office365.

In my previous organization I often received complaints about what was shown in Delve. Exactly like the results you see in Search, what you see is what you have access to, and for many people this was hard to understand. Every time the Search or Delve results got questioned (“Search is broken!”) I could prove that this person saw this search result or this document card on Delve because they had access to it, whether that was desired or not. I loved this demonstration of the importance of proper permissions management 🙂
In Search, any mismanagement of permissions only becomes apparent when you are actively searching, but in Delve “content finds YOU” so it is ruthlessly in-your-face.

Joanne Klein has written a great post on Delve and how to disable it – entirely or partially.

In my current organization we have not promoted it very much yet, so when we recently changed a number of licenses from E1 to F1 and then to F3, we did not consider the fact that the Delve app would no longer be visible for the F3-users, a big risk.
However, we received a question from someone who uses the people-part for looking up managers and direct reports, so I found three alternative options.

1. Via “My Office Profile”

After all, the Delve “Me” page is your profile page, so that should be available for every user. Just click on your picture top right and select “My Office profile”.

Delve-myprofile
“My Office profile” leads to your Delve “Me” page

2. Via the URL

Delve is available for users if they are logged in to Office365 and use the following URL: https://<datacenterlocation&gt;.delve.office.com.
For our organization and my own tenant this is https://eur.delve.office.com and for a tenant in the UK this would be https://gbr.delve.office.com
I do not have access to any other tenants so I can not give you the “code” for other data centers but please take a look at your Delve to see what it is. It may come in useful one day.

Delve-Mepage
My Delve page. The URL will resolve itself to yours as soon as you enter the URL.

3. Via Outlook (people data only)

Like Delve, Outlook also uses Active Directory so all people data is also in Outlook.
Users with an F1-license use the Outlook On The Web experience and they can see people’s managers and direct reports in the people card.
When you hover over a person’s name (searched or from an email) you will first see the small card, which expands into a larger card. When you click “Show more” you will see a ton of info, including the “Organisation” which will allow you to see a person’s manager and direct reports. In my case the tab is greyed-out because I am the only one in my tenant and have not set up AD.

Delve-Mepage2
Lots of info available if you click “Show more” on the extended hover card. The “Organization” tab will show you direct reports and managers.

What’s next for Delve?

My colleague was happy with the alternatives provided.

But when I found this all out I wondered if Delve may be going away as a separate workload as the functionality is now embedded in other, more frequently used, tools. Would anyone know?
Just as I was writing this post, I found this post from John Liu (in response to a Tweet about Delve from Joanne Klein) who is also wondering about the future of Delve – he has a good idea for its development.

So let’s wait and see if Delve keeps being a separate app, but with added functionality, or will be absorbed into relevant other workloads in Office365…

Photo by Matthew T Rader from Pexels 

SharePoint Holmes and the Online Only

sh-onlineonlyThe case

“ I can not open the embedded document” the user told me.
“Ah”, I thought, “I have once solved a case for that”.
“Please ask the site owner to make sure the library opens in the client application” I told the user. “Because embedded documents do not open in the online version“.
I thought that was the end of it, but some time later the site owner contacted me, telling me that the document library always opened in client so he did not understand what I meant.
To be honest, I did not understand it either anymore, so I needed to put on my sleuthing hat.

The investigation

  1. I checked the library and the settings. Yes, the library was set to open in the client.
  2. I selected the document and opened it with Word. No problem.
  3. I asked the user which version of Word he had. A recent client version.
  4. Then I checked his permissions to the site. Somehow or other I always end up checking permissions. The user had Read permissions, as expected.

    sh-onlineonly-sitesettings
    The user was in the Visitors group with Read permissions to the site (In Dutch it is “Lezen”)
  5. I looked at the items with different permissions and noticed that the document library had different permissions from the site. There I saw that the user had been added with View Only, which according to the description means: View pages, items, and documents. Any document that has a server-side file handler can be viewed in the browser but not downloaded. File types that do not have a server-side file handler (cannot be opened in the browser), such as video files, .pdf files, and .png files, can still be downloaded. 

    sh-onlineonly-librarypermissions
    In the Document Library this group has “View Only” permissions.

6.  I gave my colleague the same permissions to the site and checked what happened. Indeed, she could only open documents in the online version with that role.

sh-onlineonly-opening
The user could only open documents in Word Online. No option to use Word Client.

The solution

The site owner had inherited the site and did not know why this permissions set had been given. To be honest, I have never used it so I wonder what people use it for.
I explained the situation and told him that the determining factor was the need to see the embedded document.

  1. If the user had no need for the embedded document, he could leave the permissions as they were.
  2. If the user needed to see the embedded document, he still had two choices:
    – Make the document available in the document library, instead of embedding it, and leave the permissions as they were
    – Give the user Read permissions

Tips:

  • Be aware that people with View Only can also not Copy or Move.

    sh-onlineonly-nocopyormove
    There are no Copy To or Move To options when you have View Only
  • @Site Owners: stick to the standard roles as much as possible
  • @Site Owners: always ask your predecessor for the why if you see any strange things when the old site owner hands over the site to you. (Yes, I know this will not happen, but a support girl can dream 🙂 )
  • @Support people: You will have noticed by now that you should always check
    – Client/Online opening behaviour
    – Classic/Modern settings (they are not an issue here, but have been unexpected causes of issues in other cases)
    – AND permissions


About SharePoint Holmes:
Part of my role is solving user issues. Sometimes they are so common that I have a standard response, but sometimes I need to do some sleuthing to understand and solve it.
As many of my readers are in a similar position, I thought I’d introduce SharePoint Holmes, SharePoint investigator, who will go through a few cases while working out loud.

Image courtesy of OpenClipart-Vectors on Pixabay.

SharePoint Holmes and the Gone Gallery

800px-Northwestern_High_School_Student_Art_GalleryWhile all consultants are writing about Modern Sites, Hub Sites and Communication sites, I am quite certain that a lot of us practitioners are still working with the Classic sites. Looking at “my own” environment this will not change overnight.
(One of the joys of being a practitioner is that you can watch an intranet grow old…and not always gracefully 🙂 )

So here’s another case of Classic SharePoint Investigation.

The case

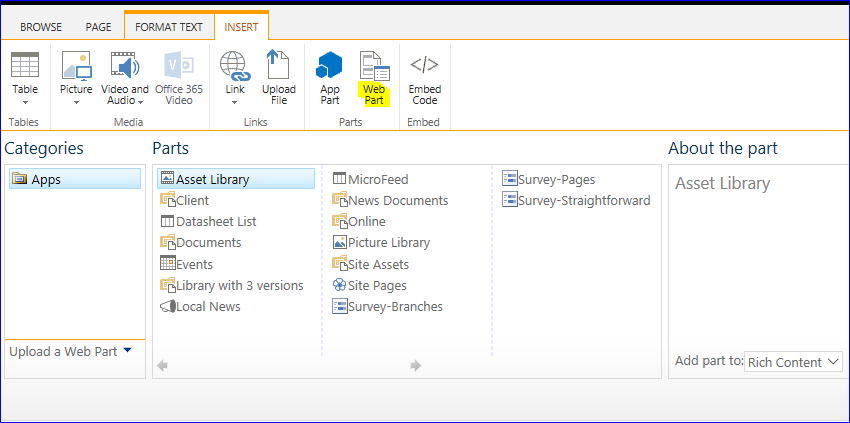
“I can only add app parts to the page,” the user said. “I am the owner of the site and I would like to add Summary Links, but I can only see the web parts for the document libraries and lists in my site.”

And indeed, when I looked at her page in Edit mode, it looked like this:

SH-GG-WebParts
Although the user had selected the Web Part Gallery, she only saw the App Parts.


SH-GG-AppParts
This is what she saw when she selected the App Parts – exactly the same!


The investigation

  1. The site permissions were OK – she indeed had the correct permissions to manage the site.
  2. I checked the permissions for the Pages library and Pages – all were inheriting from the parent so that was not the issue.
  3. I logged in as admin (that account has Administrator permissions on all site collections in the tenant) and I saw all web parts. So it looked like another permissions issue.

    SH-GG-CorrectWP
    Same page, different user: I could see the web parts
  4. I asked the owner to which business she belonged. That was Business B. This gave me the clue that I needed.
  5. I checked the site collection – this was a site collection for Business A.
  6. So I checked her permissions on the site collection level – none, as only employees of Business A had access.
  7. To confirm, I checked her permissions for the Web Part Gallery.  Bingo!

The solution

As we are divesting Business B, we have removed all permissions of the Business B people from all site collections of Business A, and vice versa. This means that the Galleries in the Business A site collections are not accessible to employees of Business B. It is an exceptional case that a Business B owner is an owner of a Business A site, but there was a reason for that.

Fortunately the Web Part Gallery had unique permissions, so I added her to the Gallery and then she could do what she needed to do. I did not have to worry about maintenance as her account will be removed in a few months automatically as the system separation takes place. (I may write about that later.)
Frankly, I do not know which permissions a Web Part Gallery should have by default, as I have seen both “inherited” and “unique” while checking some site collections.

This case is probably not very common, but if you ever get incidents where people can not see the web parts when editing a page, please check permissions of the Web Part Gallery at the site collection level. I remember once accidentally removing all permissions at site collection level, and after I had added the groups back, several Galleries were inaccessible as due to unique permissions the groups had not been added back automatically…

About SharePoint Holmes:
Part of my role is solving user issues. Sometimes they are so common that I have a standard response, but sometimes I need to do some sleuthing to understand and solve it.
As many of my readers are in a similar position, I thought I’d introduce SharePoint Holmes, SharePoint investigator, who will go through a few cases while working out loud.

Photo courtesy of Maryland Pride on Wikimedia.