Why can Frontline Workers not add a Teams meeting to their meetings?

The other day I received a comment on my post “Some quirks of the F3 license“. The commenter’s Frontline Worker F3 colleagues do not have the option to “Add online meeting to all meetings”. Apparently the option is not visible in the Outlook web app.

Enter a new Microsoft365 detective: Teams Thorne*. Will he become as famous as SharePoint Holmes, you think?

Let’s find out! Here’s what Teams Thorne did to see if he could find out if this was user-, admin, or license-related.

1. Is it a user thing?

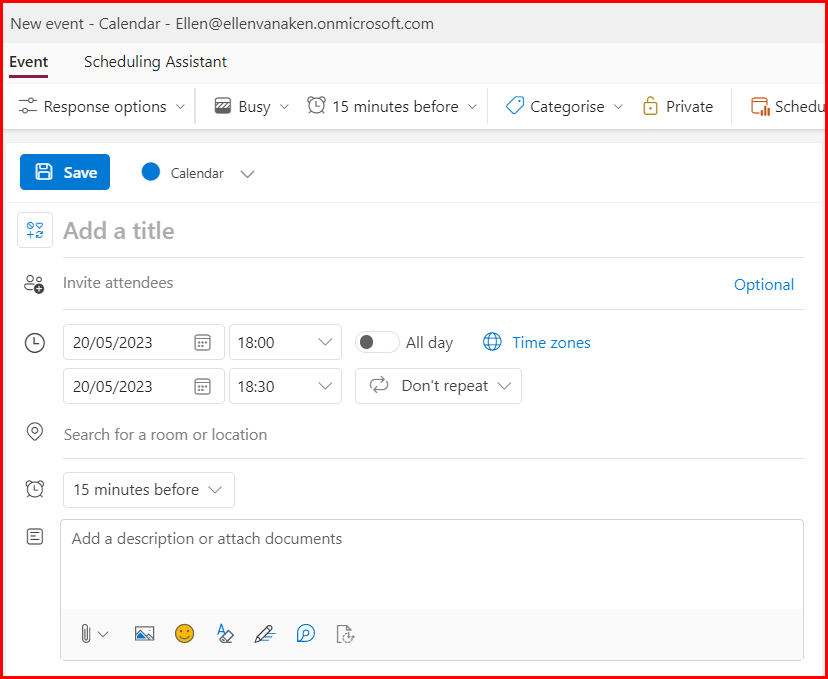
Teams Thorne has a Small Business License, which, like the F3 license, is 100% online. He opened Outlook (on the web, obviously), and first checked what the normal behaviour of his Calendar was with regards to organizing meetings. He created a new event.
The “Teams meeting” was visible, but not checked. But as soon as he added a person to the invitees, the box got checked.

The Teams meeting checkbox is automatically checked when you add another person to your meeting.

He then looked at how things were after disabling it in his settings.
In Outlook or Calendar, click the Gear Wheel > View all Outlook settings > Calendar > Events and Invitations. The option to add an online meeting was indeed checked, so he unchecked it and waited for some time.

When this box is unchecked, you do not automatically add a Teams Meeting. You do it manually.

He went back to his Calendar, created a new event and noticed that the box did not get checked when he invited someone. But he could enable the Teams Meeting manually by clicking on the button.
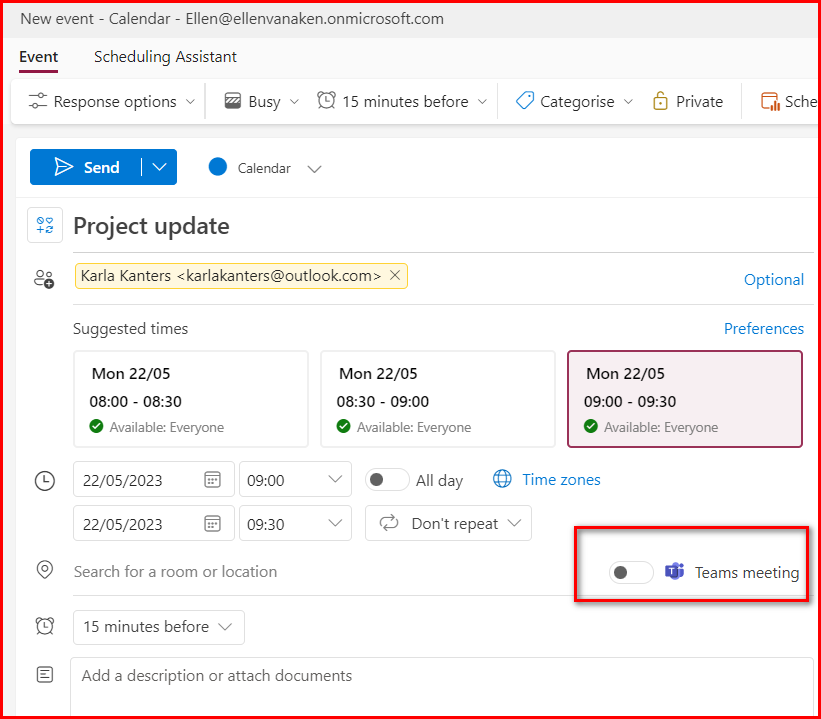
With the setting disabled, you can still add a Teams meeting, but you have to check the box yourself.

This did not match the issue described. Teams Thorne had the option to add an online meeting to all meetings, so there must be something that disables that button entirely. In any case, this did not appear to be an incorrect user setting.

2. Is it an admin thing?

The next thing to investigate was the Teams Admin Center. Perhaps there is a setting that prevents that button from loading?

Teams Thorne opened the Admin center and headed to the Teams Admin Center > Meetings. The Meeting Settings did not give any indication, but the Meeting Policies looked promising. He opened the Global (Org-wide Default) policy and looked at the options available. Hmmm, there was permission given for the Outlook Add-In, could that be the thing that made the connection between Teams and Outlook?

The Meetings > Meeting Policies menu items contains a setting for an Outlook add-in. Is that a clue?

He disabled the Outlook add-in, logged off and waited some time for the new policies to “settle”. It now looked like this:

The Outlook add-in has been disabled.

The next day, he opened his Calendar and started creating a Meeting. Hey, that Teams box was not there!

There is no “Teams Meeting” option to the right.

He went back to his Outlook settings and noticed that he could not check that box, apparently because there was no provider mentioned.

As there is no meeting provider mentioned, it is impossible to activate this setting.

So, it looks as if you need the Outlook add-in in Teams to have that option.

But…in the Global Policy, which is the Default for everyone who is not in another policy, it is enabled. I hope that organizations will not edit their Global Policy unless they have a very good reason. I can not imagine why you would want to disable adding a Teams meeting to all meetings – you do not HAVE to meet with Teams, but it is pretty convenient to have it just in case something goes wrong with your face-to-face meeting.

3. Is it a policy thing?

Teams Thorne had never tinkered with the Meeting Policies, in fact this was the first time he ever looked at them. So he concluded that the option to use the Outlook add-in is standard. But perhaps there was a special policy for Frontline Workers?

He went through the Teams Admin Center to see if there was anything else that could shed some light on whether this might be different for other groups. Hey, there was a Policy Packages menu item – could that help? He saw a number of policies, including a Frontline Worker Policy:

In the Meetings > Policy Packages there are a number of policies for different roles.

Upon clicking the Frontline Worker Policy Package, it showed a number of options:

The different policies for Frontline Workers

When he opened the Meeting Policies he noticed the following settings. The items were the same as the Global (default) policy, but a lot of things are OFF, including the Outlook add-in.

The Outlook add-in has been turned off for Frontline workers.

But when he compared it to, for instance, a Higher Education Student, or a Healthcare Clinical Worker, you see that the Outlook add-in is available for them.

In other roles, such as the Higher Education Student shown here, the Outlook add-in is enabled.

Unfortunately, it is not possible to make changes to the Policy Packages, unless you have a Teams Premium or Advanced Communications license.

Conclusion

So, there is a number of things that we have found out.

  1. Your colleagues need to have the Outlook add-in in order to be able to add a Teams meeting to a meeting they schedule.
  2. The Outlook add-in is enabled in the Global (Organization-wide default) policy and is therefore available for all employees, unless they have another policy applied to them.
  3. The standard Frontline Workers Meeting Policies have the Outlook add-in disabled, so employees with this policy package are unable to add a Teams meeting to their scheduled meetings.

So, in the organization of the person who made the comment, it is most likely that the Frontline Workers have the Microsoft Teams Frontline Workers Meeting Policy Package applied to them, or another policy without the Outlook add-in.
In theory the Global (Org-wide default) Meeting policies could also have been changed, but in that case all employees would be unable to add a Teams meeting. That was not what I understood from the comment.

But why you would want to exclude Frontline Workers from adding a Teams meeting, is totally beyond me. But that is another topic.

So, what do you think of Teams Thorne’s first case?

* About Teams Thorne:
Part of my role was solving user issues. Sometimes they are so common that I had a standard response, but sometimes I needed to do some sleuthing to understand and solve it.
As many of my readers are in a similar position, I thought I’d introduce Teams Thorne, Teams investigator, who will go through a few cases while working out loud. Teams Thorne is based on Tom Thorne, a British detective, who was created by Mark Billingham and has featured in books and a TV series.

Please note: Due to an exciting, but rather time-consuming private project (moving house) I am currently posting a bit less frequently than usual.

Conferences and OneNote – updated

In-person conferences are back! And while we all managed to attend a lot of conferences online with very few issues, it is great to be able to meet face-to-face again, get swag and rejoice or complain about the catering! 😁

A few months before the pandemic I wrote a post about using OneNote to capture screenshots of presentations. When you do not want to wait until the slides become officially available, you can quickly grab screens and add them to your notes, provided you have two devices.
You can also use this at online meetings of course – just take a picture from your computer screen.

I have updated the post, as the way to take photos with OneNote has changed somewhat. You will see the button with link below, as the “reblogging” that I did the other day (for the new Microsoft365 Homepage) does not provide a good user experience. 😒

Additionally, I am adding an excerpt that you can use during the conference. You can download it as a PDF (and print and fold it), or use the image op top of this post.

As always, feel free to share with your colleagues. I will appreciate if you mention me when sharing it on LinkedIn or Twitter.

Enjoy many in-person conferences!

How to transcribe a meeting with Teams or Word

I am quite happy with the speech-to-text options that the Microsoft365 suite provides, such as Dictation and Transcription. And while the Dutch language is apparently not fully out of beta yet, I am impressed with the accuracy of Dictation. It has saved me a lot of time, for instance when writing instructions or reports.

Transcription is a recent addition to the stack, and it comes in handy when you want to report an interview, create subtitles for a video or when you need a word-for-word report of a meeting, one with legal implications, for instance.

There are 3 ways to create a transcript:

  • Transcribe an existing recording in Word online
  • Transcribe directly in Word online
  • Transcribe directly during a Teams meeting

1. Transcribe an existing (meeting) recording in Word online

This is useful if you have an older meeting recording, if your organization does not have automatic transcription enabled, or if it is a non-Teams recording. You can transcribe up to 300 minutes per calendar month. This is calculated from the length of the video, regardless of the amount of spoken content.

  • You need to have a recording of your meeting, or other recording in .wav, .mp4, .mp3 or .m4a format
  • In your location of choice (OneDrive, SharePoint, Teams) open a new Word online document and give it a meaningful title
  • Click on the microphone on the Home tab, and select “Transcribe”
  • Make sure you select your desired language
  • Click “Upload audio”
  • Upload your recording and the transcription will begin
  • When the recording has been transcribed, click “Add to document” and you will be asked to add time and speaker name, if that makes sense
Clicking “Add to document” will create a popup with the options.

The document will then look like this. You can edit the text where necessary.

Your transcript from a recording.

Please note that the recording you upload will be copied to your OneDrive in a new folder, “Transcribed documents”, even if it is already in the “Recordings” folder! As recordings are generally large files, this can cause storage space issues. Remember, colleagues with an F3 license only have 2 GB of storage space.
Remove at least one copy of your video.

I have this video also in my OneDrive but a copy gets added to a newly created folder: “Transcribed Files”

This was only a small upload to transcribe so it only took 2 minutes of my monthly allowance!

Language and minutes left.

Tips:

  1. If you find 300 minutes is limiting, check if you can win time by cropping your video as much as possible (you can do that in Stream if you have no other software).
  2. Alternatively, you can use the free Word online that comes with your Outlook.com email address! (If the topic of your meeting and your company policies allows to store data there)
  3. If your recording is >200 MB and resides in your OneDrive, you may want to download it to your Downloads folder or Desktop before uploading. We have found that this reduces error messages on file size.

2. Transcribe directly in Word online

Check out the first of these two videos.
This will be useful for an interview, as shown in the video, but it can also be used for a meeting. Please make sure to warn the meeting participants that you are going to do this, as they will not get a system warning when you do!
Open a fresh Word online document and click Start > Dictate > Transcribe.
Click “Start recording” and your online meeting will be recorded and transcribed.
Next to the Word file with the text, you will get an audio file in the “Transcribed documents” folder in your OneDrive. There appears to be no limit in the amount of transcriptions you can execute this way.

3. Transcribe directly during a teams meeting

If you want to use this option, your Microsoft365 admin must have transcription enabled in the Teams admin portal, under Teams > Meetings > Meeting Policies.

Where to enable Meeting transcription

You can check whether it is available by clicking the … in your meeting control bar and then looking for “Start transcription”. This is available in the Teams desktop app only! If it greyed out, it has not been enabled.

Where you start to transcribe

When you click Start Transcription all participants will get a notification, just as when you start a recording.

All participants will get a warning that they are being transcribed.

During the meeting, you can watch the transcript by clicking … in the meeting control bar and selecting “Show transcript”. This will be shown in a panel on the right side of the meeting screen.

Open the transcript
The transcription pane opens on the right-hand side. With the … top right you can select the language.

After the meeting, you will find the transcript on the Chat tab.

All info is condensed on the Chat tab.

You can also see the transcript in the meeting itself in the Teams agenda, on the Recording and Transcriptions tab. The text is written on the tab, and you can download it as .docx or .vtt

The transcript is also visible on a separate tab in the meeting in the Teams agenda.

Tips:

4. You can download the transcript in .docx or .vtt format. The latter can be uploaded to the recording in Stream to provide subtitles.
5. Make it easy for yourself and your colleagues to identify you in captions and transcriptions. Toggle the button to automatically identify you. Anything you say will then be attributed to you.

If you have this setting enabled, your name will be added to everything you say. Otherwise you will be “Speaker x”.

My experiences

We have enabled option 3 as a test, but we have disabled this after a few weeks, as it was very confusing for our users:

  • Transcription in Dutch works well, but you will need to change the default language for every meeting you want to transcribe. Not everyone knows or remembers this, so chances are that you will end up with a Dutch meeting transcribed into English – and trust me, that is very very weird! 🙂
  • We found that F3-licensed users do NOT see the “Show transcript” in their menu, but it may be that our experiment was too short to fully roll out to my test account. According to Microsoft, they should be able to. They can use the Word options, though.
  • You can start a Transcription without recording but…
  • You can NOT start a recording without starting transciption. This can be confusing.
When starting a recording, all participants will get a message that they are not also recorded, but also transcribed. You may have some explanation to do!

We may try again when we can enable Dutch as the default language, either by following the language settings of transcription starter (see this Feedback item – please vote!) or by following the tenant language.

Conclusion

If you need a word-by-word report of your meeting, Transcription can be a great help.

The Teams options is the easiest way to create a transcipt, but currently it works best if your organization speaks English and you have instructed your colleages about the use of transcription.

If your organization does not have English as their preferred language, and/or you do not have it enabled in Teams, you can still record the meeting and use Word online, or transcribe it directly in Word (but this is a bit sneaky). It is a bit more work, as you will have to adjust the speakers names, and you will get a additional audio file in your OneDrive, but it still works well.

Have you been using it and do you have any experiences and tips to share?

Many roads lead to your Teams meeting

The official English saying appears to be “there is more than one way to skin a cat” but as I love cats and do not support their being skinned, I have translated the good old Dutch saying that “many roads lead to Rome”.

What I want to show is that you can start your Teams meeting in many places, to make it easy for you to join your meeting.

Let’s see if I know them all, and let me know if I have forgotten one! Or more!

1. Teams calendar

This is my regular way to access. The meeting is displayed on your calendar and when you click on it, a popup will show you the details and the link to join.

Popup with meeting details

When the meeting is about to start, or in progress, the link will be shown on the calendar, saving you a click, so you can access immediately.

As the Weekly meeting is currently in progress, the Join link is already displayed.

2. Invitation in Outlook

In this case, I have created the meeting myself so I can only show the “sent” mail, but every invitation email contains two links to the meeting. When you accept the invitation, the email is removed from your Inbox, so this is not the most frequently used option, I guess.
Unless you make it a habit NOT to respond to invitations of course…but I hope you are not that kind of person 🙂

There’s a button top left, and the link on the bottom of the email.

3. Outlook calendar

As your Teams calendar syncs with your Outlook calendar , your meeting will be displayed here too. If you “live” in Outlook, you will probably use this most often. Again, when you click the meeting, you will get a popup with the meeting details, including the link.

Regular calendar view – the Join link will show in a popup
Again, as this meeting is in progress at the moment of screenshot, the link to Join is already available.

4. MyDay in Outlook/Microsoft365 landing page

If you click on MyDay, you will see your schedule for today and more, including your meeting. If you click on this message, you will get a link to the meeting. If your meeting is already running, you will see the Join link straight on the MyDay popup.

5. Outlook notification/reminder

Do you see the notification at the top right of Outlook 15 mins before start? Click on it and you will see the meeting link in the MyDay screen.

You will see this reminder in your Outlook email and calendar

6. The Microsoft365 landing page

When your meeting is about to start, you will see it in the Recommended documents on top of the page. It disappears shortly after meeting start time. Does anyone ever use the MyDay button on the top of this page? It’s there too!

OK, so the reminder is not a document, but it has frequently saved me a late entrance! 🙂

7. My Feed webpart on SharePoint

If you have a MyFeed webpart on SharePoint, the meeting will show up there, with a link to Join. The MyFeed shows your stuff, see my earlier post.

It is a “you” thing, so this reminder will also pop up in your My Feed webpart

8. Desktop notification

When someone else starts the meeting, you will see a purple banner on the bottom right of your screen, when enabled. You can Join from here, too, or send a message that you will be a tad later. Again, this has been a life-saver when I forgot I had a meeting! 🙂

As I am the only person in my tenant, I can not share the usual screenshot (that your colleague has started the meeting) but this one from an external guest is almost the same.

The banner will show you when someone else has started the meeting.

9. From OneNote (if you have sent the invitation to OneNote)

You can send an email or invitation from Outlook to OneNote, which gives you a very nice page with all info in a nice structured way, and the link to the meeting is included as well.

OK, it is in Dutch but you will get the gist.This page in OneNote is also an excellent starting page for your meeting notes.

Have I missed anything?

Please let me know in the comments! I know there’s probably a few extra places on mobile, but I do not use that very often now that I am mostly working from home.

Organizing a Teams Webinar with an F3-license

The Teams webinar functionality has rolled out. Many things have already been said about it (Mike Tholfsen’s video says it all really) and basically it is a regular Teams Meeting with a registration form and very limiting meeting options, so it was both a relief to me (“oh good, it works like a Teams meeting”) and a disappointment (“oh, it works like a Teams meeting, what is all the fuss about?”) when I investigated it.

However, F3-licensed users do not have the option to create a Webinar, just as they can not create a Live Event. Our E3-licenses users have three options when they click the New Meeting option: Schedule meeting, Webinar, Live event. F3 users only have New Meeting option.
They can of course use a regular Teams meeting for any webinar, as described in my earlier post, but seriously, they can use the webinar option as well! Here goes:

Webinar creation for E3-users. F3 users only have the New Meeting button.

1. Create the event

  • In your Teams calendar, click New Meeting. The invitation screen will open.
  • On the top right, you will see an option “Require registration”. Select “people in my organization”. “(If you want to make this available for external attendees, you may need to create a Form for registration – remember to make this available for everyone)
Click the arrow and select “For people in your org” to create a registration form. F3-users can not create a registration form for everyone.
  • Leave the registration form for now, as that can be done later when you can give it your full attention.
  • Add all relevant event details, and invite the presenter(s) only.
Make sure you only invite the presenters.
  • Send the invitation to the presenter(s) and the event will be added to the agenda of yourself (the organizer) and the presenter(s), looking like this:
a Webinar looks like this in your calendar

2. Edit the registration form (attendees from your organization only)

  • Open and edit the event from your Teams calendar and click “Customize registration form”.
  • Op the top left, click “Edit”
  • Adjust the registration form – make sure date and time are correct (it does not always copy correctly!!!) and you can add a picture, add speakers, and (optional) ask a few extra questions.
The registration form – you can add all details and even a picture! Check if date and time have copied over correctly!
  • Click “Save” top left, and “View in browser” to see what it looks like. Adjust when necessary. Copy the registration link to distribute to your audience.

3. Adjust the meeting options

  • Open the event from your Teams calendar and click Meeting Options or Change Options
Two places to change the meeting options
  • Adjust the meeting options until they look like the screenshot below and click “Save”.
  • If you do not want to be bothered with adding people from the lobby, make sure you set Lobby to “everyone”.
These are the standard Meeting options for a webinar.

4. Advertise your webinar

Make sure that your audience knows about the webinar. Share the information and add the link to the registration form in and outside your organization. You can use the intranet, a SharePoint site, Yammer, email, social media, an external website, a printed flyer with a QR code, whatever is relevant.

5. Check registrations

The registrations will be added in a nice list in the Details tab of your event.

You can keep track of registrations from your calendar

6. Before the webinar

  • Download the Teams desktop app from the Microsoft Store. F3-licenses users use the web and mobile apps by definition, but the Teams desktop app is free and gives you a ton of extra control options for your event. Download, log in and familiarize yourself with it.
  • Plan your break-out rooms (desktop-app only) and add any Polls that you would like to use during the webinar.

7. During the webinar

  • A little before the start time, open the Teams desktop app and click “Join meeting” from one of the usual places
  • Proceed as in any other Teams meeting
  • You can add Polls, use breakout rooms, and what not, just like any regular meeting
  • If you want to allow live questions at the end of the webinar, open the Meeting options (… in the Meeting control bar) and allow microphones and cameras to be opened up (Teams desktop app only)
Options available for the organizer in the Teams desktop app

8. Attendance report

The attendance report will be on the Chat tab, as usual.

Good to know:

  1. That little lectern icon appears on events which require registration, only in the Teams calendar. Check out the second and third screenshots from the top to see the difference!
  2. When you have selected registration “for people in your organization” only, their names and emailadresses will be added automatically when your colleagues open the registration form.
  3. There has to be a presenter in the Meeting options, otherwise you can not save the Meeting options. When the organizer is the presenter, make sure you select “Only Me” as the presenter.

Conclusion:

Every F3-licensed user can create a Teams webinar, with one limitation and one manual action compared to an E3-user:

  • The F3 license has no option to create a registration form for externals – you will need to use Microsoft Forms to collect registrations.
  • They will need to adjust the Meeting Options manually.
  • Using the Teams desktop app (free from the Microsoft Store) gives you many more options to control the event.

Good luck!

Send a Teams meeting invitation from a group mailbox

Teams is very much a personal tool. You see only your own calendar and if you organize a Teams meeting, the invitation is coming from you, and you can only attend as yourself.
But…sometimes you want to send the invitation from a mailbox that does not disclose your name.

There are (as far as I know) two ways to make that happen:

1. Schedule in Teams and forward meeting link

  • Schedule the meeting from your own Teams Calendar
  • Adjust meeting options if needed
  • Copy the meeting link
  • Create an invitation from the group mailbox
  • Paste the link into the invitation
  • Send to all participants
It is easy to find the meeting link: When you have created the meeting, rightclick “Click here to join the meeting” and copy.
  • 👍 Keeps your name out of the invitation
  • 👍 Teams meetings are accessible to all who have the link, so no need to worry about lack of access
  • 👍 You will be able to access the meeting as an organizer and be able to make adjustments during the meeting if needed, e.g. if you need a report of attendees or if it is important to make a “hard stop” to the meeting.
  • 👎 Some extra steps of copying and pasting the link

2. Schedule in Outlook from group mailbox

  • Schedule a meeting from Outlook
  • Add a Teams meeting
  • Send to all participants
  • IMPORTANT: Adjust meeting options NOW if needed
  • 👍 Keeps your name out of the invitation
  • 👍 Easy
  • 👎 The group mailbox is the organizer now, and that mailbox has no Teams account. This means that the meeting will have to be done without an organizer, so nobody will be able to adjust the meeting options during the meeting, end the meeting or download the attendee report.

What is best?

There are plenty of meetings where the organizer is not missed. We schedule our training webinars with the second option and that works perfectly well.

For larger or very important meetings you may want to read my post about the importance of the organizer first to see if you think there may be a need to do “organizer things” during the meeting. Perhaps you only need to adjust the meeting options beforehand.

Meeting options – they may need adjusting before the meeting.

I am often asked if you can delegate the organizer role and the answer is NO. In fact, Teams does not do delegation well, as Tony Redmond confirms in his recent useful post.

Have you come across this requirement and how are you dealing with this? Happy to learn new tricks!

Smooth operating

This week I attended an online symposium. As the organizer knew that most of the attending organizations do not like, or have even blocked Zoom, he used regular Teams meetings.
It is always a good event, with interesting speakers and cases, and this year’s edition was no exception. What struck me however was the smoothness of the experience. All presenters had organized their own session (so I entered in all kinds of meeting recipes, from one session where all 80 of us were presenters, to a session where I was a muted attendee) and I just hopped smoothly from one session to the other and apart from the occasional lobby, there was no barrier at all.
All session links were in the chat of the main meeting, and that chat was listed in my Team chats, so I could always easily check what the next session was or chat to the organizer.

Why did this work so well?

  • I have at least two Teams meetings a day at the moment, so I know the tool inside and out.
  • Using my Microsoft365 subscription meant I could do whatever I do at work – the experience was completely the same. In the Participants I could see two descriptors – “Outside your organization” (which means logged-in M365 users) and “Guest” (which means not logged in to M365).

What is a Guest?

A Guest in a Teams meeting is someone without a Microsoft365 account, or who has entered the meeting without logging in. They can attend via the web, mobile or use the app, but they always have limited options.

Meeting organized by my private account, invited myself and Test15 from my work, and two others without an account.

What are the limitations of the Guest role?

1. No notification of people waiting in the lobby

Guests do not get a notification that someone is waiting in the lobby, and they can not allow someone into the meeting, even if they are a presenter. External presenters with a M365 account can do that, even when they are attending the meeting on their phone.

2. Chat only available during the meeting

Guests have the Teams meeting screen, but not the Teams rails (if you are attending via the web app) or other Team windows (if you use the desktop app). Therefore they can only use the chat when they are in the meeting.
External participants with M365 see the meeting Chat in their Teams rails on the left and can keep on chatting.

3. No background effects in the app

Guests have the option in their menu to adjust background, but it shows just an empty frame.
External participants with M365 can adjust their backgrounds as usual.

Mystery Guest (Guest) is a presenter (as the Sharing block is not greyed out and she can ask control over the shared presentation) and she uses the app (as there is an option to change background effect) but the panel shows no pictures or other options.

4. No Focus or Large Gallery/Together Mode

You can see from above screenshot that there are also no options for Focus or the Large Gallery or Together Mode. And yes, the Modern Experience has been applied in the app.
External participants with M365 can use those options, as shown in this screenshot where Test15 is using the same app.

Test15 (with M365) uses the same desktop app as above and has all the modern options. An external presenter with M365 can even create a Poll!

5. No option to manage attendees

Guests can only pin people, but not spotlight or mute them, or change their roles.
External presenters with M365 can do that.

This is Mystery Guest’s screen, and she is a presenter but can only Pin Test15.

6. Limited participant’s info

Guests only see the names of the participants, and who is the organizer.
Presenters with a M365 account can see organizational contact information.

A Guest sees only this when they hover over any participant’s picture or initials
An external with M365 sees this when he hovers over the picture/initials of the organizer
And this is what you see when you hover over picture or initials of a colleague – even more info! (This is my work account – this was an external participant for this experiment)

Roles list updated!

Some time ago I wrote about the differences in roles, and I have updated the list of who can do what from that post. I added extra columns for the Presenter (Guest) and Attendee (Guest) as these have different options from the M365-attendee. Feel free to download and/or use for your own organization!

This is only the top of the list, but you already see some differences

Conclusions:

Do you have a Microsoft365 subscription and you are invited to a Teams meeting? Make sure you log in before joining the meeting!

An external participant who, like you, has a Microsoft365 subscription can do as much as a participant from your own organization, except recording and viewing a recording. This allows for a smooth meeting experience.
A Guest can only do the basics.

When you are organizing or presiding Teams meetings with externals regularly, you will have to take the following variables into account to have an idea about each participant’s meeting experience.

  • Role: Organizer, Presenter or Attendee
  • Means of attending: Desktop app, web or phone
  • M365 account: Yes or Guest?

Be a Smooth Operator 😁

Are you a regular presenter in Teams meetings outside your organization? (E.g. a therapist or a trainer) You may want to consider taking a subscription to Microsoft365 as it will allow you to do SO much more. I have a Business Basic subscription which is only $5.00 per month (ex tax) and you get a lot of other goodies, too!

Title inspired by “Smooth Operator” by Sade.

The importance of being Organizer

The person who organizes a Teams meeting has become more and more important over the last few months. Many recent improvements are available for the organizer only.

Yes, so what?

Indeed, many meetings can be done without the organizer being present. Our team’s daily call, for instance.

But it can be an issue for situations where you need special things and the organizer does not plan to attend the meeting, e.g. a secretary who plans meetings for the manager or other people in the team, or our Convention Bureau who organizes webinars as a service for our education institute.
In case you want to see who has attended a meeting, for instance, the organizer needs to be there to download the report. Also, the much awaited break-out room functionality can only be used by the organizer!

Unfortunately, the organizer role is not transferable, which also means that when the organizer of a recurring meeting changes roles, the meeting has to be cancelled and set up anew, especially if the audience of the meeting changes. While this has long since been the case for all meetings, with everyone meeting remotely with Teams it has become more visible. There’s a User Voice item to have the ability to transfer this role to someone else.

Awareness is key!

There’s not much we can do about it right now, except making everyone aware, that you need to think who will setup the meeting, especially the larger and more important events.

Microsoft has published a list of roles and responsibilities, but that is currently not complete. So I have created my own roles mapping for you to use. I will keep this updated as “who can do what” is important! (Please feel free to download for re-use)

Preview of what to expect when you open my document

Of course, options are not only depending on role, but also on the app used. Microsoft has an extensive overview for that.

But wait, there’s more:

During the creation of the list I found another variable:

  • Is the participant from your organization or not?
  • If not, do they have a Microsoft 365 account or not?

OK, so that’s my homework for next time! 😉

Update November 22, 2020: I have posted my findings about this, and updated the roles mapping!

Title inspired by “The importance of being Earnest” by Oscar Wilde.
I have once played the role of Lady Bracknell!
😁

Make your Teams meeting screen work for you

You may think that a Teams meeting is what it is, but there are so many ways you can adjust what you see!

Seeing other participants in the meeting

In general, you will see those people who have their camera on and who have made a sound most recently. If you have your camera off, your picture/initials will generally be moved to the bottom of the screen, depending on the number of people present. The same goes for your microphone.
So, if you want to make a mark in that meeting, make sure you have your camera on and make noise! 🙂

But…this is also depending on the app and other options you are using.

  1. Web app:
    You can see only 1 person
  2. Mobile app:
    You can see max. 8 people in a 4 x 2 grid. This has recently been improved from 4. I have not heard much about it and only found out by accident the other day!
  3. Gallery:
    By default you will see max. 9 people in a 3 x 3 grid. More attendees will be moved to the bottom of the screen, attendees with video off and microphone muted first. Desktop app only.
  4. Large Gallery:
    You can see max 49 people in a 7 x 7 grid when you have the latest version of the app, and select “Large gallery” from the … in the Teams meeting control bar. Teams will auto-adjust the grid for fewer attendees. Nice post on the topic. Desktop app, and I found it in the Android mobile app as well!
  5. Together Mode:
    You can see max. 49 people in an auditorium-style setting when you have the latest version of the app, and select “Together Mode” from the … in the Teams meeting control bar. Desktop app, and I found that it is available in the Android mobile app as well! Thank you, Sam Gray, for the comment!
  6. No video.
    You can also turn off other people’s videos altogether and see people’s picture only. In the Teams meeting control bar, click the … and select “Turn off incoming video”.
    This is useful if all those moving videos distract you.
  7. Pin someone.
    You can pin someone’s video to keep seeing them, even if they do not speak. This can be useful for interviews or a group therapy session, if someone is very quiet. This is done in the Participants panel.
  8. Spotlight yourself or someone else.
    Contrary to the other items, you do not do this for yourself alone, but for everyone in the meeting. This will show the spotlighted person full-screen for all participants. This is useful for speeches.
    Do this only when they do not share a screen (otherwise the screen will be shown at the bottom, too small to read) and when the camera quality allows it. Desktop app only. This video tells you more.
Here’s where you apply Pins and Spotlights. For the Meeting control bar options, please scroll down to the bottom of this post.

Presenting yourself in the meeting

There’s also choices you can make for the way you are visible on screen, apart from Spotlighting in #8.

9. Turn video on or off.
During most calls, I have my camera on. During webinars, after the introductions I turn my video off as it does not add much value while I share presentation and screens. It also saves bandwidth for myself and others.

10. Blurring your background.
With everyone working from home, you sometimes run into interesting home situations. One of my colleagues works from her storage room, which means she sits in front of storage shelves. Others have children coming into view, or pets. I really appreciate seeing those real-life backgrounds, but in some cases you’d best blur. Desktop app only.

11. Changing your background.
This is also desktop-app only. One of my colleagues entertains us with an endless array of pictures from far-away places, and another sometimes uses a picture of himself sitting at his desk in the office, while he covers his web cam (which makes you disappear from your background). 🤣
My home office is rather neutral, so I generally keep things as they are.

Looking at presentations

When someone presents and/or shares their screen, you also have a few options to show their presentation on your screen.

This is the normal view, when someone else shares a presentation with me.

The regular view when someone shares a presentation with me

12. Focus
With Focus, you enlarge the shared screen so it hides the other attendees’ videos and pictures and is therefore less distracting. Click on the … in the Teams meeting control bar and select Focus. Desktop app only.

This is Focus. You see that the presenter’s video at the bottom right is hidden by the PowerPoint.

13. Full screen
This will hide the title bar from the meeting AND the task bar from the PC, but will leave the videos of attendees visible. Click on the … in the Teams meeting control bar and select Full Screen. This is also available on the web app, but it completely fills your screen. Below is what it looks like from the desktop app.

The meeting title bar at the top has been removed when using Full Screen, and the task bar from my PC is also hidden. As I have captured the active window only, you have to trust me on that.

14. Focus AND Full Screen.
Focus and Full Screen can be applied together. The presentation will then take as much screen as possible, hiding the title bar, the videos and the task bar.

Combining Focus and Full screen will give you a large and distraction-free presentation.

15. Control + Mouse wheel
This option allows you to zoom in or out of the presentation. It generally changes the ratio of shared screen vs. line of videos.

16. Show presenter and presentation side by side.
To be honest, I have as yet been unable to work this out, but you may want to check out Matt Wade’s video.

Conclusion

There’s many things you can do to determine what you see during your Teams meeting. This will allow you to select the best way for your purpose and preferences. During Ignite, more options were presented, so I guess I will need to update this post soon! 😁

The desktop app gives you many more options, so use it whenever you can.

To compare, I share two screenshots from the … in the Teams control bar, a presenter on Chrome, and an organiser/presenter using the desktop app.

Presenter on Chrome:

This is what a presenter can do using the web app

And these are the options for the desktop app:

The desktop app has many more options

Did I miss anything? If yes, please let me know!

Teams meeting recipes

Since the start of this year, many extra controls have arrived in Teams meetings. We all remember the stories from early lockdown of students muting the teacher, or removing other students from the meeting, just because every Teams meeting was a free-for-all by default, which is of course excellent for regular business collaboration (its original purpose), but less than perfect for other situations.

By now there are a lot of extra ingredients to create a Teams meeting that is exactly suited for purpose:

Lobby, presenter/attendee roles and muting options.

As we have a lot of different meeting types, and I am often asked for advice on how to set up a particular type of meeting, please allow me to share a few “recipes” for different types of meetings, from “no boundaries” to “tightly controlled”.

1. The recurring team/update meeting

These (default) settings are perfect for a recurring meeting for a well-established team. Within my own team we have these settings for our 3-times-a-week-meeting. We mostly talk, but occasionally share screens so it is nice if we all can do that when needed. We only use special features to test them if they are new (we used Spotlight a few times this week), or for the occasional prank. Everyone knows how to mute that colleague whose dog starts barking, and everyone does that when needed.

Who can bypass the lobby? People in my organization

Who can present? Everyone

Allow attendees to unmute: Yes

2. The formal meeting

This is usually a one-off, carefully planned meeting with known and sometimes unknown business partners. As it generally does not have too many people present and should be collaborative, everyone will need to be able to speak, but not necessarily present or do anything else that a presenter can do.
If it is a recurring meeting with known externals, you may want to remove the lobby barrier, but I do not think any external contact will feel offended if they have to wait until someone admits them.
If plans need to be discussed, screen sharing will be more important than Spotlighting the speaker. (It’s one or the other; if you Spotlight someone their presentation will be just another tile in your gallery of people present.)

Who can bypass the lobby? People in my organization (occasionally: Everyone)

Who can present? Specific people

Allow attendees to unmute: Yes

3. The group therapy session

As mentioned earlier, we allow Teams to be used for group therapy sessions as long as in-person sessions are not feasible and our preferred tool can not accommodate larger groups. These sessions are led by one or more of our therapists, and attended by clients, who are externals.
The therapists need to be able to take measures when the group is too noisy or needs to focus their attention, so the occasional Mute All (with the option that a client can unmute) will be helpful, as will the Spotlight option to focus attention to a therapist. This will also reduce visual clutter and movement, as some clients are sensitive to that.

Who can bypass the lobby? People in my organization or Only Me, provided the therapist is the organizer (but that is not always the case).

Who can present? People in my organization

Allow attendees to unmute: Yes

4. The large team event

The autumn season always has a lot of large meetings, both as a get-together for teams after the summer holiday period, and as a starting point for plans for the year ahead. We have recently seen a lot of virtual get-togethers for these purposes.
As these sessions often contain many people, and generally need to discuss too many topics in too little time, control is needed. As are breakout rooms!
Spotlights can be useful to highlight a speaker, as well as Mute all.

Who can bypass the lobby? Only Me or People in my organization.

Who can present? Specific people.

Allow attendees to unmute: Yes.

5. The seminar, lecture, training, speech

Our education season has also started again, and with it the need to do this online. Now that Hard Mute is available, smaller events may be done in a Teams meeting rather than in a Live Event. For questions, you can use chat or allow unmuting after each lecture. Spotlight may be useful for a speech.
The Live Event has some advantages: the moderated Q&A, the option to see the presenter next to their slides, the fact everyone can focus on the presenter and they are not distracted by the videos or pictures of other attendees, etc. but for each event you could balance the easy setup of the Teams meeting versus the more complicated formality of the Live Event.

Who can bypass the lobby? Everyone (for education events) or People in my organization (for an internal speech).

Who can present? Specific people.

Allow attendees to unmute: No.

Conclusions

The new options are valuable additions to the existing toolkit. I especially like the option of Hard Mute, as it may allow some events to be done in a Teams meeting rather than in a Live Event.

I am looking forward to making everyone aware of these new features, and helping organizers to mix the various options to make their own event the best possible experience.

Oh yes, and we are all SO looking forward to the break-out rooms!!!