In-person conferences are back! And while we all managed to attend a lot of conferences online with very few issues, it is great to be able to meet face-to-face again, get swag and rejoice or complain about the catering! 😁
A few months before the pandemic I wrote a post about using OneNote to capture screenshots of presentations. When you do not want to wait until the slides become officially available, you can quickly grab screens and add them to your notes, provided you have two devices. You can also use this at online meetings of course – just take a picture from your computer screen.
Additionally, I am adding an excerpt that you can use during the conference. You can download it as a PDF (and print and fold it), or use the image op top of this post.
Did I ever mention that I am a big fan of speech-to-text functionality? Not only does it save time, but it is also magical to see your spoken word turn into pretty accurate text. (Yes, even in Dutch)
The latest addition, as far as I know, is the Voice option in the Office Mobile app. It is super easy to use and allows you to make notes while on the go. But I have also used it while sitting at home on the sofa, capturing the most interesting statements from election programmes for our recent council elections. It has saved me a lot of writing. 🙂
How to start?
Download the Office Mobile app to your phone
Log in with your account (one-time, unless you want to switch accounts)
Click +, then Voice
Select language by clicking the world logo (one-time, unless you want to switch language)
How to record?
Click the Microphone button – this will turn red
Speak
Click the Microphone button to pause, and click again to resume
When done, click Done button
Now what happens?
Depending on your license, different things will happen. As far as I could find out, from literature and experiments, my Business Basic subscription has limited options, but my Family account is supported. How strange! In the screenshot below, the subscriptions marked with * have limited options.
The different licenses. Licenses with an * have limited functionality, e.g. they do not do speecht-to-text in this app.I do not see an F3 license mentioned, that’s weird.
Supported license:
You will see the written text appear while you speak. Magic! Even in Dutch it is very accurate.
When you open the file on your phone and click the Share icon, you can share it to Word which creates a Word file with a link to the voice file. You can save that in OneDrive.
A voice file (.wav) and a transcript (.transcript) will appear in OneDrive, in a new folder called Voice Captures.
After using the Voice option, a new folder is created in my OneDrive with 2 files.
I have tried to share my phone screen in a Teams meeting and recording that, but that did not work out. I suppose it is a microphone issue. So, I made a (silent) video using screenshots.
You can see what happens.
Non-supported license:
You will create a voice file (.wav) which is stored on your phone. You can share it and save it on OneDrive, or download it and transcribe the text to Word, as described in my earlier post, option 1. So, rather disappointing.
You can see the difference in outcome in below screenshot:
On top: voice capture with Business Basic, bottom: voice capture with Family account; it displays the text.
Another limitation: device
Voice appears to be available on phones only and not on tablets. In any case, I could not select any microphone settings on my iPad, not even when I had my headset attached.
I really like this option for taking quick notes, but I was rather disappointed to find out that my Business Basic license only has limited options. But you, reader, will probably have a solid Enterprise license so I guess that won’t be an issue. So, why not give it a try!
Do you or your organization have any experiences with the app? Have I missed something, or do you have more experiences with the licenses? Please share!
I am also investigating the other Mobile app options, so watch this space 😁!
Right now Teams is being used by many non-business people, and I have had a lot of questions about “how it works” for non-business or external users, as in: “what do they get and what do they have to do in order to participate?”
We have also looked at getting into the meeting – which browsers work and which don’t, and what about the Teams app?
This time we will look at the meeting experience.
We started with a variety of email programmes, which all give different views and results. But all emails contain the link to the meeting, which is just a link, albeit a long and non-intuitive one. So in the end, everyone uses the same link in a browser or in the app. Let’s see what that brings.
I have the following people in my meeting:
Myself, as the organiser and presenter, joining from my own tenant, initially via web (Edge), later through the app on my laptop
Gerald Adams, an attendee joining from web (Chrome)
Kim, an attendee joining from the Windows 10 app, not signed in
Ellen iPhone, an attendee joining from iPhone
My work’s account, joining as attendee from the Windows 10 app, signed in.
Prepare for an awesome (or awful if you do not like long posts) amount of screenshots!
1. Organiser/Presenter – web
So, this is what I see when I join the meeting on the web – the latest version of Edge.
You see that I do not have an option to blur or change background – I must be on the web!
Gerald is already waiting for me in the lobby:
It is very clear that people are waiting in the lobby.
And this is what I see when I start sharing my screen
What the presenter sees when they start to share screens.
When my presentation is shared I take a look at the options (click on … in the bar)
You see that in the browser I do not have the option to blur or change background – please compare that with the app version below.
When I look at the people in the meeting I see that most of my “external attendees” have entered as a Guest, except Ellen van Aken (outside of your organisation) who has joined from another Office365-account. I can also invite other people, and mute all of them.
This is what the organizer/presenter sees when opening the People pane.
The presenter can also manage people individually, this is independent of web or app. I can make either people from other organizations (business users, in this case) or Guests a presenter or an attendee again, or I can mute or remove a person from the meeting.
I can also pin a person, which means I will always see that person when they have their camera on and nobody is sharing a screen, regardless of who’s talking.
2. Organizer/Presenter – app
What do I see when I join via the desktop app and signed in? I have some more options: meeting notes, background effects, the option for Live Captions and End meeting. (I can also check my audio settings before I join)
I have a few more options when I join in the app.
Not shown here, because I am sharing a presentation and Kim, Gerald and myself were on the same PC: with the desktop app (and the mobile app) you can see 4 people if you have the camera on, with the web only 1 person. That is where the pinning comes in handy. I can not wait until we will see 9 people!
3. Attendee – web
Gerald is the one attending via Chrome. This is what he sees: a greyed-out Sharing screen, and fewer options in his meeting menu (or whatever that popup behind the … is called)
This is what an attendee sees when joining through Chrome (which shows the same as Edge, by the way)
An attendee can only see who is there, but not their role. Nor can they do something.
4. Attendee – app
Kim is using the app without sign-in, as she does not have an Office365 account. What does that look like? She can not share her screen and has one extra option compared to the web attendee. (However, she will see 4 people when there is no screen sharing and people have their webcam on)
Kim’s menu shows background effects options, but otherwise it looks just like the other attendee on the web. She can also not share her screen.
The People popup shows the same as for the attendee on the web.
5. Attendee – iPhone
The meeting experience on the iPhone is different again. Please note the attendee is not signed in to the app. Top right you see chat and people options. There’s no “share” button, not even greyed out.
iPhone experience.
When you click the 3 dots in the meeting control bar, you have even fewer options than a regular attendee: just “put me on hold”, “keypad” and “turn off incoming video”.
Translation of these 3 items is above. In any case, very few options with the iPhone, not signed in.
6. Attendee – Business User
It was a bit of a juggle to get this meeting together with all these people (all of them ME) and all these devices and options. But a second user, with Office365 account and a fully-fledged laptop, was easily available (again: ME at work) so for comparison’s sake: here goes.
Business attendee can not share screen, but has more options than a non-business user: the Live Captions option is available. And everything is in Dutch 🙂
Conclusions
The meeting experience is very similar for all attendees, regardless of how they got there.
There is hardly any difference between a Guest (someone without Office365 account, not logged in) and Someone outside your organization (an external business user with Office365 account, logged in). The only difference is that the organizer/presenter can see who’s what.
The role is the largest differentiator – if you are a presenter, you can simply do much more than when you are an attendee. See the differences here.
There are some differences between web and desktop app. The main advantages of the desktop app are
4 people visible instead of 1 (when you have cameras turned on).
This has been a BIG issue in my organization, especially for our therapists doing online group therapy sessions. Most of our therapists have an F3-license, which means they can only do web and only see 1 person. We have suggested they also log in with their phone to see 4 more people. We have now installed the desktop app for them as well but we are still looking for another tool that shows more people. I really can not wait until Microsoft finally rolls out the 3 x 3 view!
The option to blur or change backgrounds.
The option to do a Test call.
Live Captions. As these are currently only available in English, this is not relevant for my organization right now, but it may be a big plus for others.
The iPhone experience is sufficient, but sparse.
My suggestion would be to tell your non-business users to use the web version. I would only suggest to download the app when
it is important to see 4 people
a non-business user is the presenter (so they can adjust their background)
when they join on iPhone.
Joining on the web will probably be easiest for them, especially if they are not very savvy. Perhaps you can just send them the link in an email, instead of the official Outlook invitation, and tell them to open the link in Chrome or Edge (new versions).
Right now Teams is being used by many non-business people, and I have had a lot of questions about “how it works” for non-business or external users, as in: “what do they get and what do they have to do in order to participate?”
In my former post we discussed the email invitation to the Teams meeting for non-business users, and how it can differ depending on device and email client.
This time, we will look at getting to the meeting.
It’s the browser, baby!
In this part of the process the main difference is not in the email programme, but in the browser that people use. I have added a ton of screenshots so you know what participants can expect.
I use an up-to-date Windows 10 laptop with up-to-date browsers. This may already be different from what your “consumer” users have. I have no Mac, but I have used an iPad and an iPhone.
In the invitation you will see the link to join the meeting.
The link. Please note you can copy the link and share it with others.
1. What happens when you click on the link?
a. Firefox and Internet Explorer
If you are using Firefox or Internet Explorer as your browser, you will get the message that those browsers do not support Teams and a nudge to move to Edge OR to download the app.
You are pushed to use Microsoft Edge or download the appEnter a caption
b. Edge or Chrome
If you are using Edge (the new one) or Chrome, you will get this nudge to either download the app or to join on the web:
You will have to make a decision: download the app or join on the web.
I have occasionally seen this image, which is the new experience, or so I think:
I think this is the new experience – it is more obvious you have 3 options
c. Safari on iPad
If you use this, you will get a similar screen as for Internet Explorer or Firefox, except that you will only have “Get the Teams app” as suggestion.
Safari does not support this – downloading the app is the only suggestion you get.
d. Safari on iPhone
If you are on an iPhone you will get a warning that Safari does not support it, and a nudge to download the app.
It’s in Dutch but I guess you will understand that you are nudged to download the Teams app
2. What happens when you join on the web?
a. Edge or Chrome
When you have decided to open Edge or Chrome (if you are using Chrome as your default browser) you will get to this screen. You are requested to enter your name and click “Join Now”. Look at the bottom, where you are again enticed to sign in (if you have a Microsoft account) or to download the app.
Strangely enough the name of the meeting is not shown. Enter name, select camera and phone settings and click “Join Now”.
After clicking “Join Now” you get into the lobby. As you may know, recently Microsoft changed the default settings for all meetings to “People outside your organization will have to wait in the lobby”. While I agree with this setting, especially now that so many new (and often non-business) people are using Teams, it led to a lot of questions in my organization because we had just been telling everyone that by default everyone could get into your meeting immediately. 😤
If you have a paid subscription to Microsoft365 it is worth signing in, because you will get the full web experience. The link to the meeting is accessible for everyone, so you can just sign in even if your Microsoft365 account has a different email address than the one that you have been invited with.
3. What happens when you download the app?
a. Laptop (Windows 10)
Downloading and opening the app can take a few minutes, so you may want to warn your newbies to start early or do a test run well before the meeting.
Once you have the app installed, and you click the meeting link from your email, you can use the “launch it now” button or your browser will ask you to open the link in the app. Internet Explorer just opens the app.
Chrome and app
Firefox and app
Edge and app
Once the app has opened, you will be requested to add your name and click “Join Now”, like when you join on the web. Please note that the app has two extra features:
You can enter the meeting with a blurred or custom background (the toggle between camera and microphone)
You can check your microphone by clicking on “PC Mic and Speakers” and then selecting “Test Call”. (Functionality that I know and ❤ from Skype)
Some extra functionality when you join a meeting with the Teams app.
You will enter the lobby as usual.
Again, you will see the extra options that the app has to offer. While you are waiting, why not select a nice background! 😄
If I download the app on my iPhone, give permission to use the microphone, and click that horrible long link from my email, it will ask me if I want to open the link with Teams and then I get this message (Time to meet):
You can enter as a guest or again, sign in.
After entering your name and clicking Participate you will get the lobby message, which looks similar to the ones above.
iPhone lobby message (in Dutch)
c. iPad
On my iPad the “Open in Teams?” message did not happen so I could not make the switch from my email to the app. I was also forced to sign in with an account, which is not the purpose of this exercise. Anyone out here who had more luck?
Copying the link to the meeting and pasting it into the Edge app on my iPad worked. It switched over to the app and I could enter as a guest, with the same image as above for iPhone (but wider).
What have I found so far?
Your non-business participants do not need to have a Microsoft account to participate.
You do not need to download the app on your PC, as you can participate on the web if you use Microsoft Edge or Google Chrome as your browser.
Internet Explorer, Safari and Firefox can not be used for a Teams meeting.
If you do not have a Microsoft account (or if you do not sign in with it), you will have to enter a name when you log on, and you will participate as a Guest.
The Teams mobile app is a must if you want to take part from an iPhone.
Both the mobile and desktop apps may take a few minutes to download and install, so always ask your participants to download and test-drive well in advance, or start at least 10 minutes before the meeting.
The desktop app will give you more options such as the custom backgrounds and the option to do a test call.
If you have an external presenter or discussion leader, strongly suggest to use a laptop and download the desktop app as the extra options will be very useful especially for them.
The roles in Teams meetings, especially for the Organizer, are changing constantly. To see who can do what, please check out my post “The importance of being Organizer” and look at/download the “who can do what” sheet.
Our health care organization has gone a step further in using Teams.
Our dedicated (non-Microsoft) software for helping our clients online was just (=before COVID-19) being rolled out with various amounts of success. Some people loved it, and saw the benefits for both client and therapist (no need to travel for both parties, client being in their own environment, connection with the client registration systems), others said they needed the face-to-face meetings to be able to provide real help.
Now that we have had to move all therapy online, we found a functionality gap in the software: the option to use this for group sessions, either multiple therapists seeing one client, or sessions with one therapist and several clients.
After discussing various options we agreed to make Teams temporarily available for this purpose, so our therapists can finalise the existing group therapies, and perhaps even start new ones.
Microsoft Teams is a business tool and meant for collaboration in an organisational context. Mental health therapy is something completely different, so we had to create special instructions to make sure that our therapists are in control of the meeting. But also in other situations, such as meetings with many attendees (You can have up to 350 people in a Teams meeting!) knowing these control options can be useful:
1. Create the invitation from Outlook
Create the invitation from Outlook Online, NOT from Teams.
Add the relevant title, attendees, date and time, and message info.
Make sure you make this a Teams meeting.
Before sending, click the “Response Options” top right and select “Hide attendee list”. Optionally, you can also UNselect “Allow forwarding” to avoid uninvited people getting into your group session.
As soon as you have made a choice, the popup will go away, so it is a good idea to check if you have made the right selections.
Click Send.
Make sure to hide the attendee list, so clients do not see eachother’s email addresses. Also, do not forget to toggle the Teams meeting button if you have not yet made all meetings a Teams meeting!
Alternatively you can add the attendees to the BCC field, but as this field is not visible by default, it means people will have to change their Outlook settings. Using “Hide attendee list” is easier. Those who use the Outlook desktop (in our case: hardly any therapist has this) can use the BCC field or add the users as a Resource. This is a bit of a weird workaround in my opinion. Just use Outlook Online, it is great!
Now, if the invitation is sent, the attendees will see only their own name in the invitation, which is a privacy requirement in this situation. If you have also disabled the “Forward invitation” option, this will be displayed on the invitation, depending on the recipient’s email programme.
2. Manage meeting options
By default, everyone can go into the meeting freely, and everyone can present. (Update 15-04-2020: the default is now that externals will have to wait in the lobby. Good idea.) While this is the easiest setting for regular business purposes, it is not always the best option. We have heard about Teams meetings in education, where pupils muted the teacher and/or changed his/her role into attendee or even threw each other out of the meeting altogether!
So, in our situation it may be best to prevent any issues and provide a little more control to the therapist(s). The following can only be done by the person who has organised the meeting.
Open the meeting in your Teams calendar
Click the Meeting Options, to the right of the time zones OR on the bottom of the invitation underneath the link to the meeting. (see the Outlook screenshot below)
I prefer this button to adjust meeting options.
Change the lobby settings to: “People in my organization” (so you can discuss with your colleague before you allow everyone into the meeting)
Change the presenter settings to anything except Everyone. “People in my organization” is a good one. This will make all others an attendee, and they can only use audio, video and chat. (Roles description by Microsoft)
Update Feb. 7, 2021: Determine if you want people to be able to unmute. By default everyone can talk, but you could start the meeting in silence, and then allow people to speak up later in the meeting.
Update Feb 7, 2021: Decide if attendees are allowed to chat (default: yes), or not, or in-meeting only. (=when at least 2 people are in the meeting)
Click Save.
I would suggest the above meeting options for a group session with our (psychotherapy) clients.
This can also be done from the invitation in Outlook:
At the bottom you will find the meeting options. Please note you are reminded that you have hidden the list of attendees.
3. Change meeting options during the meeting (added Feb 7, 2021)
In case you would like to change presenters or other options during the meeting, the organizer can also adjust the meeting options from the control bar by clicking the … (1) and selecting “Meeting Options” (2):
The meeting options are a bit hidden behind the menu for this screenshot, but normally, when you click “Meeting Options from the control bar, the full menu becomes visible.
4. Manage attendees during the meeting
During the meeting the organizer and presenters also have some other controls via the Participants icon.
See who is present in the meeting and control their microphone, roles and other things.
You will now see the list of participants.
The options to manage attendees. These options are available for organizer and presenters.
You can now “Mute all” or manage individual participants by clicking on the … behind their name and
Mute someone individually, e.g. when they provide background noise.
Pin, to make them visible all the time, for you only.
Spotlight, to make the visible all the time, for everyone. This is useful if someone gives a speech.
Make an attendee or, when they are an attendee, you can make them a presenter.
Remove them from the meeting.
Steven Collier has made a nice video where he explains “Teams-bombing” and the prevention thereof with an example of a rebellious student.
5. Avoid “private viewing” of your presentation
If you are sharing via PowerPoint, by default people are allowed to click through at their own pace.
This is what an attendee sees on-screen, when you share a PowerPoint without switching off the private viewing.
It may be a good idea to switch that off, especially if your presentation has a carefully designed build-up. After selecting to share “PowerPoint” and your presentation, you will see some controls in the meeting control bar. Click on the eye icon to turn off private viewing. It looks like this:
Click on the eye to allow or stop (this screenshot) clicking through the presentation.
6. End the meeting
If you want to make sure that the conversation stops when the meeting ends, you can click the arrow next to the “Leave” button and click “End meeting”, which will stop all audio and video. The chat will still be accessible for people in the organization and can still be used, if you have enabled chat this way.
End the meeting. This option is only available for the organizer.
Conclusion
The default settings of Teams may be a little too “flexible” for non-business purposes. Fortunately there are many options to have more control.
Mind you, you as my regular audience will probably know all of this, but our therapists generally know only the basics of Office365 (oh, I need to say Microsoft365 now, right?) and they need detailed instructions, as they have to schedule these sessions themselves.
Next time, I will discuss the user interface for various email programmes. I have had a ton of questions about what clients see and I want to make sure I can answer that properly.
While List.ly is doing their best to get their Vimeo videos displayed properly, I thought I’d share a number of recent finds with you.
Where available, I have added related videos so you do not have 5, but 8 items to look at. In total, this should keep you busy for a little more than 30 minutes! 🙂
Stay indoors and stay safe!
1. Intro to Delve
Quite a good introduction to the capabilities of Delve. It is not very specific to the organization (a University in Melbourne, Australia) so it is very reusable. They also have good videos for Managing permissions in Delve and Managing your Office profile.
The logos are outdated so I guess the video is older than the upload date of February 2020. But as far as I can check in my one-person Delve, the functionality is still correct.
2. Your new intranet (in Portuguese)
Teaser for the upcoming new intranet at Samsonite Brazil. Uploaded March 2020.
Quite a long demo of this SharePoint intranet for a USA-based building services organization. This demo starts with the log-on process and it starts to get really interesting from 1.40 onwards, when the homepage is shown. I am fascinated by the colour scheme! It has a lot of useful content and other stuff. In their next video, they look a bit more at the homepage and the SharePoint functionalities and invite you to name the intranet (by completing a Form, of course!).
Uploaded March 2020.
4. Mobile app for real estate organization (builder) – in Dutch
Nice overview of the mobile (SharePoint-based) intranet-app for this Dutch real estate organization. They build houses but also own some DIY-shops in the Netherlands.
This mobile app has a ton of good stuff – News of course, colleague search, employee-stuff. It does not look like the native SharePoint app though.
Uploaded March 2020.
5. SmartSpace SharePoint intranet
Walkthrough of a SharePoint intranet for a software organization with offices in UK and USA. The look and feel is quite basic (just the company logo, not even their corporate colours) compared to the design of their proposal templates and website. They appear to do almost everything “corporate” in one site.
Having your Mission and Vision statement on the landing page must become boring after some time, but they may want to change that over time into News or something used frequently. I really like the fact they have a list of approved software (with details) as well as their project portfolio also in SharePoint lists.
Uploaded March 2020.
At the very last “Office365/SharePoint Connect” gathering in Haarlem* I was quite impressed when Rick van Rousselt gave us a demo of Kaizala, sharing his telephone on a large screen.
This may come in useful when we want to provide our colleagues with more information about the Office365 mobile apps. So, I thought I’d write out the steps and practice as I am usually quite clumsy when it comes to connecting devices. 😎
The secret ingredient is…a Teams meeting!
March 2020. As the next weeks will mean “remote working’ for a lot of people, due to the Corona virus, this may also come in useful if you want to demonstrate a cool new app to a colleague, or for helpdesks to support colleagues who have questions about the workings of a smartphone.
A few days before the demo
Make sure you have the Teams app installed on your presentation laptop and your telephone
Schedule a Teams meeting for the time of the demo
Remove any apps on your mobile that you do not want to show – or move them to a separate page – and check if your phone’s background image is suitable for the audience 😉
Create your demo (what do you want to show and which sequence)
Practice sharing your screen on your phone
The day before the demo
Charge your devices (and a powerbank, to be on the safe side)
Remove screen notifications and sounds to avoid disturbance (or embarrassment – you do not want to know what I have seen during all the years I have been working in multi-location organizations 🙄 ) during your demo
Sign in to both Teams apps with the account you want to use for the demonstration
At the time of the demo
Start well before time, if possible
Connect your laptop to the demonstration screen
Mute the sound on both devices to avoid an irritating reverb
Join the meeting on both devices, without microphone and camera
On your mobile, click the … in the meeting bar and select “Share”
Enter a caption
Select “Share screen” (exact words may vary on iOS and Android) and then “Start broadcast”
Dutch again! Click on “Start…” to start broadcast.
Wait until your mobile phone is shown on the screen
Go to the content you want to show (on your mobile) and dazzle your audience!
It is a bit dark but this is my phone (device left), displayed on my laptop (in the middle), while showing SharePoint News.
8. When your demo is over, open the Teams app and click “Stop broadcast”.
To end, click “Stop…”.
Although my (iOS) app tells me that everything is recorded, (it even shows a timer in the red bar on top) it does not mean that a video is created. I guess they mean everything will be shared.
Conclusion
As usual, this is not rocket science, but I thought it might be helpful for myself and for others to share the detailed steps.
Are you ever demonstrating smartphone (apps) to an audience and are you using Teams or something else?
* Office365 and SharePoint Connect, Haarlem/Amsterdam
I am really sad that Office365 and SharePoint Connect will no longer be around, as it was always VERY useful, in a convenient location, well-visited by many people in my network, and not too expensive. Thank you, Nigel and Irene Clapham, for organizing this great event for so many years!
It all started with this Tweet (nowdeleted – December 2023)
Uh… why did it take me so long to figure out I can use Emoji in folder names and they sync perfectly to OneDrive / Web / Mac. Have not figured out why they are black and white on Windows and this ice cube doesn’t render…. pic.twitter.com/ka2JEFHzeA
That looked interesting so I spent a most enjoyable day finding out how and where it works in Office365, and if I could find anything remarkable.
By the way, you get the emoji keyboard when you click the Windows-key plus . or ;
You can type and see suggested emoji (on top), or you can search (bottom left) or navigate between various categories. Now shown: recently used.
The Windows 10 emoji work almost universally, including Office365. You can use it in SharePoint document libraries, folders and documents; in Yammer groups, Teams channels, Outlook, To Do, well, everywhere I have tried!
It also works in Twitter and Hootsuite and I guess on many more platforms.
Benefits
In most cases they merely look nice, but I think their biggest benefit is that they can help people identify the most important item(s) in a long list, e.g. OneDrive, SharePoint or Outlook folders. They act as “visual tags”.
My favourite
My personal favourite usage is in List names of ToDo. I share a lot of lists with my colleague and I like being able to see to which list a task in My Day, Assigned to Me or Planned Tasks belongs. The colour scheme you can apply to a list does not provide sufficient contrast, and if you have more lists than the 5 colours available you still need to look at the list name.
Until now I always thought I had a lot of redundant tasks, because one task can show in different views, but now I can easily see where they belong.
Now that I have added icons to my lists, it is easier to see which task is for which list. BTW, you also see that the default list icon is being overwritten if I add the emoji to the left. Neat.
Things to know
Not every image has sufficient detail – stay on the safe side and choose images that are clear and unambiguous for your team.
Always use text in combination with your emoji…otherwise you will have to refer to “that folder with the red-and-white striped tshirt” which is a bit silly.
Do not overdo it – adding an emoji to every folder looks cluttered and defies its purpose of making things stand out.
Does adding “little coloured images” fit your organization? I am quite sure that I would have had a serious (and unpleasant) discussion in my former organization, had I suggested to use it there. I think it will be appreciated in my current one, though.
They display nicely in all web and mobile apps (screenshot below, left), but the desktop apps (screenshot below, right) show them only in black-and-white. No problem for me, as I find I am using the web apps more and more, but be aware if your colleagues are all desk(top) jockeys. 🙂
OneDrive online
OneDrive-desktop
I would suggest to not use this in high level names and URLs, such as SharePoint site names or Teams names. I do not know if you run into issues if you need to access these types of names or URLs with Powershell or in the admin mode. (Please let me know if you have experiences with this)
Although you can use this in document names, I would suggest to pin a document to the top of the library if you want to highlight it. That way the document will always be visible, regardless of sorting, folders, etc.
Speaking of sorting, the sort order can change when you add emoji. In the screenshot below I have made a list of folders in the Ninja Cat library in a SharePoint site. All folders were created in one go, i.e. I added the emoji when creating the folder. You see that a folder with an emoji first, gets shown on top, while an emoji behind the name sorts “normally”. (Look at the “Clothes” folder, which are two different instances) If I add the emoji to the left of an existing folder name, it suddenly moves to a different position!
Sort order: name ascending. Depending on the location of the emoji, the folders end up in different locations. Look at the Clothes folder.
Now let’s see what happens if I add an emoji to the Clothing folder, to the left of the name.
When I add the emoji to the left of the name, it moves up!
In the above example I could create two folders with the same name – so apparently “👕 Clothes” is NOT the same as “Clothes 👕”. They have different URL’s, where an addition comes either before or after the word “Clothes”. Yet it is impossible to create a third plain “Clothes” folder as “that already exists”. Why?
I tried to copy and paste the different URL’s of both folders in this post, but as soon as I did that, the red-and-white stripes of the emoji in 8. suddenly turned into plain blue! (BTW, this also happened when I switched to the HTML editor writing this post) What sorcery is that? So I have to use a screenshot:
Different URL’s for the Clothes folders. But why can I not create a new plain Clothes one?
Yammer groups have a number in their URL, not a name, so you should be able to use them safely in Yammer groups. But if you use Yammer on your phone or tablet, the group icons are already displayed so why add another one?
I hope Microsoft will address this and make the group icons also show in your list when you work on your PC or laptop. (which would make the emoji redundant)
Laptop, where adding an emoji makes sense
Mobile app, which displays the group images anyway, so an extra emoji does not add much
In Teams, the team image is displayed with the name, so adding an emoji in the Teams name only clutters things up. But using an emoji in a Channel name makes sense, both on laptop and on mobile.
Team channels – I admit adding too many images make it a bit cluttered.
Should you add images left or right to the name? To the left gives a more uniform appearance, and in To Do, it nicely overwrites the default icon. But I think it is generally better if they are to the right, as the text should be more important than the image and you are more in control of the sorting. Also, they stand out more when they are not all aligned. Any thoughts? (Since Wedge told us that decorative illustrations of a post should be to the right, unless they are an essential part of the post, I have added illustrations to the right of my post, so that’s why I think to the right is better)
Conclusion
Adding an emoji to a folder or Teams channel name can be a nice way to shows its content or purpose, or to make it stand out. However, use with caution as not everyone may like it or understand the image, things may get cluttered and it may even break some things as well.
There’s still a lot to find out, especially in admin and any other occasion where a URL is involved. If you have any experiences with usage in Office365, especially from the admin side of things, please let me know!
Have you noticed that Forms has a new icon? I have been unable to get a good large file but here’s a screenshot from my tenant.
Planner and To Do have new icons as well.
Comparison of Forms and Forms Pro
Megan V. Walker has recently created an excellent comparison of Forms vs. Forms Pro. Apart from more options in the typeface part, you have more options to integrate data from other Office365 applications.
However, the licensing cost for Forms Pro is quite high in my opinion, so I will try to guide people to the regular Forms as much as possible. A few colleagues had the Forms Pro Free Trial and they experienced issues when their trial expired. Once I removed the Pro Free license from their accounts, all worked well again, except that your Forms created in Pro are no longer accessible. Any results you captured, are still available. Be aware!
Check out Megan’s blog as she has tons more info on Forms and Forms Pro.
I do not think anyone will ever create a SharePoint survey any more 😦 , but if you are still interested, or want to know how if Forms is a good replacement for SurveyMonkey or GoogleForms, here’s my earlier comparison of survey tools:
Some months ago I shared an invitation to a farewell party in our Yammer group, as an example of Forms. It was to invite internal and external attendees and ask them for their attendance and dietary preferences. I had helped the organizer create it, and he got it immediately and included some lovely pictures.
This was the start of an informal “contest” in my organization on who can create the best-looking form. 🙂
One of my colleagues no longer sends Outlook invitations for large meetings, but creates a nice-looking Form, which means she gets fewer emails and has all responses in a tidy Excel sheet. I guess the receivers are pleasantly surprised by a nice-looking invite rather than a plain Outlook one.
Another colleague is carefully matching images and colours in her themes, and has even added a link to a hexcode website to her browser favourites!
I wonder if they are now thinking up new events just to be able to create a great-looking Form for it! 🙂
I freqently get calls where people mention “this person has created a beautiful survey and now I want one as well – how do I do that”.
And if all goes well we may replace a third-party application with a simple Form in the next few months. Fingers crossed!
This all delights me as I am working in a health care organization and most colleagues have different priorities than sitting at a desk at a computer.
(Something similar is happening with the SharePoint modern pages by the way, which is another pleasant surprise. More about that later)
So, invitations for larger meetings appear to be THE Forms application in my organization. What’s your number one scenario for Forms?
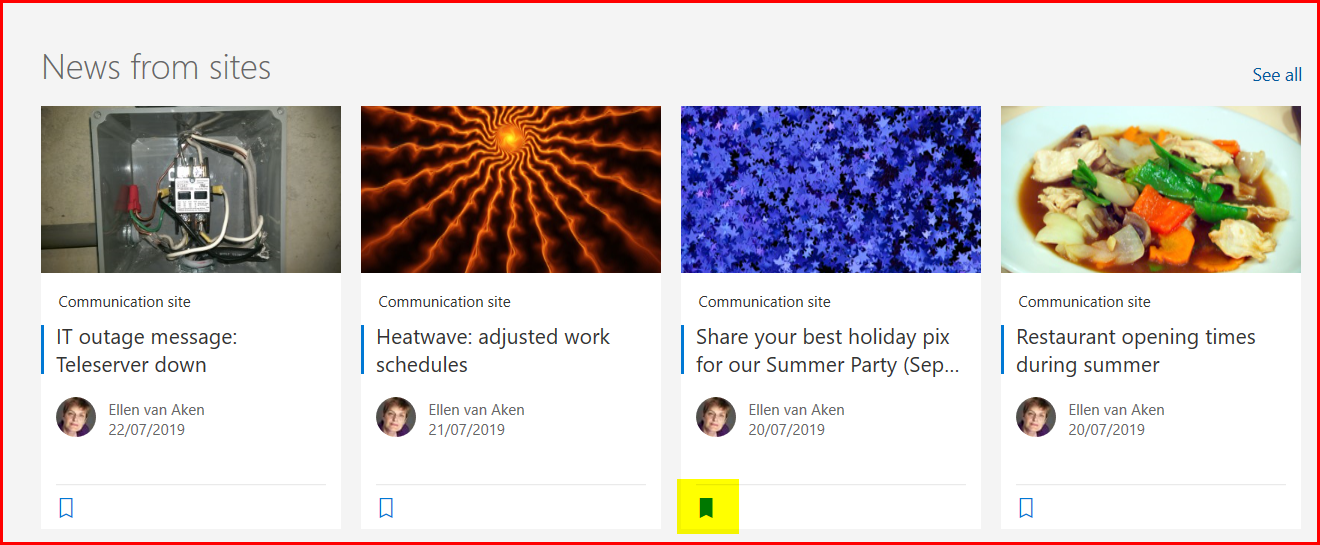
In earlier posts we have looked at SharePoint News and the News digest from the sender’s perspective. It is time to look at it from a reader’s point of view!
1. You can find SharePoint News in the following places:
The site where it has been published
The site overview (click “See all” on the web part after publishing 5 articles)
News digests (Newsletters), consisting of the above, gathered with previews in an email
The SharePoint app
“News from sites” on the SharePoint landing page
All “News from sites” if you click the “See all” on the SharePoint landing page
To avoid a very long post, I have compiled some screenshots in this deck. You may want to watch it full-screen:
2. You will only see News articles to which you have access.
The News digest is an exception – it can be sent to you and you may not have access to one or more of the articles.
3. The SharePoint web part on the landing page can not be configured or removed.
So if anyone is posting News articles and you have access, you will see them there, whether you want it or not.
Our project was a first and we did not want to show the News to everyone just yet. That is why we made the News site and the News digest available to a limited group of people only, even thought the content was not confidential. We simply did not want to confront people with something new which may be there only once. (In theory 🙂 )
We received some comments of people in the target audience because it “obscured their view of the Frequent Sites”.
4. You can like a page and/or comment on it.
You will find the options at the bottom of the page. The author will receive an email now and then with the likes and comments. If you @mention someone, they will receive an email immediately. This is great for urgent remarks to the author, and also to inform a colleague about this article.
Likes and comments are available. If you @mention someone, they will get an email.
5. You can save a news article for later.
This will come in useful when you do not have time to read it now, or in case you will want to keep it. There are 3 ways to do that:
At the bottom of the post you will see an option to “Save for later”.
You can save an article for later by clicking the label at the bottom of the page.
You can also click the label of any News article that you see on the “News from sites” overviews.
In the SharePoint app you can click the … at the right of each article and select “Save for later”
From the Newsfeed in the app you can also save for later. Sorry – in Dutch 🙂
There are 3 places to see your saved articles:
On the News cards in “News from sites”, saved articles will show with a “filled” label as opposed to have the outline only (Is this proper English? 🙂 )
The highlighted label show that this News article is “saved for later”. You can (un)save on this page by clicking the label.
On your SharePoint landing page, in the left-hand menu under “Saved”
You will see “Saved” News articles in the left-hand column on the SharePoint landing page.
In the SharePoint app News, under Filter (on top) you can select the “Saved Items”.
Click the Filter and select “Saved Items”. Sorry for the Dutch! 🙂
I would have expected this to be on Delve, together with bookmarks. But no.
6 a. The SharePoint app (iOS and Android) is excellent for reading News.
The Newsfeed (in order of First Published Date) looks great and your saved items are available in a separate place. (Click the filter on top to see only the “Saved Items”)
You can easily read the News in public transport or in the evening on the sofa!
News in the app. The third item is “saved for later”. You can see all saved items nby changing the filter on top.
This items is “saved for later”.
I often hear that people “do not have time to read the news during the day”.
I also heard a story from a bank that made the News available on smartphones (this was pre-SharePoint News and app) and they saw a massive spike in views around 8 pm, when people were ready to settle in for the evening. Apparently employees do not mind spending private time on work-related News, as long as they can consume it at a time that suits them.
6 b. The Android app is very sticky when it comes to post-publication changes.
Both iOS and Android are fast to show freshly published News articles. But while the iOS app is fast to respond to post-publication changes (e.g. items being renamed, edited, depublished or removed) the Android app is very slow and can take several hours to change. Some unpublished or deleted items never even go away, providing you with a 404 (not found) message when you click them.
Android phones and fast-moving news such as IT outages and their fixes are therefore not a good combination.
7. Make it a habit to click on the title to open a News article.
Clicking on the image in the News Digest will only show you the image. Everywhere else you can also click on the image. Weird.
8. You will get notifications of new News articles in the app.
This happens when someone you work with frequently posts a new article. This is determined by the Microsoft Graph (the machine that also provides you with suggestions of documents, sites and people) based on your interactions, so there is not much you can do about it 🙂
Someone I work with has posted one (1) News article.
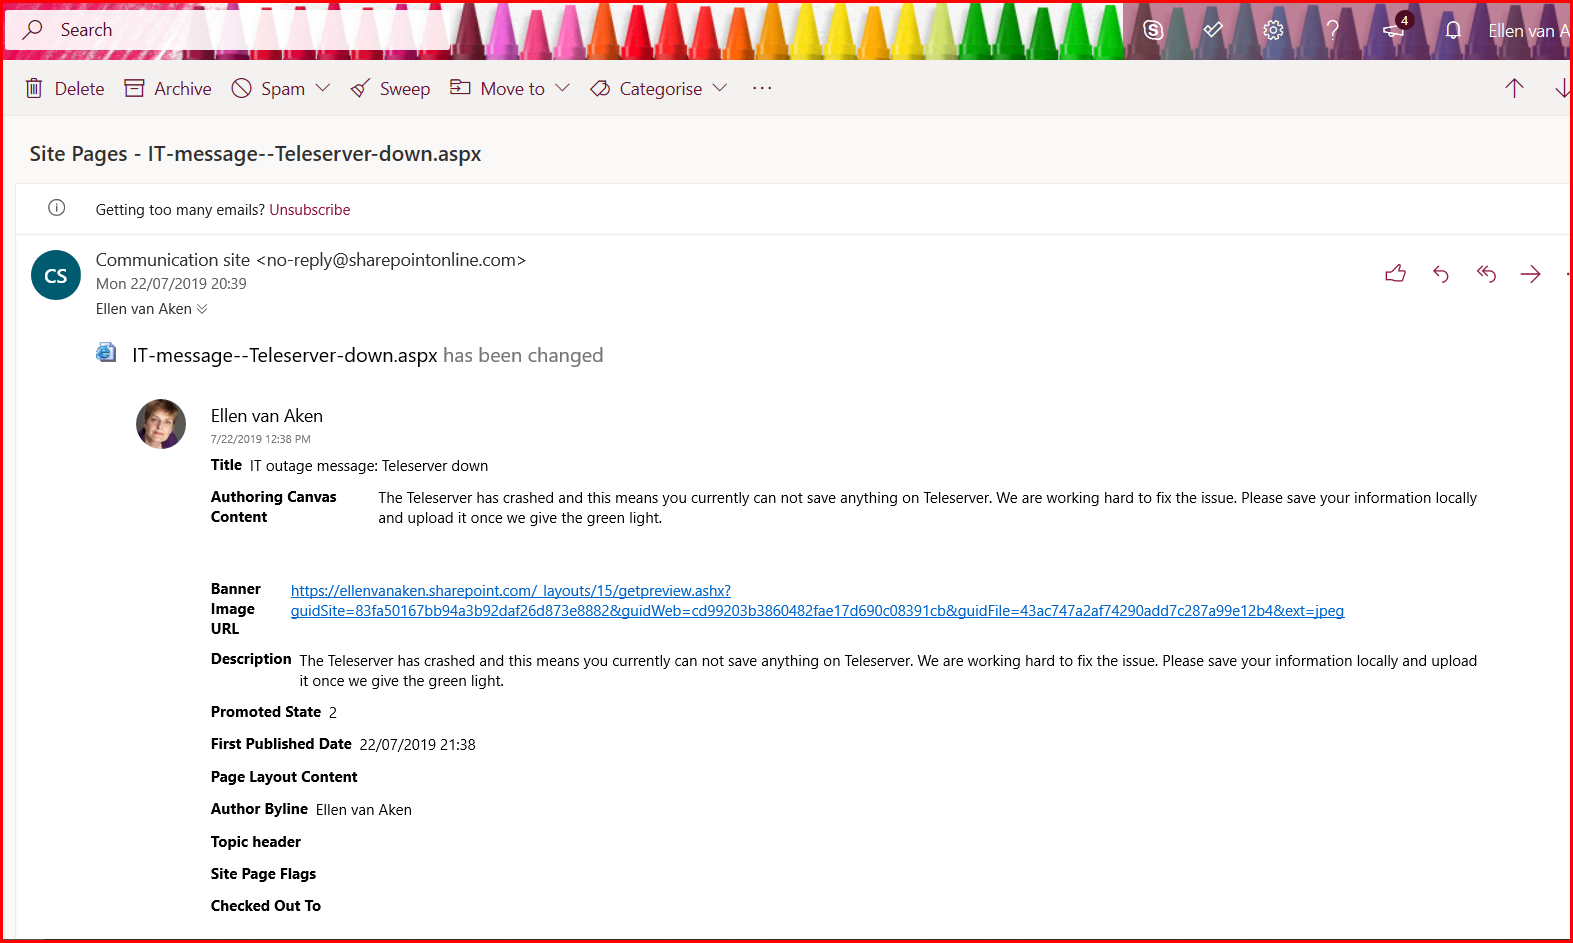
9. Alerts suck big time.
If you do not like to wait until you get a News digest or an app notification, you may think about setting an Alert. Please don’t – Alerts do not work.
Here’s what happens:
If you set an Alert based on “All changes” you will get two Alerts – one with the raw URL and one with the title, content and metadata. After that, you will get notified of all changes, of course.
First Alert you will get – yikes!
You get this one minute later.
If you set an Alert for “When new items are added” you get…nothing!


 Right now Teams is being used by many non-business people, and I have had a lot of questions about “how it works” for non-business or external users, as in: “what do they get and what do they have to do in order to participate?”


 Right now Teams is being used by


 While List.ly is doing their best to get their Vimeo videos displayed properly, I thought I’d share a number of recent finds with you.
 At the very last “Office365/SharePoint Connect” gathering in Haarlem* I was quite impressed when
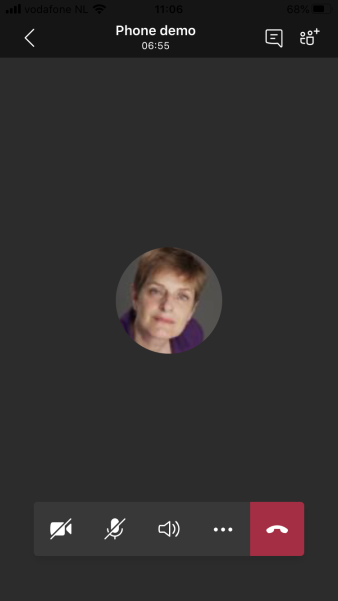


 Have you noticed that Forms has a new icon? I have been unable to get a good large file but here’s a screenshot from my tenant.
 In earlier posts we have looked at